Simple Load Testing for RESTful APIs with Locust

Load testing is a crucial part of ensuring that our APIs can handle real-world traffic without slowing down or failing. While tools like JMeter and Gatling are popular, Locust offers a Python-based, easy-to-use alternative for simulating user traffic. Whether you're preparing for a product launch or want to understand your system's breaking points, this guide will show you how to set up and run your first Locust test in under 10 minutes—no complex configurations required.
Setting Up Locust
Getting started with Locust is straightforward, especially if you're already familiar with Python. You'll need Python 3.6 or newer installed on your system before proceeding.
The simplest way to install Locust is via pip:
pip install locust
To verify your installation, run:
locust --version
You should see the current version number displayed in your terminal.
Project Structure
While Locust can be used with minimal setup, it's helpful to organize our testing files. Here's a recommended project structure:
-
📁 locustfiles/
- 📄 api_tests.py (Our main test file for this tutorial)
- 📄 advanced_tests.py (Additional test scenarios for future use)
-
📁 data/ (For test data files if needed)
- 📄 users.csv
- 📄 requirements.txt (Contains 'locust' and any other dependencies)
For our basic example, we'll focus on creating just the api_tests.py file. This file will contain the test scenarios we want to run against our API.
Each Locust test file needs to define at least one "user class" that inherits from Locust's HttpUser class. This class will contain tasks that simulate user behavior, which we'll cover in the next section.
Our First Locust Test
Now that we've set up Locust, let's create our first test file. We'll build a simple test that simulates users interacting with a RESTful API. I'll explain each part of the code as we go.
Understanding the Basic Structure
A Locust test file consists of one or more user classes that define the behavior of simulated users. Each user class contains tasks that represent actions users take against your application.
Let's start by creating our user class:
from locust import HttpUser, task, between

class APIUser(HttpUser):
    wait_time = between(1, 5)

    host = "https://jsonplaceholder.typicode.com"
Here, we're:
Adding Tasks
Now let's add tasks to our user class. Tasks are methods decorated with @task that define what actions our simulated users will perform:
@task(3)
def get_posts(self):
    with self.client.get("/posts", name="Get all posts") as response:
        if response.status_code != 200:
            print(f"Failed to get posts: {response.status_code}")
This task:
Let's add two more tasks to create a realistic user flow:
@task(1)
def create_post(self):
    payload = {
        "title": "Locust Test Post",
        "body": "This is a test post created during load testing",
        "userId": 1
    }

    with self.client.post("/posts", json=payload, name="Create post") as response:
        if response.status_code != 201:
            print(f"Failed to create post: {response.status_code}")

@task(2)
def get_single_post(self):
    post_id = 1
    with self.client.get(f"/posts/{post_id}", name="Get single post") as response:
        if response.status_code != 200:
            print(f"Failed to get post {post_id}: {response.status_code}")
These tasks:
This test file demonstrates several important Locust concepts:
Running the Test
Once we've created our Locust test file, we're ready to execute our load test. Let's walk through the process step by step.
Starting Locust
To run our test, we open a terminal, navigate to our project directory, and execute the following command:
locust -f locustfiles/api_tests.py
If your file is named differently or in another location, adjust the path accordingly. You should see an output similar to this one:
[2025-03-09 16:29:28,405] ~/INFO/locust.main: Starting Locust 2.33.1[2025-03-09 16:29:28,406] ~/INFO/locust.main: Starting web interface at http://localhost:8089, press enter to open your default browser.
Accessing the Web Interface
By default, Locust starts a web interface that allows us to control our tests and view results in real-time. Open your browser and navigate to:
http://localhost:8089
You'll be greeted with Locust's clean, user-friendly dashboard.
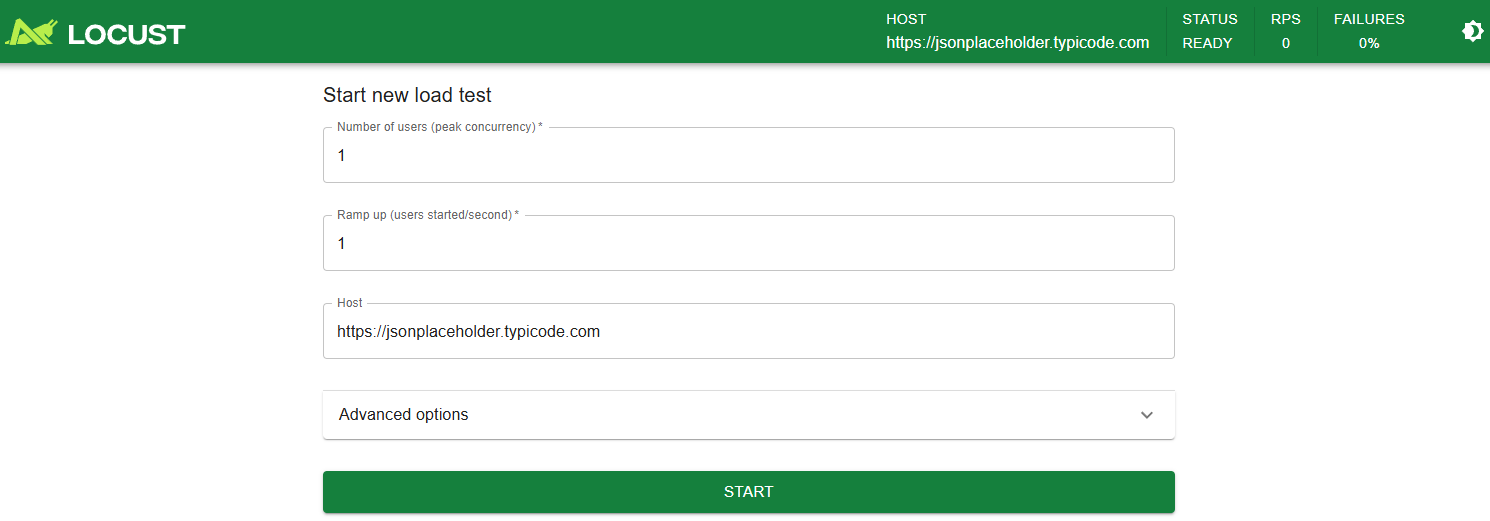
Locust Dashboard
Configuring Our Test
On the main page, we'll need to set three key parameters:
Starting the Test
Once we've entered these values, we click the "START" button to begin our test. We'll immediately see Locust's dashboard transition to show real-time statistics.

Locust Statistics Page
Understanding the Dashboard
The dashboard is divided into several key sections:
Controlling the Test
While the test is running, we have several options:
Example Test Run
For example, if we run our test with 20 users and a spawn rate of 5, we might see:
These patterns reflect our task weights (3:2:1) and provide valuable insight into how our API performs under this level of load.
Remember, Locust load tests run continuously until you manually stop them via the 'Stop' button in the web UI. This allows for flexible testing durations, crucial for long-term monitoring and simulating traffic spikes. For precise, automated test lengths, leverage the --run-time command-line option, perfect for CI/CD integrations.
Understanding the Results
After running our Locust test, the real value comes from understanding what the results mean for our API's performance. Let's explore the key metrics and graphs available in the Locust UI.
Key Metrics Explained
1. Requests Per Second (RPS)
RPS measures how many requests our system can handle per second, which is a fundamental indicator of our API's throughput.
2. Response Times
Response time metrics show how quickly our API responds to requests. Locust provides several values:
Pro tip: Focus on median and 95% values rather than average or max, as they better represent typical user experience and aren't skewed by outliers.
3. Failure Rate
The percentage of requests that resulted in errors (non-success HTTP status codes).
Interpreting the Graphs
1. Total Requests Per Second Chart
Shows the combined RPS across all endpoints.

Total Requests Per Second Chart Example
What to look for:
2. Response Times Chart
This graph shows the evolution of response times during our test.

Response Times Chart Example
What to look for:
3. Number of Users Chart
This Graph shows the number of active simulated users over time during our test.

Number of Users Chart Example
What to look for:
Conclusion
Locust offers a refreshing approach to load testing that balances simplicity with power. With just a few lines of Python code, we can create realistic simulations of user behavior and gain valuable insights into our API's performance under load. Whether we're validating a new microservice or troubleshooting performance issues in an existing application, Locust provides the tools we need without the complexity of traditional load testing platforms.
For your convenience, the complete code example from this tutorial can be found on our GitHub page, ready to clone and run. We encourage you to experiment with the parameters, add more complex test scenarios, and discover how Locust can fit into your testing workflow.
Remember that consistent load testing throughout your development cycle is the key to catching performance issues before they impact your users. Happy testing!