Peek Behind the Curtain: Unveiling UI States with Playwright and DevTools

In the world of web development, ensuring the correct behavior of User Interface (UI) elements is crucial for delivering a seamless user experience. This often involves manipulating the Document Object Model (DOM) and interfacing with APIs to validate various UI states. In this guide, we'll explore how to automate UI state testing using Playwright, a powerful tool for browser automation and testing. We'll also delve into manual techniques using browser developer tools to accomplish similar tasks.
Illustrative Example
Let's immerse ourselves in a practical scenario where we're tasked with ensuring the reliability of a TV show information retrieval application. As QA engineers, our responsibility is to meticulously test the application's functionality and responsiveness across various user interactions and data scenarios.
Upon landing on the website, users encounter a simple interface designed to fetch and display information about a specific TV show. A prominent button labeled "Get TV Show Name" prompts users to initiate the retrieval process, while a designated area beneath awaits to showcase the fetched show's title.
Simplified website example
Our testing journey commences as we scrutinize the behavior of this UI component. Clicking the "Get TV Show Name" button triggers an API call to retrieve data about a predetermined show. Our primary objective is to thoroughly validate the UI's response to this action under different conditions.
Through rigorous testing, we aim to unearth any potential inconsistencies or anomalies in the UI's behavior. For instance, we need to ensure that the show's title reliably updates upon successful retrieval of data from the API. Additionally, we must handle scenarios where the API call fails or returns unexpected data, ensuring graceful error handling and user feedback.
This illustrative example underscores the critical importance of comprehensive UI state testing in guaranteeing a seamless user experience. As QA engineers, our responsibility extends beyond mere functionality testing; we strive to instill confidence in the site's reliability under diverse usage scenarios.
Unveiling DOM Dynamics
In this section, we'll embark on a journey through the intricate landscape of DOM manipulation and explore how Playwright serves as a powerful tool for automating the testing of various UI states resulting from dynamic changes within the DOM structure or content.
DOM manipulation lies at the heart of modern web development, enabling developers to dynamically alter the presentation and behavior of web pages in response to user interactions or application events. However, with great dynamism comes the need for meticulous testing to ensure the consistent and reliable behavior of UI elements.
Playwright offers robust functionalities for automating UI state testing, including the manipulation of the DOM. To showcase these capabilities, we'll first import the necessary functions and define a test case block using Playwright's testing framework:
const { test, expect } = require("@playwright/test");

test("DOM manipulation", async ({ page }) => {
    // Remaining code
});
We initiate the test case by instructing the browser to navigate to the specified URL, which represents the website we're testing.
await page.goto("your-website-url");
Using Playwright's locator function, we identify the hidden banner element on the page with the CSS selector #hidden-content.
const banner = page.locator("#hidden-content");
We utilize Playwright's expect function to assert that the banner element is initially not visible on the page.
await expect(banner).not.toBeVisible();
Before any manipulation occurs, we capture a screenshot of the page and save it as no_banner.png.
await page.screenshot({ path: "no_banner.png", fullPage: true });
Within the page context, we execute JavaScript code to manipulate the DOM. Here, we add the CSS class custom-class to the hidden banner element, making it visible.
await page.evaluate(() => {
    const element = document.getElementById("hidden-content");
    element.classList.add("custom-class");
});
After the manipulation, we use Playwright's expect function again to assert that the banner element is now visible on the page.
await expect(banner).toBeVisible();
Finally, we capture another screenshot of the page after the manipulation and save it as with_banner.png.
await page.screenshot({ path: "with_banner.png", fullPage: true });
Through this sequential execution of steps, we observe how Playwright facilitates the testing of dynamic DOM manipulations, providing insights into UI state changes within web applications.
By comparing the screenshots captured before and after the DOM manipulation, we can visually verify that the hidden banner element transitions from an initially invisible state to a visible state, validating the expected UI behavior.
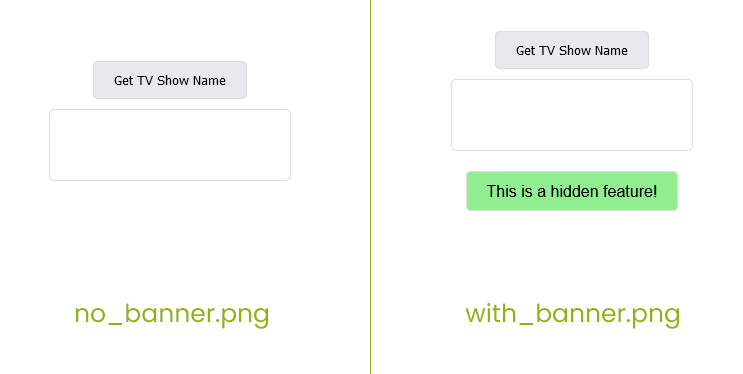

Screenshot comparison of the DOM manipulation
Empowering API Interactions
In this section, we'll delve into the realm of API manipulation and witness how Playwright orchestrates seamless automation of API interactions, validating UI responses to varying data payloads.
Playwright empowers QA engineers to unlock the potential of API manipulation in influencing UI states. To demonstrate this capability, let's embark on a journey through a test case block defined using Playwright's testing framework:
const { test, expect } = require("@playwright/test");

test("API manipulation", async ({ page }) => {
    // Remaining code
});
We initiate the test case by navigating the browser to the specified URL, representing the website under test.
await page.goto("your-website-url");
Using Playwright's locator function, we identify the element responsible for displaying TV show names on the page.
const tvShowName = page.locator("#show-name");
Upon clicking the designated button to trigger an API request, we wait for the TV show name element to become visible.
await page.locator("#get-tv-shows-button").click();
await tvShowName.waitFor("visible");
To ensure that the UI accurately reflects the retrieved data, we assert that the TV show name is not No data available.
expect(await tvShowName.textContent()).not.toEqual("No data available.");
Upon successful interaction with the API, we capture a screenshot to document this event.
await page.screenshot({ path: "api_success.png", fullPage: true });
In simulating a scenario where the API fails to provide expected data, we intercept requests to the API endpoint and modify the response accordingly.
await page.route("https://api.tvmaze.com/shows/39", async (route) => {
    const response = await route.fetch();
    const data = await response.json();
    data.name = null;

    await route.fulfill({
        body: JSON.stringify(data),
        headers: response.headers(),
    });
});
In essence, this code snippet acts as a filter for the specific API call. It intercepts the request for show ID 39, removes the show's name from the response data, and then sends back a modified response to the program that made the request.
After reloading the page to reset the state, we repeat the process of triggering the API request.
await page.goto("your-website-url");

await page.locator("#get-tv-shows-button").click();
await tvShowName.waitFor("visible");
To validate the UI's response to the failed API request, we assert that the TV show name is now No data available.
expect(await tvShowName.textContent()).toEqual("No data available.");
Upon encountering a failed API interaction, we capture a screenshot to document this occurrence.
await page.screenshot({ path: "api_fail.png", fullPage: true });
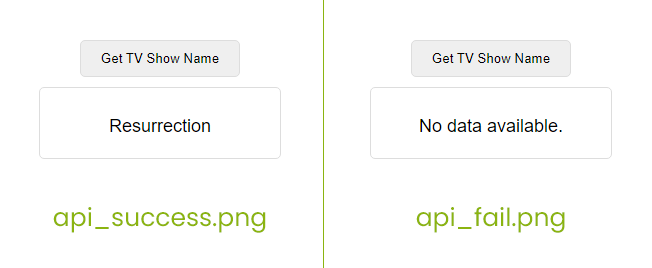

Screenshot comparison of the API manipulation
Through meticulous testing and validation, we gain insights into how Playwright facilitates the seamless integration of API interactions into UI state testing, ensuring robustness and reliability in web applications.
Insightful Manual Exploration
While automation tools like Playwright offer powerful capabilities for testing UI states, similar outcomes can also be manually achieved through browser developer tools. In this section, we'll explore how manual techniques using browser developer tools can provide deeper insights into UI behavior and aid in debugging.
DOM Manipulation
To manually manipulate the DOM, we begin by accessing the browser's developer tools. We can do this by pressing F12 or right-clicking on the webpage and selecting "Inspect" from the context menu. Once the developer tools are open, we navigate to the "Elements" tab to access the DOM tree.
Before continuing, I need to mention that we will use Chrome for our demonstration, but other browsers have similar features.
Next, we locate the desired DOM element that we wish to manipulate. By right-clicking on the element, the context menu options will be revealed. From the context menu, we select "Edit as HTML" to enter the HTML editing mode for the selected element.
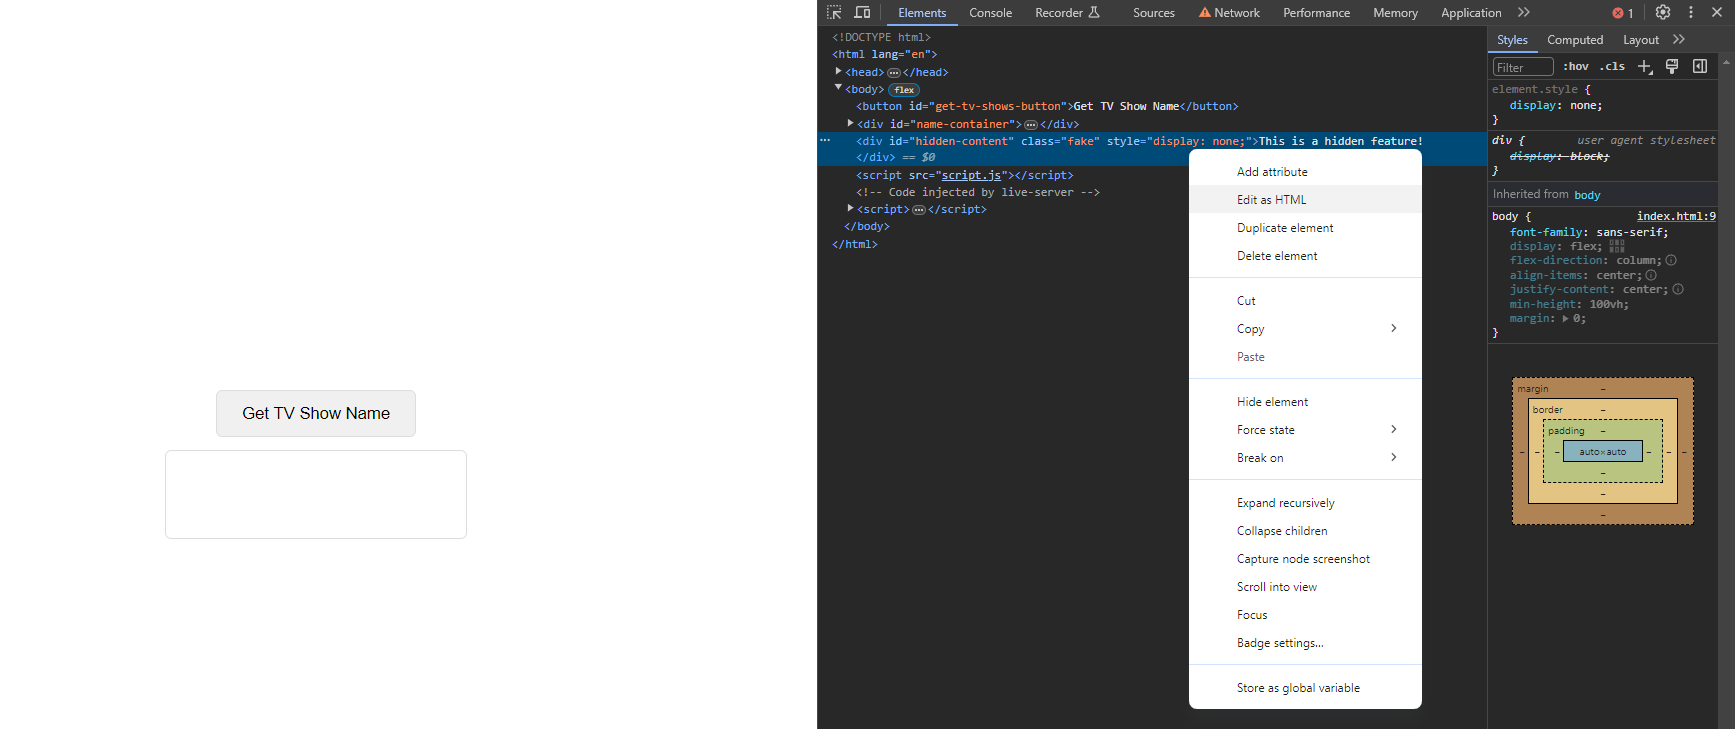

Manual DOM manipulation
Now that we're in HTML editing mode, we can modify the HTML content of the selected element directly within the developer tools. We make the necessary changes to the HTML content to simulate the desired alterations in the UI state.
Once we've completed the modifications, we click away anywhere in the developer tools to apply the changes. We can then observe the updated UI state in real-time on the webpage, reflecting the manual changes made to the DOM.
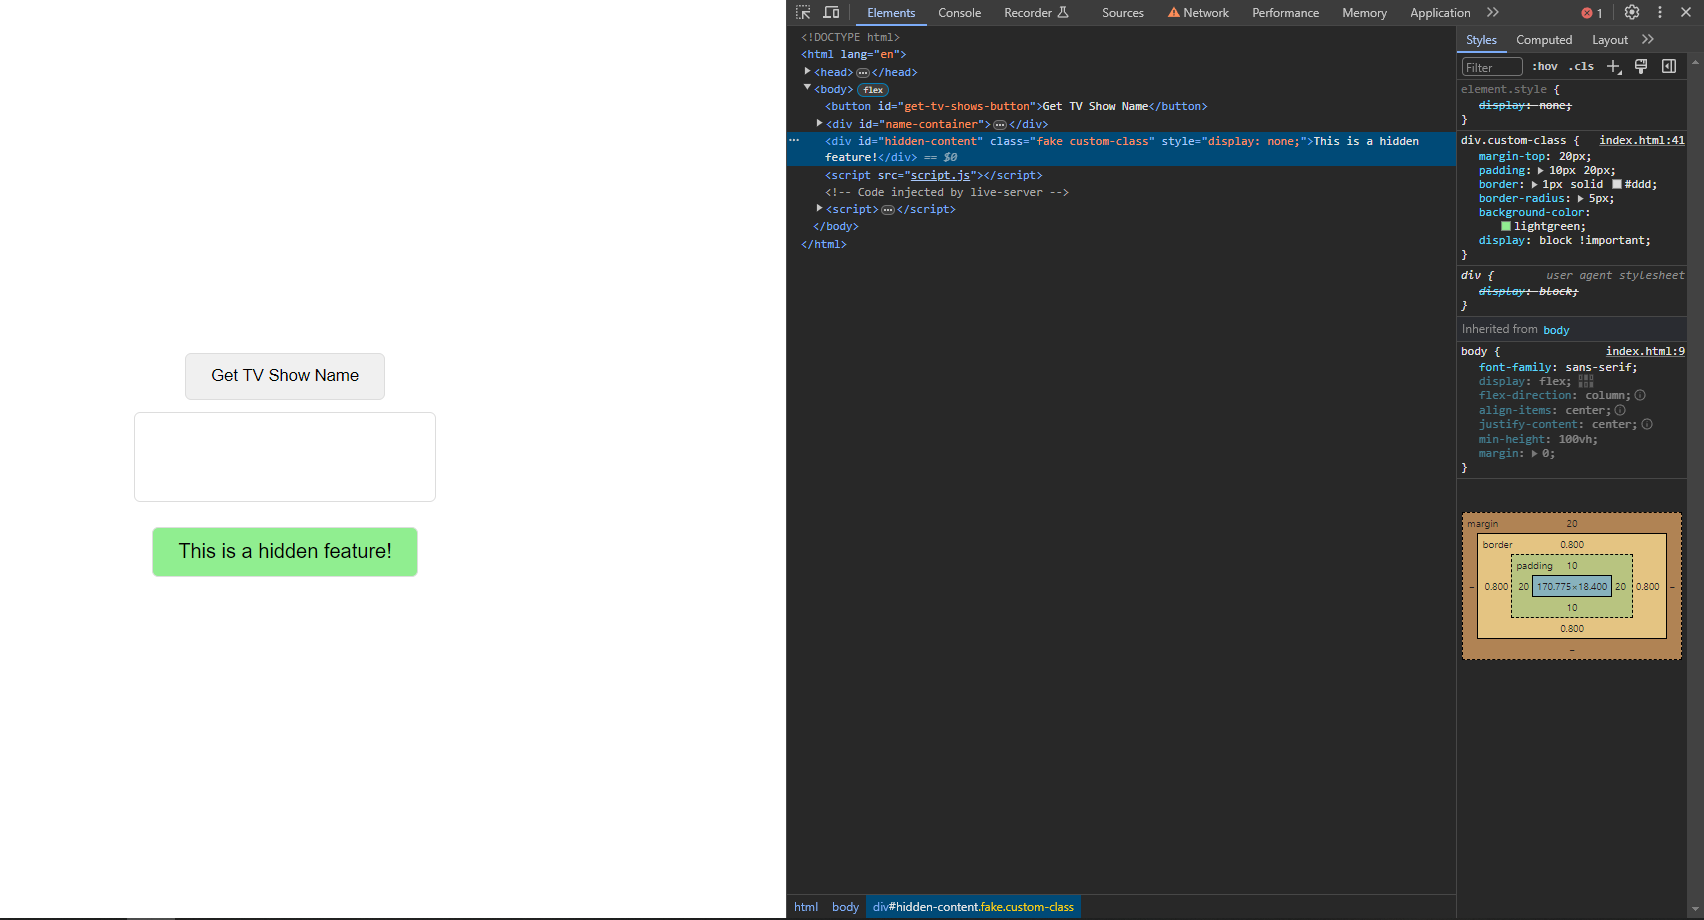

Manual DOM manipulation result
API Manipulation
To manually manipulate API requests, we start the same way by opening the developer tools in our browser. Once the developer tools are open, we navigate to the "Network" tab.
Next, we trigger the action in the web application that initiates the API request we want to manipulate. As the network requests populate in the developer tools, we locate the specific API request we wish to modify. Right-clicking on the API request will reveal the context menu options.
From the context menu, we choose the "Override content" option. This action will allow us to modify the response content of the selected API request.
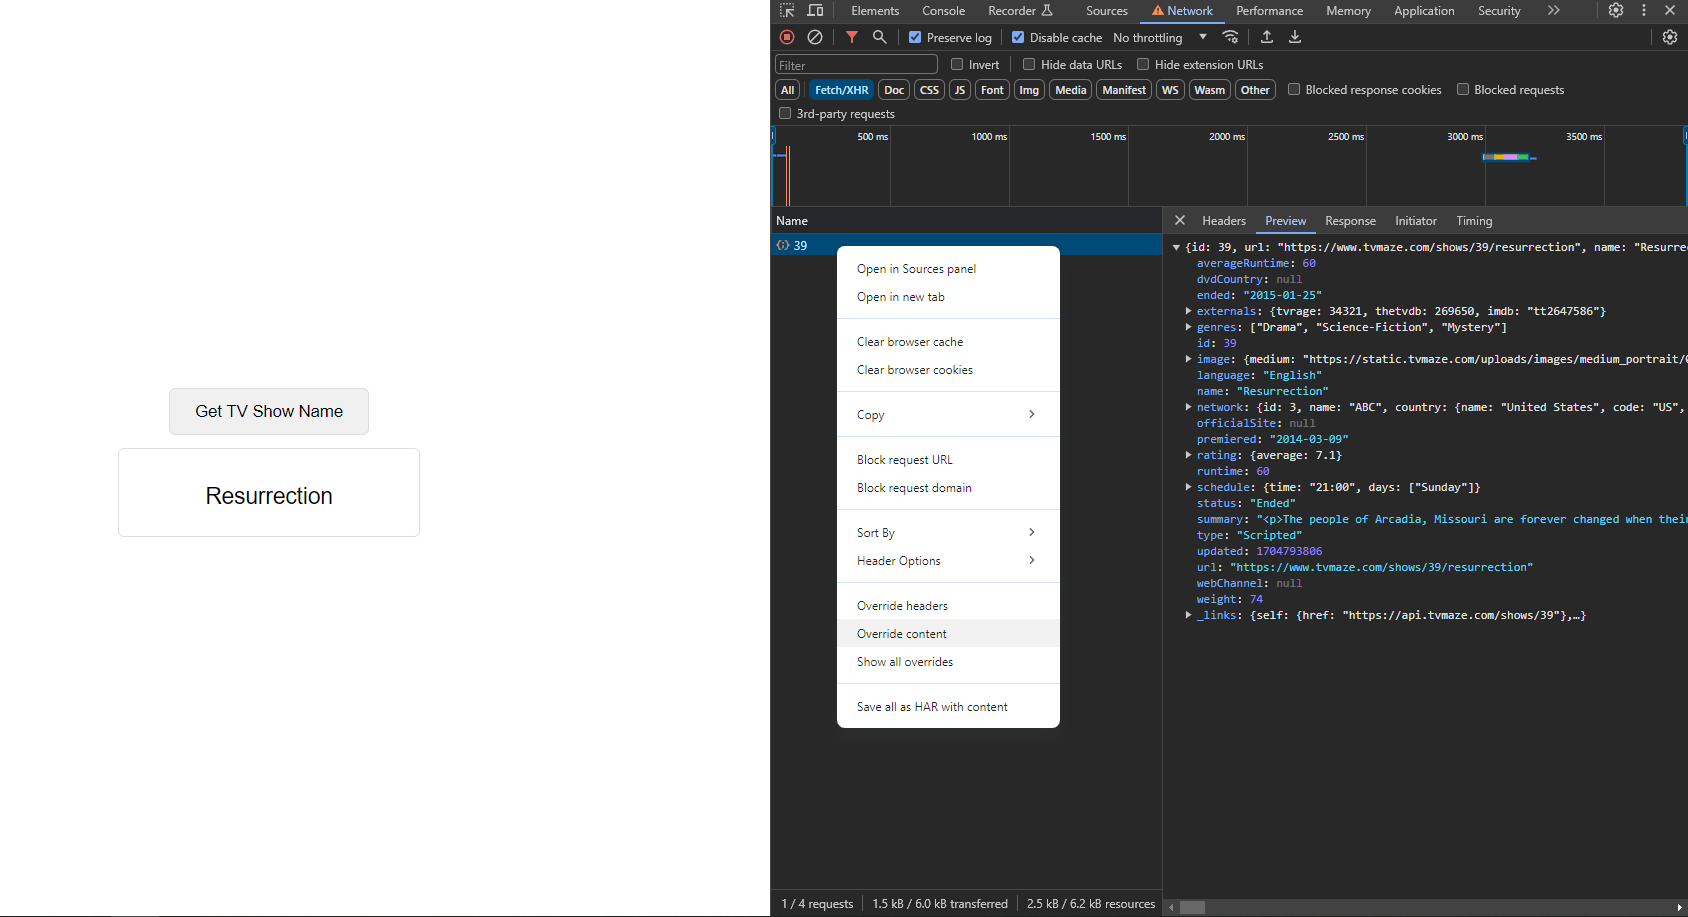

Manual API manipulation
Now that we've overridden the content of the API request, we can modify the desired property or parameter within the response content. Once we've made the necessary changes, we save the modifications by pressing Ctrl+S or using the appropriate save option in the developer tools.
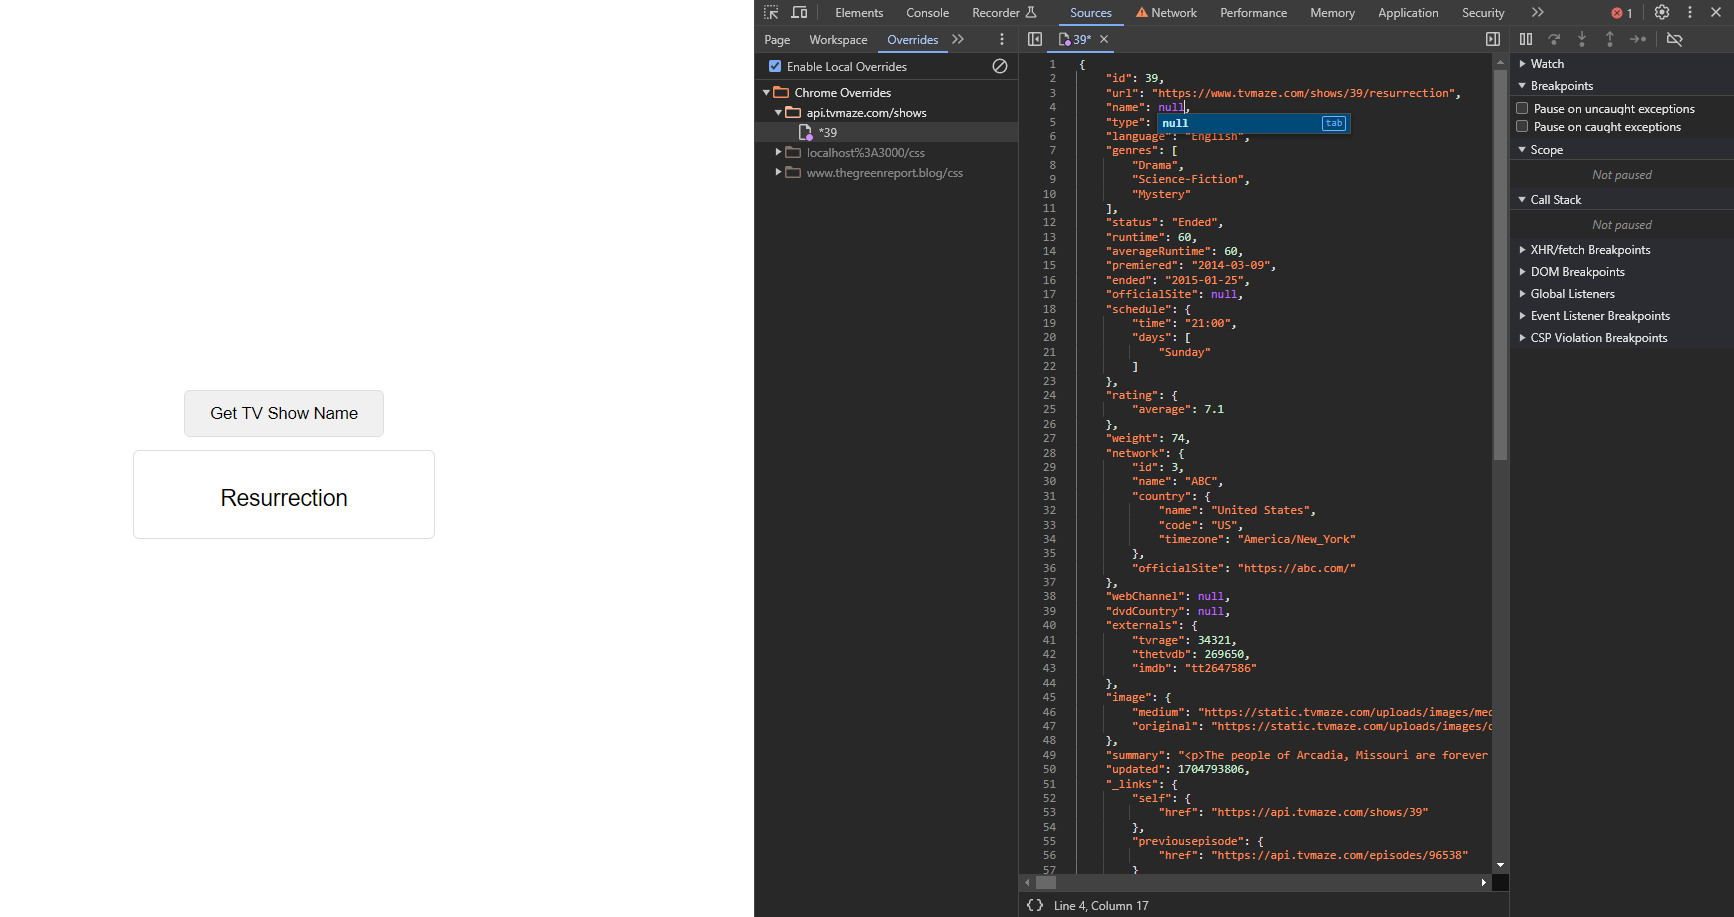

Overriding the API response properties
After saving the changes, we can call the modified endpoint again by triggering the same action in the web application that initiates the API request. This will send the modified request to the server and fetch the updated response.
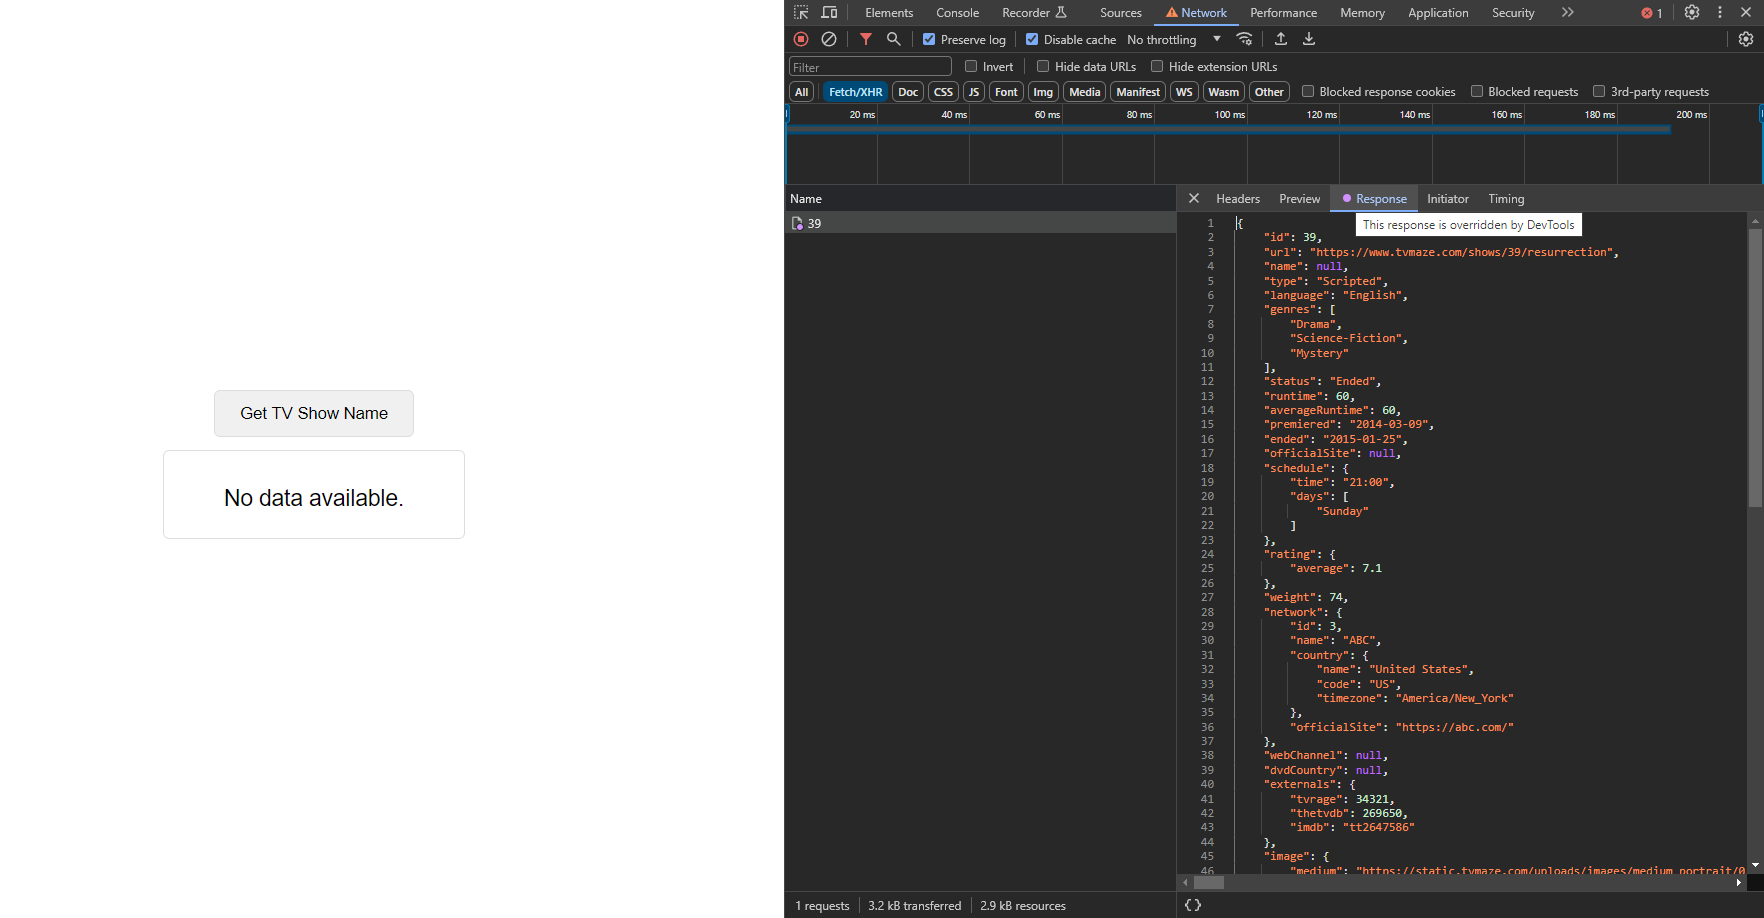

Manual API manipulation result
Conclusion
In wrapping up our exploration of UI state testing with Playwright, we underscore its indispensable role in fostering robust and user-friendly web applications. By harnessing a combination of automation and manual techniques, we can confidently navigate the complexities of UI behavior, ultimately delivering seamless user experiences across diverse web environments.
Playwright automation empowers developers to efficiently execute test cases, identify regressions, and ensure consistent UI behavior across various scenarios. Its robust capabilities streamline the testing process, enabling teams to maintain high standards of quality and reliability in their applications.
Additionally, manual techniques complement automation by offering a hands-on approach to exploring nuanced UI behaviors and uncovering edge cases that may not be captured through automated tests alone. By leveraging browser developer tools, we gain deeper insights into UI states, facilitating thorough validation and debugging of web applications.
As we embrace the synergy between automation and manual exploration, we equip ourselves with a comprehensive toolkit for addressing the evolving challenges of web development. Through diligent testing and continuous refinement, we pave the way for delivering exceptional user experiences that delight and engage audiences worldwide.
Thank you for staying until the end. If you're interested in trying out the examples mentioned above, you can access both the tests and the test website on our GitHub page. See you in the next one!