Mobile QA Automation: Leveraging Visual Screenshot Comparison for UI Consistency

In mobile QA automation, most testers focus heavily on verifying functionality — but what about how the app looks? Visual screenshot comparison is a powerful yet often overlooked technique that catches subtle UI inconsistencies across different devices and screen sizes. In this post, we'll explore why visual comparison is essential for mobile apps, how to implement it easily using Python with Appium and Pillow and share real-world examples where it made all the difference.
Why It's Particularly Valuable for Mobile Testing (Device Fragmentation)
One of the biggest challenges in mobile app testing is device fragmentation. With Android and iOS, there are countless combinations of screen sizes, resolutions, aspect ratios, and OS versions — and each variation can subtly affect how our app's UI is rendered. A layout that looks perfect on a Pixel 7 may break on a Galaxy S21, and a button that's perfectly aligned on iOS 16 might shift slightly on iOS 17.
Functional automation tests are great at ensuring that features work, but they often miss visual discrepancies like misaligned elements, overlapping text, or color rendering issues. These issues might not cause a functional failure but can severely impact the user experience.
Manually checking the UI on dozens of devices simply isn't scalable, especially as new devices are released constantly. This is where visual screenshot comparison becomes invaluable — by automating visual checks, we can catch these inconsistencies early, with minimal extra effort. It acts as an extra safety net to maintain a consistent, polished UI across the fragmented mobile ecosystem.
How to Implement It Using Python, Appium, and Pillow
To automate visual comparison in mobile testing, we'll use a simple but powerful tech stack: Appium for automating interactions with the mobile app, and Pillow, a popular Python imaging library, for processing and comparing screenshots. We'll also need a working Python environment, an Appium server running locally or remotely, and a connected device or emulator.
The first step is to capture a screenshot of the app's current state. We define a capture_screen function that saves the screenshot to a local directory. If the directory doesn't exist, it will be created automatically.
def capture_screen(driver, screen_name):
    screenshot_dir = os.path.join(os.getcwd(), 'screenshots')
    os.makedirs(screenshot_dir, exist_ok=True)

    file_path = os.path.join(screenshot_dir, f"{screen_name}.png")
    driver.save_screenshot(file_path)
    return file_path
Next, we need a way to compare two screenshots: the current one and a baseline image. The compare_images function handles this. It first checks if the baseline image exists. If not, it logs a message and skips the comparison. If both images are available, it compares their pixel data. If the images have different dimensions, the current screenshot is resized to match the baseline. The function uses Pillow's ImageChops.difference to detect pixel differences.
def compare_images(baseline_path, current_path, diff_path):
    if not os.path.exists(baseline_path):
        print(f"No baseline found at {baseline_path}. Creating new baseline.")
        return False

    baseline_img = Image.open(baseline_path).convert('RGB')
    current_img = Image.open(current_path).convert('RGB')

    if baseline_img.size != current_img.size:
        print("Images have different dimensions. Resizing for comparison.")
        current_img = current_img.resize(baseline_img.size)

    diff = ImageChops.difference(baseline_img, current_img)

    if diff.getbbox() is None:
        return True

    diff = diff.convert('RGB')
    for x in range(diff.width):
        for y in range(diff.height):
            r, g, b = diff.getpixel((x, y))
            if r != 0 or g != 0 or b != 0:
                diff.putpixel((x, y), (255, 0, 0))

    diff.save(diff_path)
    return False
Finally, we create the test_ui_consistency function, which ties everything together. It sets up the Appium driver with the desired capabilities, navigates to a specific screen in the app, captures a screenshot, and then compares it against the saved baseline. If differences are found, a diff image is saved for easy inspection. If no baseline exists, the current screenshot is saved as the new baseline.
def test_ui_consistency():
    options = UiAutomator2Options()
    options.platform_name = 'Android'
    options.device_name = 'Samsung Galaxy S21 API 31'
    options.app = 'path-to-the-apk-file'
    options.automation_name = 'UiAutomator2'

    driver = webdriver.Remote('http://localhost:4723/wd/hub', options=options)

    try:
        driver.find_element(AppiumBy.XPATH, '//android.widget.TextView[@text="Info"]').click()
        time.sleep(1)

        current_screenshot = capture_screen(driver, 'login_screen_current')

        baseline_path = os.path.join(os.getcwd(), 'screenshots', 'login_screen_baseline.png')
        diff_path = os.path.join(os.getcwd(), 'screenshots', 'login_screen_diff.png')

        are_identical = compare_images(baseline_path, current_screenshot, diff_path)

        if not are_identical and os.path.exists(baseline_path):
            print("Visual difference detected! Check the diff image for details.")
            return False
        elif not os.path.exists(baseline_path):
            import shutil
            shutil.copy(current_screenshot, baseline_path)
            print("Created new baseline image.")
        else:
            print("No visual differences detected.")

        return True

    finally:
        driver.quit()
When Visual Screenshot Comparison Makes the Biggest Impact
While visual comparison isn't necessary for every mobile test, there are specific cases where it can dramatically boost the quality of our app.
First, it's highly effective for layout verification. UI elements like buttons, labels, and input fields may technically still exist and be functional, but their visual arrangement can shift depending on device screen size, resolution, or OS rendering changes. Visual screenshot comparison immediately detects these shifts without relying on fragile coordinate-based assertions.
It's also particularly useful after design or theme updates. When introducing a new style guide, dark mode support, or branding refresh, verifying that all screens follow the updated look consistently across devices can be a daunting manual task. Visual comparisons can flag inconsistencies automatically, ensuring that colors, fonts, and layouts match expectations.
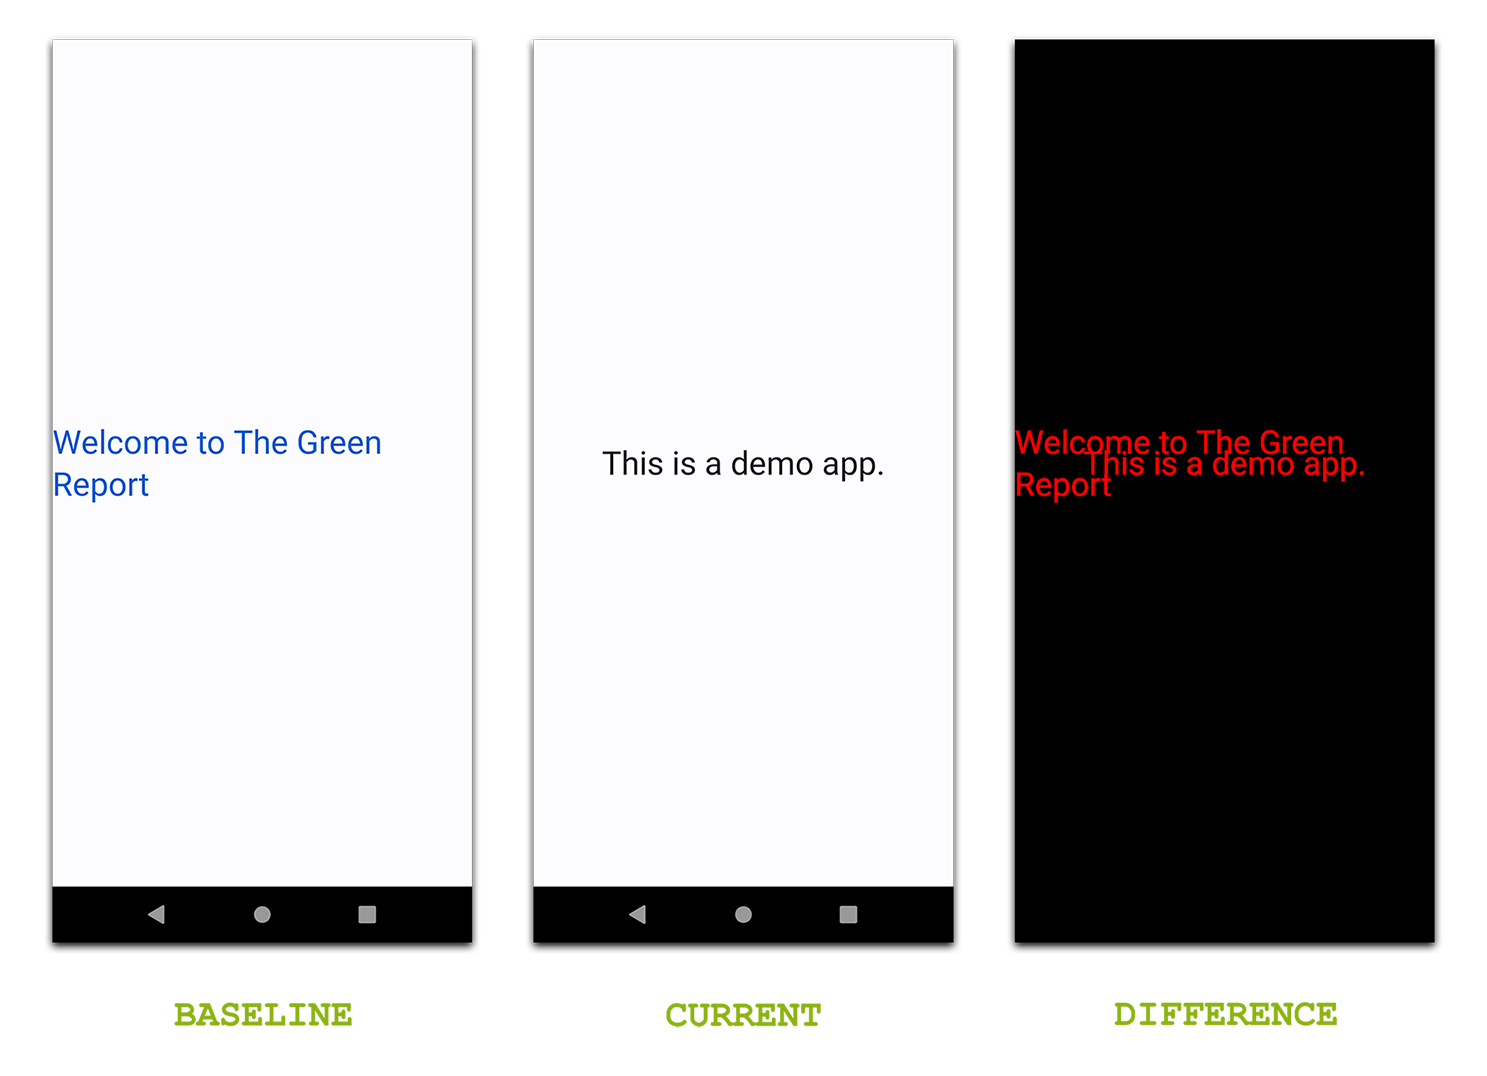
Baseline vs Current vs Differences: Quickly spot visual changes after a UI update.
Another area where visual comparison proves its value is during device diversity testing. Even after accounting for different screen sizes and OS versions, subtle rendering differences can still appear between device models. Automated visual checks make it easier to quickly spot unexpected UI issues without the need to manually review endless screenshots across a broad device set.
In short, visual comparison is most impactful when our goal is not just verifying functionality, but protecting the overall quality, accessibility, and visual consistency of our app across a fragmented device landscape.
Best Practices and Pitfalls to Avoid
Visual screenshot comparison can be a game-changer for mobile testing, but using it well requires a few important habits. Let's walk through best practices we should follow — and common pitfalls we'll want to avoid.
Best Practices Pitfalls to AvoidBy following these simple rules, we'll avoid common frustrations and make visual comparison testing a reliable asset in our mobile automation toolbox.
Conclusion
Visual screenshot comparison is a simple yet powerful technique that can catch subtle UI issues before they reach our users. Especially in mobile testing, where device fragmentation makes consistency a constant challenge, adding visual checks to our automation can save time, improve quality, and build confidence in every release. If you want to dive deeper, the complete code example along with a demo Android app is available on our GitHub page — feel free to explore, clone, and start experimenting!