Introduction to Selenium Grid

If you have done some testing using Selenium, chances are you have heard of Selenium Grid. Maybe you have heard about some projects utilizing it, but you aren't sure what it is or its purpose. Let's find out.
By looking at the official documentation, you will find that Selenium Grid is a proxy server used to run tests in parallel on multiple machines. It does this by routing commands to remote web browser instances, where one server acts as the hub that routes test commands to registered nodes. Now, to avoid confusion, let's look at the Grid components and their purposes.
The Grid is composed by six components:
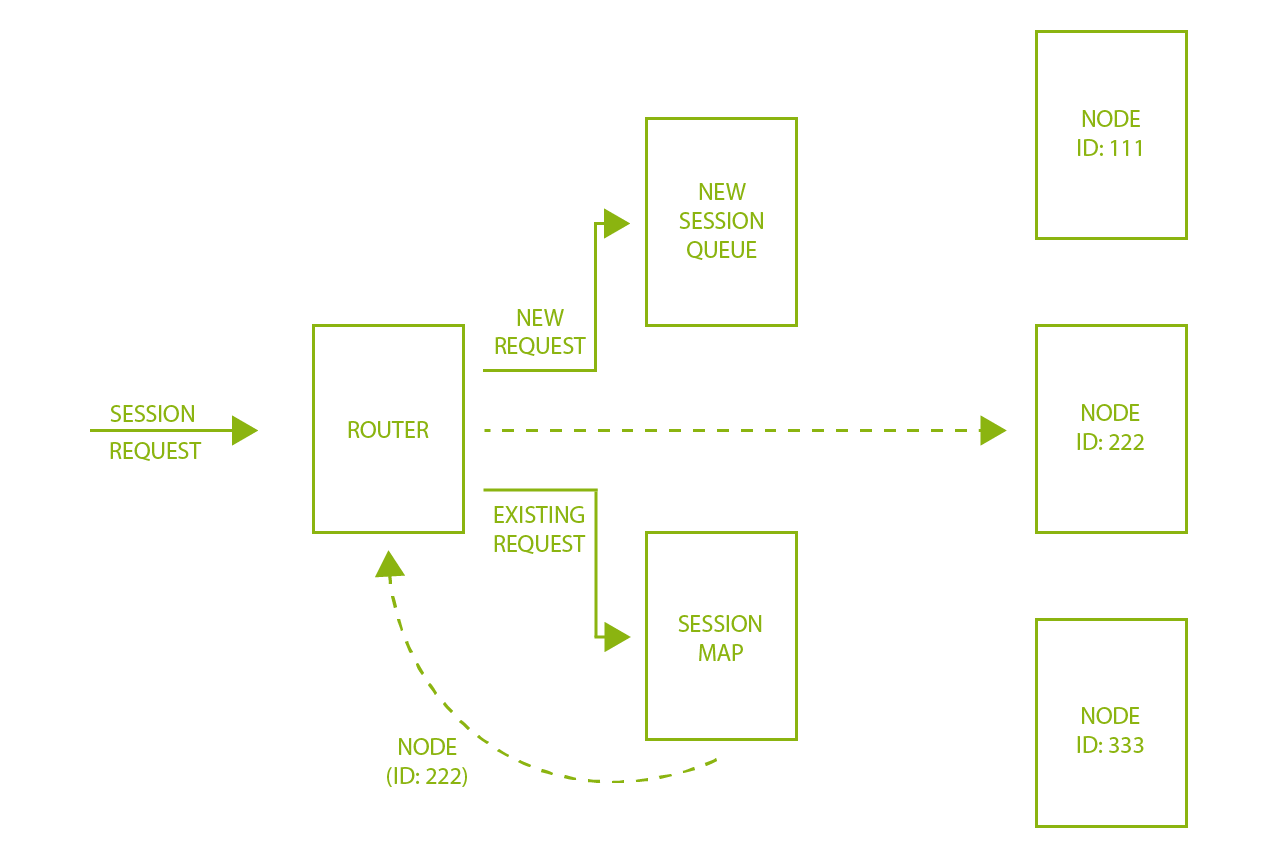
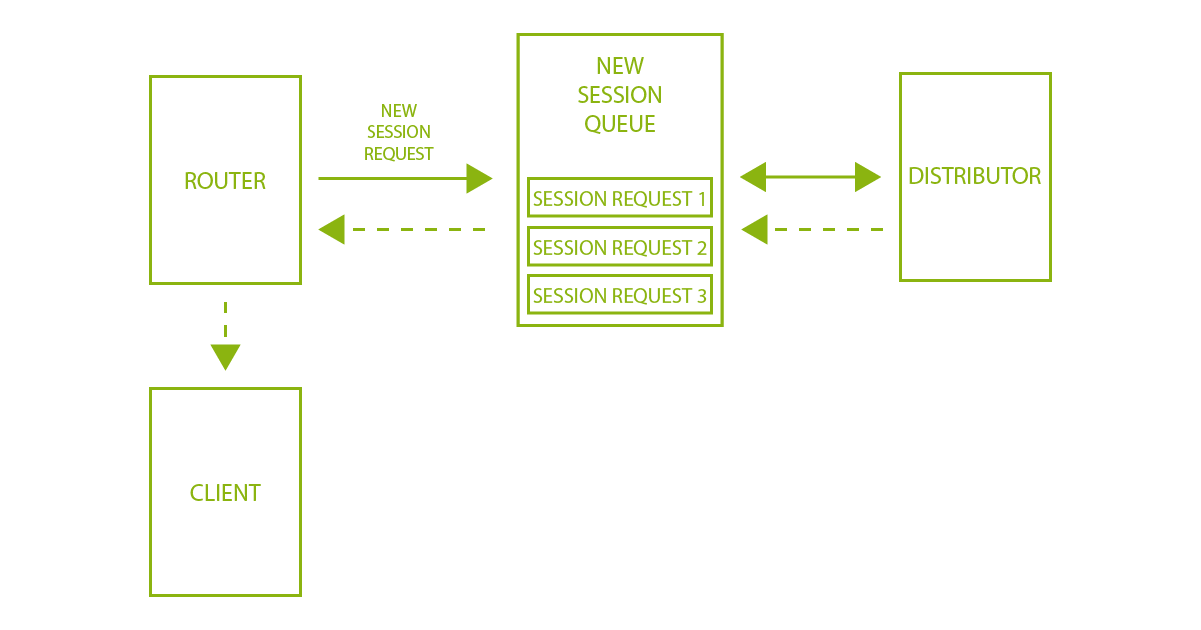
Router
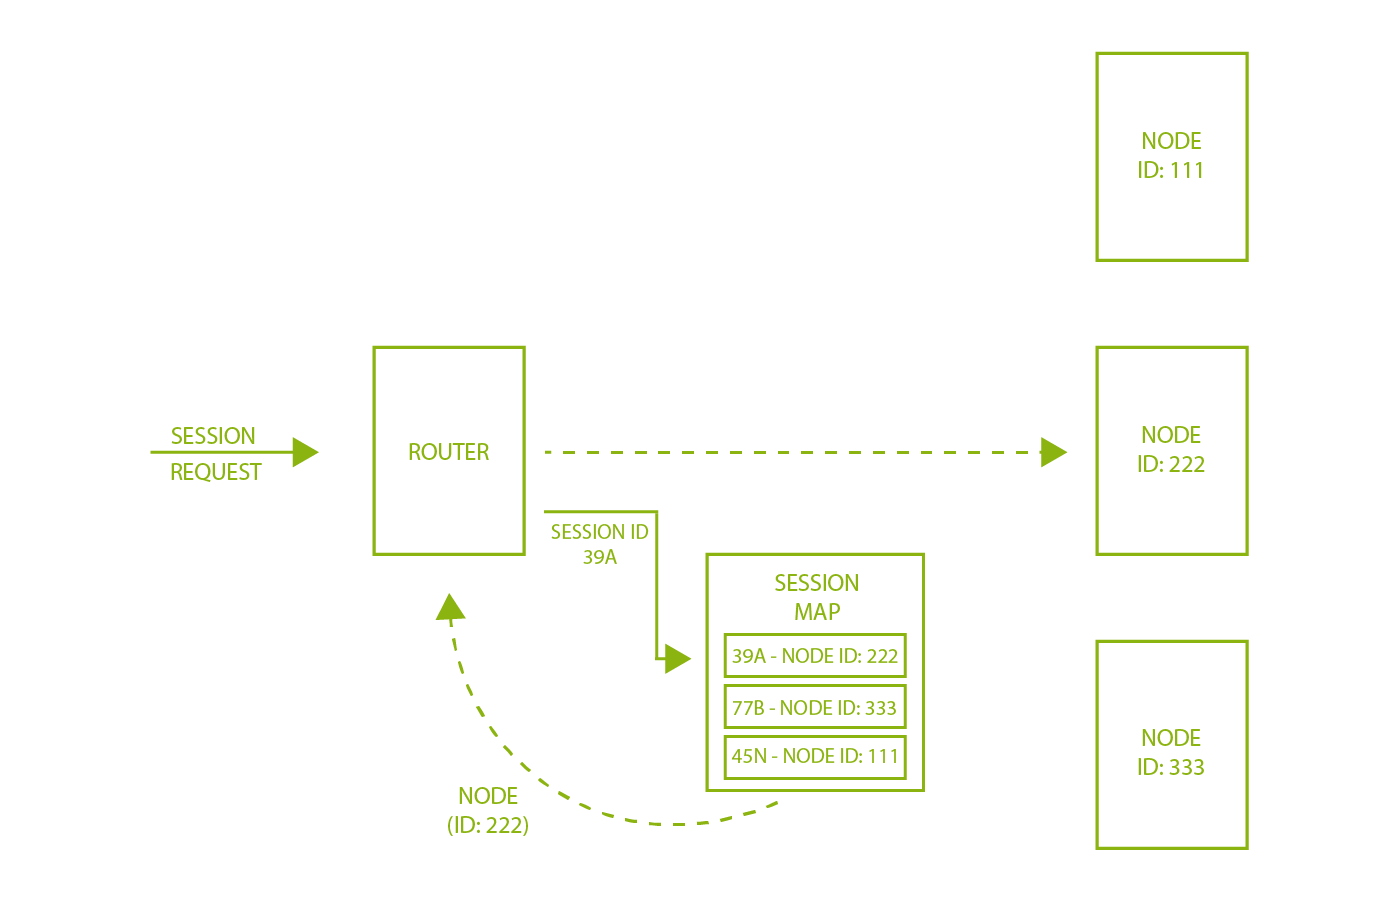
The Router is the entry point of the Grid with a simple role. A session request comes in. The router checks if that request is already existing or if it's a new one. If the request already exists, the Router will query the Session Map to get the Node ID where the session is already running and send that request to the appropriate Node. If it's a new request, it gets forwarded to the New Session Queue.
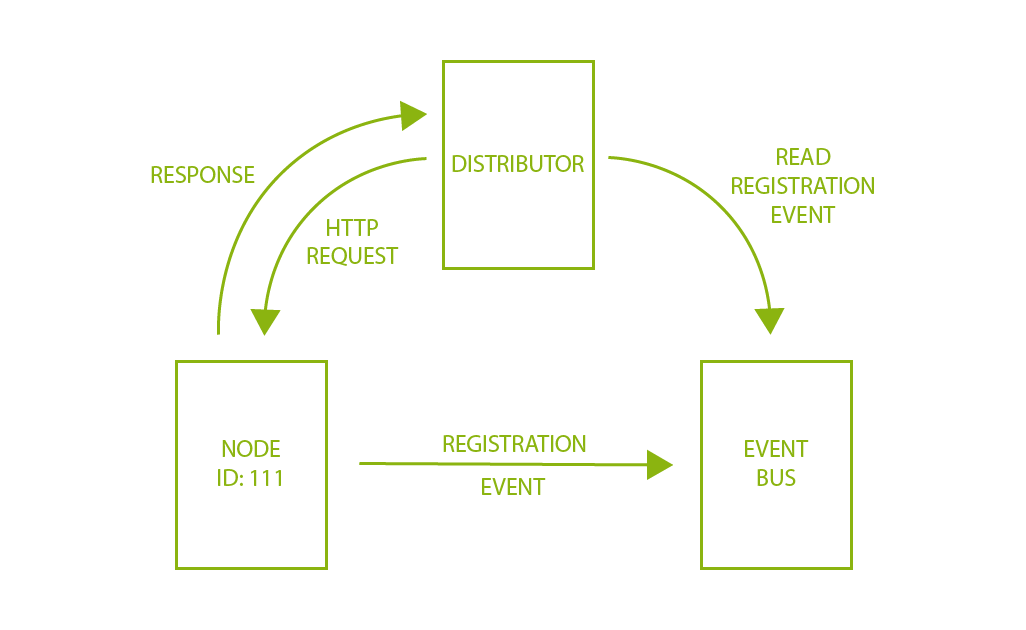
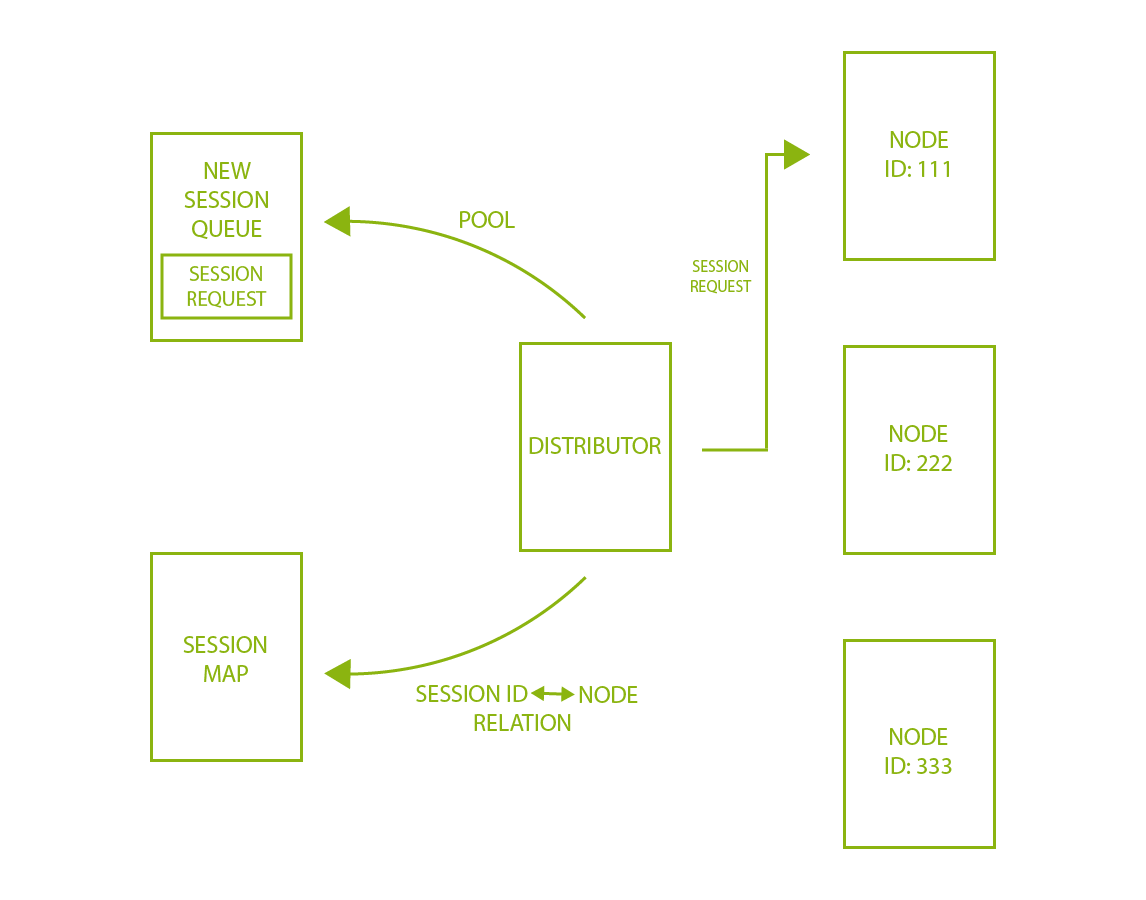
Distributor
The Distributor does mainly two things.
The first one looks like this. A Node sends a registration event through the Event Bus. The Distributor reads this event and tries to reach the Node with an HTTP request. If the request is successful, meaning the Node exists, the Distributor can register it and keep a record of its capabilities.
Let's look at the second role. New session requests are waiting in the New Session Queue. The Distributor polls this queue for pending new session requests and then finds a suitable Node where the session can be created. Once created, the Distributor stores the relation between the session ID and the Node in the Session Map.
Session Map
As we have already mentioned, the session map is a data store that holds relationships between the session IDs and Nodes where the session is running. The Router asks the Session Map for those Nodes associated with a specific session ID.
New Session Queue
The New Session Queue holds all session requests in a FIFO (first in, first out) order. The Router adds new session requests to this component. The New Session Queue performs regular checks if a request in the queue has timed out. If so, the request gets rejected and removed.
The Distributor also regularly checks if a slot is available. Once it finds one, the Distributor polls the New Session Queue for the first matching request. After that, he tries to create a new session.
Now when requested capabilities match the capabilities of any free Node, the Distributor attempts to get an available slot. If the slots are busy, the Distributor sends the request back to the queue. If the requests time out, they get rejected.
Once a session is successfully established, the Distributor sends the session information to the New Session Queue. From there, the session information goes back to the Router, and at the end, to the client.
Node
A Grid can have multiple Nodes. Each of these Nodes manages slots for the available browsers of the machine where it's running. One specific Node registers itself to the Distributor through the Event Bus. An important thing to note here is that the Node only executes commands it receives. We will talk more about Nodes in the upcoming practical example.
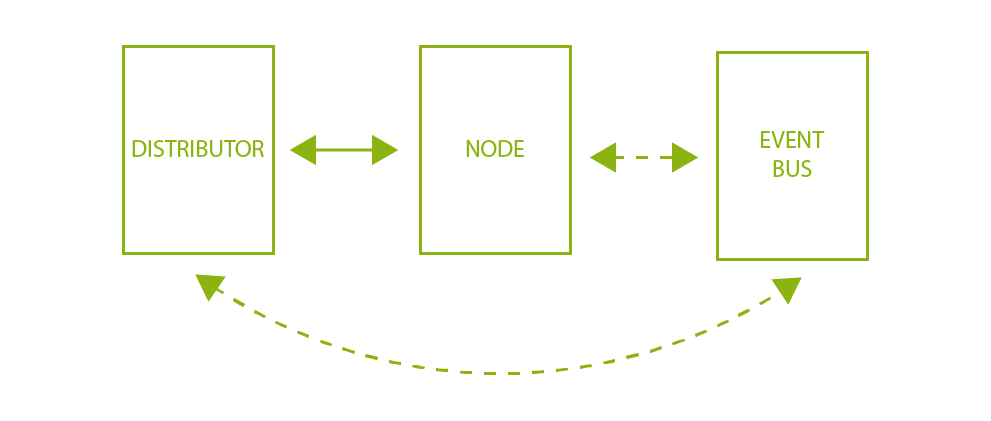
Event Bus
The Event Bus is the communication path between the Nodes, Distributor, Session Map, and New Session Queue.
It's worth mentioning that we can deploy the Grid in a couple of ways. And in case we need to execute all of our components individually (distributed mode), we need to start the Event Bus first.
Practical example
I know the theoretical part is boring, so let's go over a practical example to see the Grid in action.
To show some cool features of the Grid, we will use the Hub & Node role. It will allow us to combine different machines into a single Grid. Those different machines, in our case, will be two virtual machines running Ubuntu OS. We could also use two physical devices, like two PCs, but to avoid as much configuration as possible, we will stick with the VMs.
Device configuration
To configure the virtual devices, we will use Oracles VM VirtualBox. Inside VirtualBox, we need to install two Ubuntu operating systems. Both systems should have the same configuration. If you don't know how to create a VM in VirtualBox, follow this tutorial. The only important setting here is the Network. We need to make sure that our two machines can communicate with each other and access the internet. For that purpose we will set the network adapter to be attached to a Bridged Adapter.
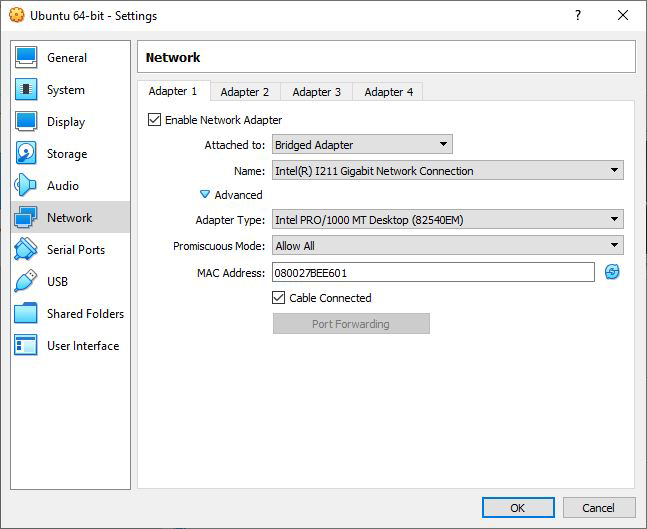
This network mode will allow multiple virtual machines to communicate with each other via the network. VirtualBox will connect to one of our installed network cards and exchange network packets directly.
By looking at the last screenshot, there is only one option that we will have to update, and that is Promiscuous Mode. By setting this to "Allow All", we are removing all restrictions for the VM network adapter.
Grid configuration
It's time to configure the Grid. On both virtual machines, we will create a folder (I will call my automation-testing) and add the required assets.
The first virtual machine will be our entry point and host the hub. On this VM, we will download the Selenium Server JAR file and a geckodriver. This VM will also have a running Node.
The second virtual machine will run a Node and have the same two files plus a chromedriver. The current setup looks like this:
Virtual Machine 1:-
automation-testing
-
assets
- geckodriver
- selenium-server-4.6.0.jar
-
assets
-
automation-testing
- chromedriver
- geckodriver
- selenium-server-4.6.0.jar
The Selenium server jar file is used to configure and run the hub and nodes, and the drivers are used to link automation tests with your browsers.
Once we have our files in place, we need to install the web browsers that the drivers will use. In our example, on the first VM, we will use Firefox. Ubuntu comes with Firefox preinstalled, so no action from our side will be required. On the second VM, we will use Chrome and Firefox, so we will need to install Chrome there.
To run our hub and nodes, we need to install Java (version 11 or higher). We can do this by entering the following command in our terminal:
sudo apt install openjdk-11-jdk
Don't forget to do this for both virtual machines.
After Java has been installed, we can start our hub. In our terminal (first VM), we need to navigate to the folder where we saved the Selenium server jar file and execute the following command:
java -jar selenium-server-<server-version>.jar hub
Once executed, we will get a log output in the terminal where the last line will be similar to this one:
Started Selenium Hub <server-version> (revision <revision-number>): http://<ip-address>:4444
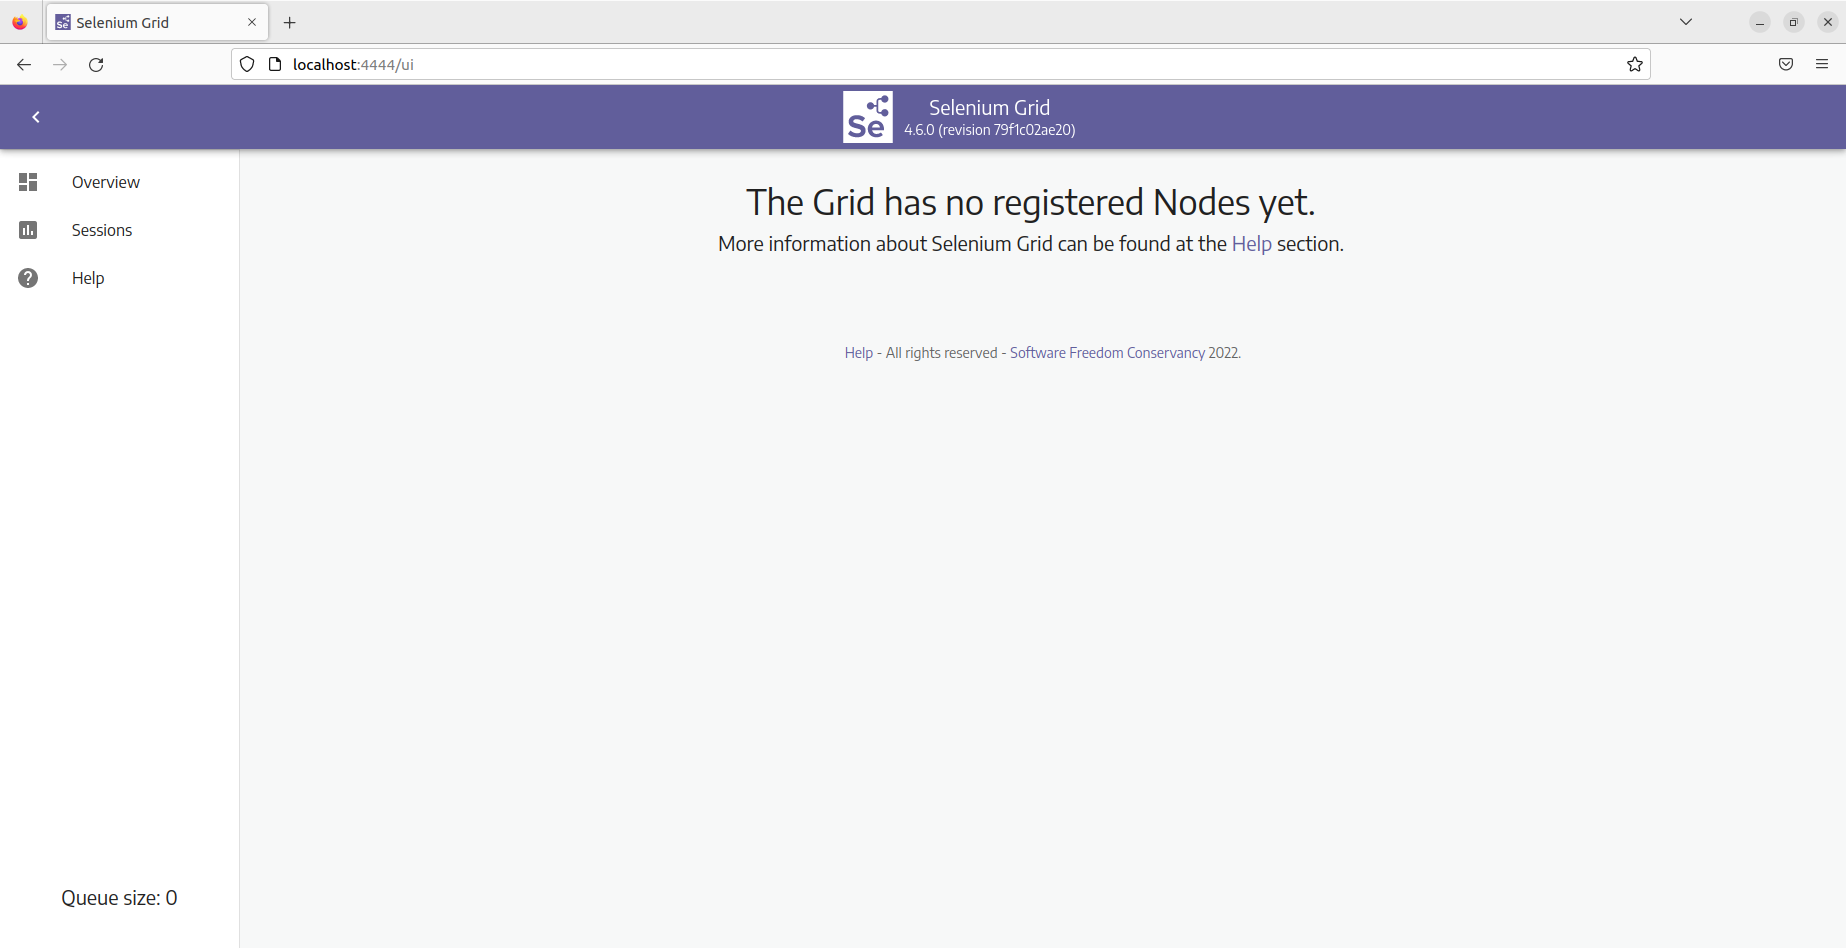
This means that we have successfully started our hub. The important part of this message is the IP address and the port. Since we started our VMs in the Bridged Adapter network mode, they will have dedicated IP addresses each. By default, the hub will start on http://localhost:4444. By entering the localhost hostname with the port in our browser, we will be navigated to the Grid GUI.
Again on the first VM, we will open a new terminal window and type the following command:
java -jar selenium-server-<server-version>.jar node --detect-drivers true
This command will register a Node to our Hub and detect available drivers. While reading the log output, we can see that the server detected how many processors the machine has available and which drivers could be obtained. If the log finishes with a message like the following one:
Node has been added
that means that our Node is successfully registered. Now, let's take a look at our Grid GUI again.
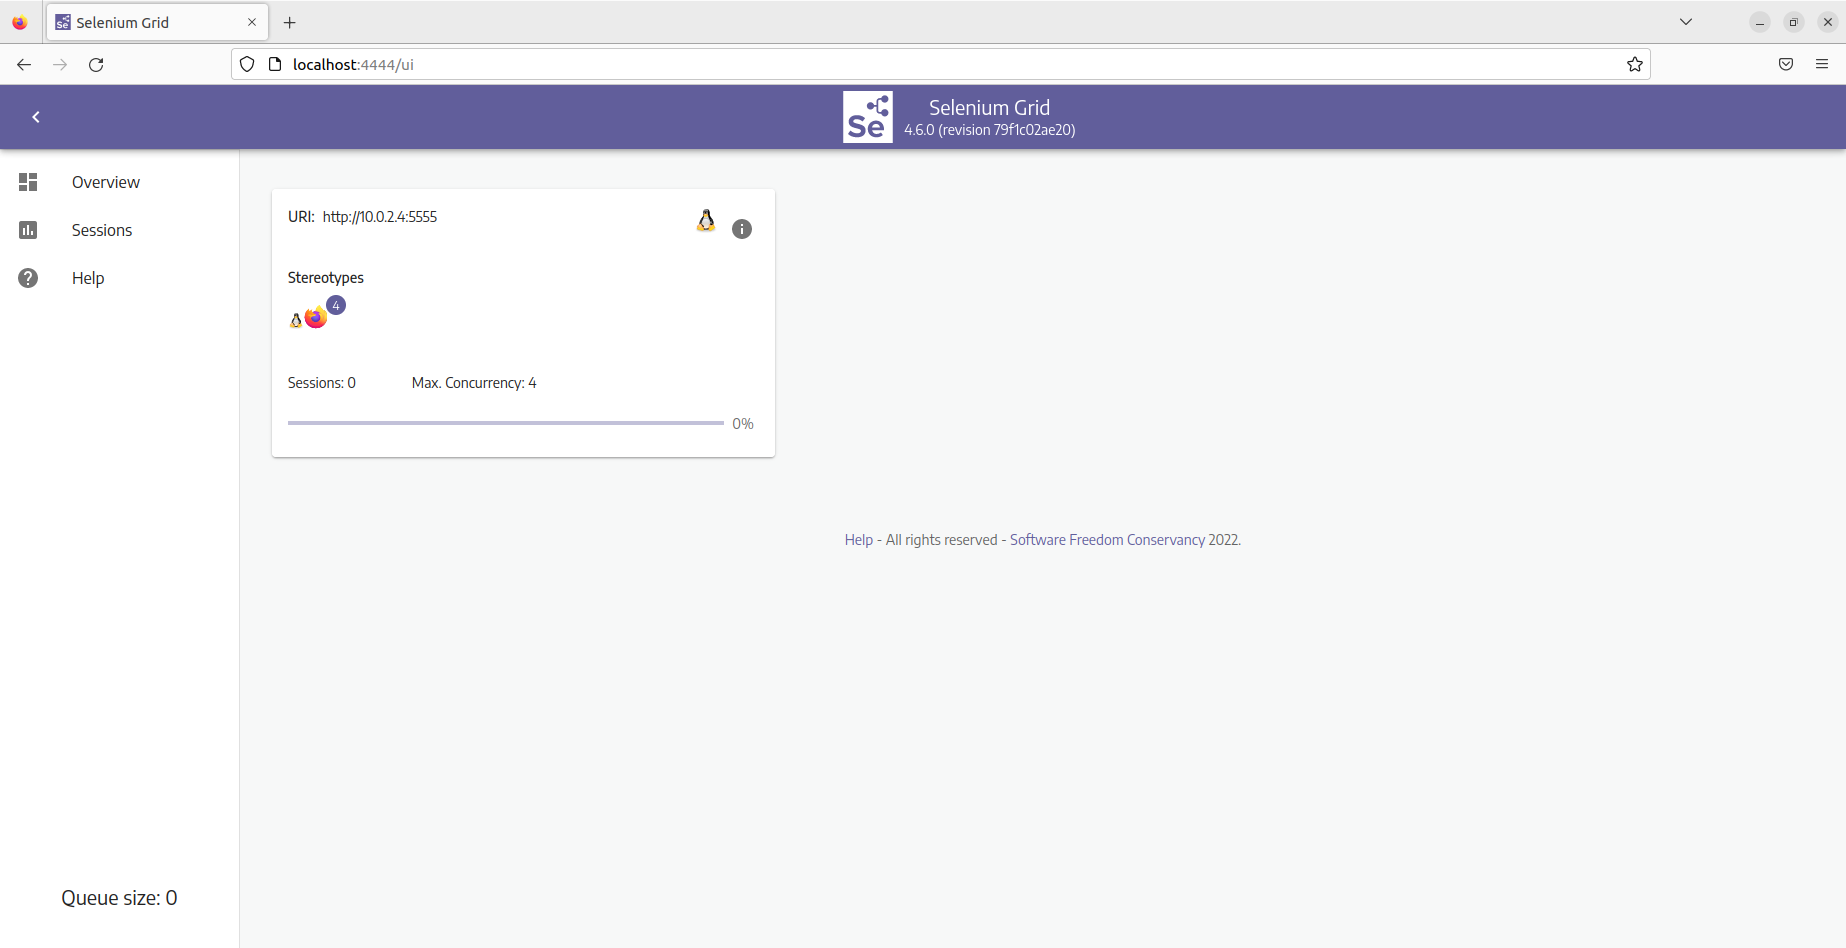
A Node is represented as a rectangle with some information in it. The following can be seen:
Since we have successfully registered our first Node, let's do the same with the second one.
To register the second Node, we will not use the same command since our second Node is located on a different device (our second VM). If we take a look at our hub log from the first VM, we can see a line similar to this one:
XPUB binding to [binding to tcp://*:4442, advertising as tcp://127.0.1.1:4442], XSUB binding to [binding to tcp://*:4443, advertising as tcp://127.0.1.1:4443]
This tells us that the server uses XPUB and XSUB sockets, where XPUB indicates the publish events and XSUB the subscribe events. Those sockets are a combination of the Hub IP address and the appropriate port numbers (seen in the previous log message). To register our second Node, we will need to provide them as parameters:
java -jar selenium-server-4.6.0.jar node --detect-drivers true --publish-events tcp://<hub-ip-address>:4442 --subscribe-events tcp://<hub-ip-address>:4443
If the Node is added successfully, you will get confirmation messages on both terminal logs (the second VM Node log and the first VM Hub log). And if we look back at our Grid GUI, our second Node is there.
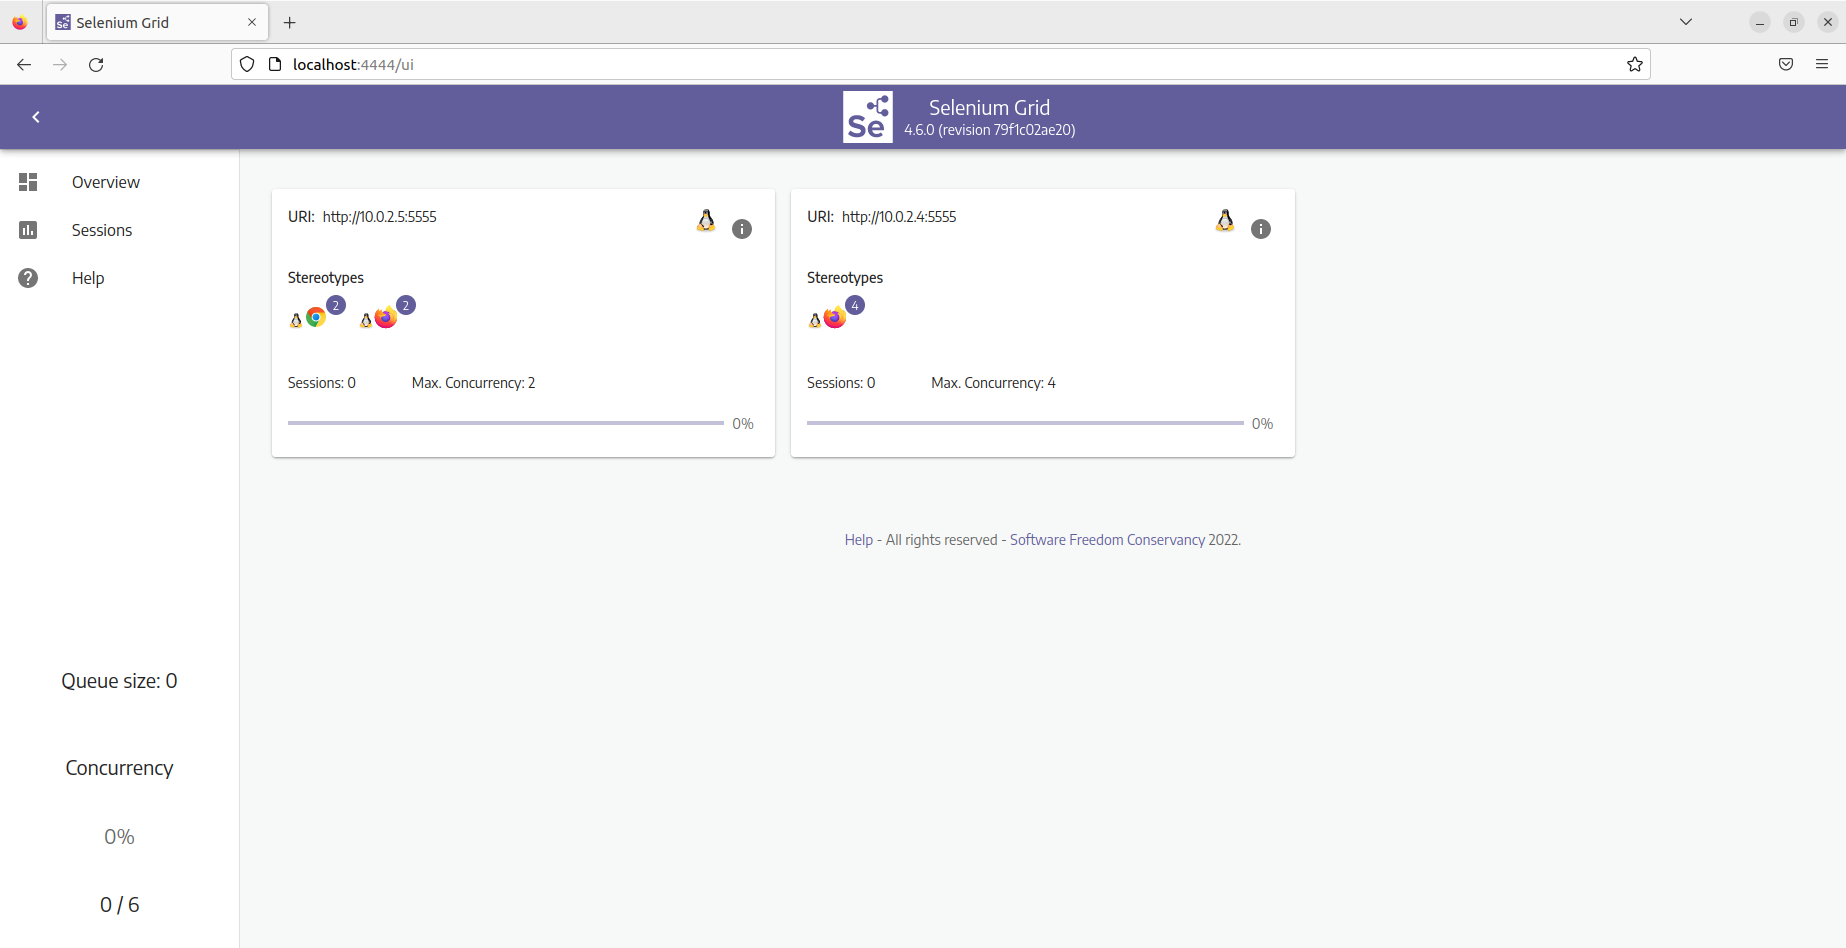
In comparison to the first Node, this one has two stereotypes (can run tests on Chrome and Firefox) but has only a maximum of 2 concurrencies since I set the number of CPUs to 2 for this VM.
Test execution
Let's see our Grid in action. We will create a small automation project that will contain two test classes. Both classes will verify that the Youtube logo is displayed on the landing page, but they will target different browsers.
Usually, if we want to target, for example, Chrome, we would use the ChromeDriver. This time we want the Grid to manage this for us, so we will use something called RemoteWebDriver.
The RemoteWebDriver class implements the WebDriver interface to execute test scripts through the RemoteWebDriver server on a remote machine. The server is a component that listens on a port for requests from a remote WebDriver client. Once the request is received, it forwards the request to a browser driver like the ChromeDriver or FirefoxDriver. The client libraries serve as a remote WebDriver client. The client translates test script requests to a JSON payload and sends it across to the remote WebDriver server using the JSON wire protocol.
For verification purposes, we will be using TestNG, and since our project will utilize Maven, we need to add the TestNG dependency in the POM file:
<dependency>
  <groupId>org.testng</groupId>
  <artifactId>testng</artifactId>
  <version>7.7.0</version>
  <scope>test</scope>
</dependency>
For the first class, we will start by initializing the RemoteWebDriver:
import org.openqa.selenium.remote.RemoteWebDriver;
import org.testng.annotations.Test;

import java.net.MalformedURLException;
import java.net.URL;

public class YouTubeGridChromeTest {

    @Test
    public void verifyYouTubeLandingPage() throws MalformedURLException {
        RemoteWebDriver driver = new RemoteWebDriver(new URL("http://<hub-ip-and-port>"), capabilities);
    }
}
To use the RemoteWebDriver, we need to make sure that our selenium-server-4.6.0.jar file is imported into the project!
From the above code piece, we can see that the RemoteWebDriver accepts two parameters:
We will use only one capability, and that will be the name of the browser in which we want to execute our test:
DesiredCapabilities capabilities = new DesiredCapabilities();
capabilities.setCapability(CapabilityType.BROWSER_NAME, "chrome");
The last piece is the actual test. We will navigate to the Youtube landing page, verify that the logo is displayed, and close the driver:
driver.get("https://youtube.com");
assertTrue(driver.findElement(By.id("logo")).isDisplayed());
driver.close();
The whole class looks like this:
import org.openqa.selenium.By;
import org.openqa.selenium.remote.CapabilityType;
import org.openqa.selenium.remote.DesiredCapabilities;
import org.openqa.selenium.remote.RemoteWebDriver;
import org.testng.annotations.Test;

import java.net.MalformedURLException;
import java.net.URL;

import static org.testng.Assert.assertTrue;

public class YouTubeGridChromeTest {

    @Test
    public void verifyYouTubeLandingPage() throws MalformedURLException {
        DesiredCapabilities capabilities = new DesiredCapabilities();
        capabilities.setCapability(CapabilityType.BROWSER_NAME, "chrome");
        RemoteWebDriver driver = new RemoteWebDriver(new URL("http://<hub-ip-and-port>"), capabilities);

        driver.get("https://youtube.com");
        assertTrue(driver.findElement(By.id("logo")).isDisplayed());
        driver.close();
    }
}
For the second class, we will do almost everything the same. The only difference is going to be the capabilities. This time we want to target Firefox:
capabilities.setCapability(CapabilityType.BROWSER_NAME, "firefox");
Now that we got our test classes in place, we just need to execute our suite. For that, we will use the TestNG configuration XML file. We will configure the file to execute the classes in parallel and pass in their names:
<?xml version="1.0" encoding="UTF-8" ?>
<!DOCTYPE suite SYSTEM "https://testng.org/testng-1.0.dtd">
<suite name="Suite" parallel="classes">
    <test thread-count="2" parallel="classes" name="Test">
        <classes>
            <class name="YouTubeGridChromeTest"/>
            <class name="YouTubeGridFirefoxTest"/>
        </classes>
    </test>
</suite>
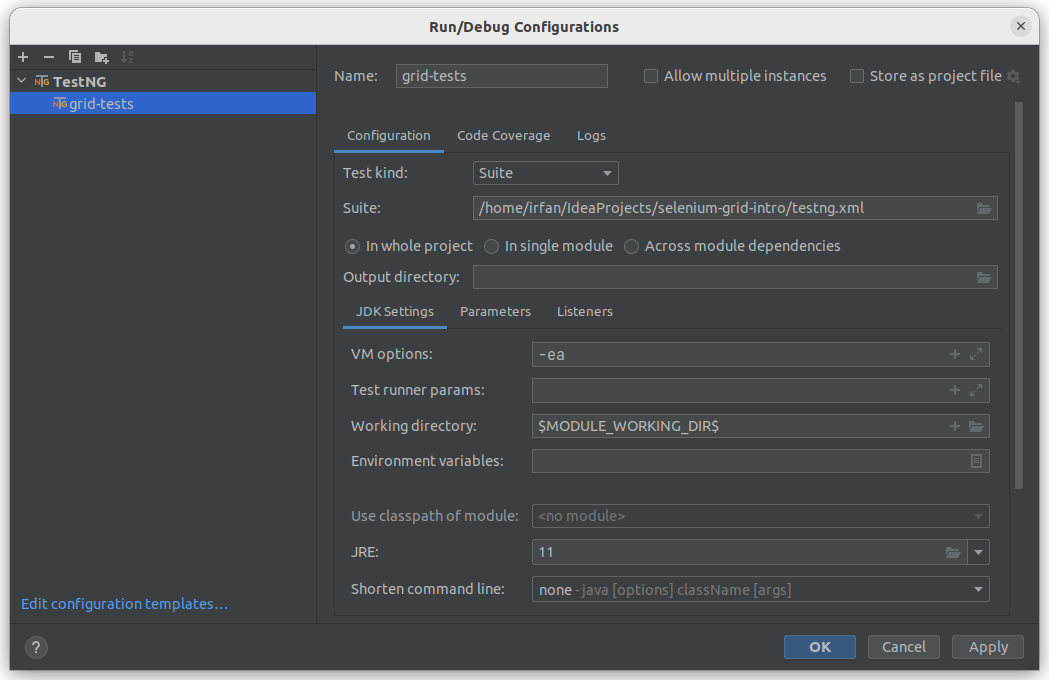
Depending on which IDE we are using, the steps to execute the file may vary. In IntelliJ, in the upper right corner, we can click on the 'Add New Configuration' button. In the opened modal, we will click the + button and select TestNG. For the options, we need to set the following:
To execute the file, we can right-click in the testng.xml file and choose the 'Run testng.xml' option.
We can now see that on one VM, the test is running in Chrome and on the other one on Firefox. If we look at our Grid GUI, we will see something similar to this screenshot:
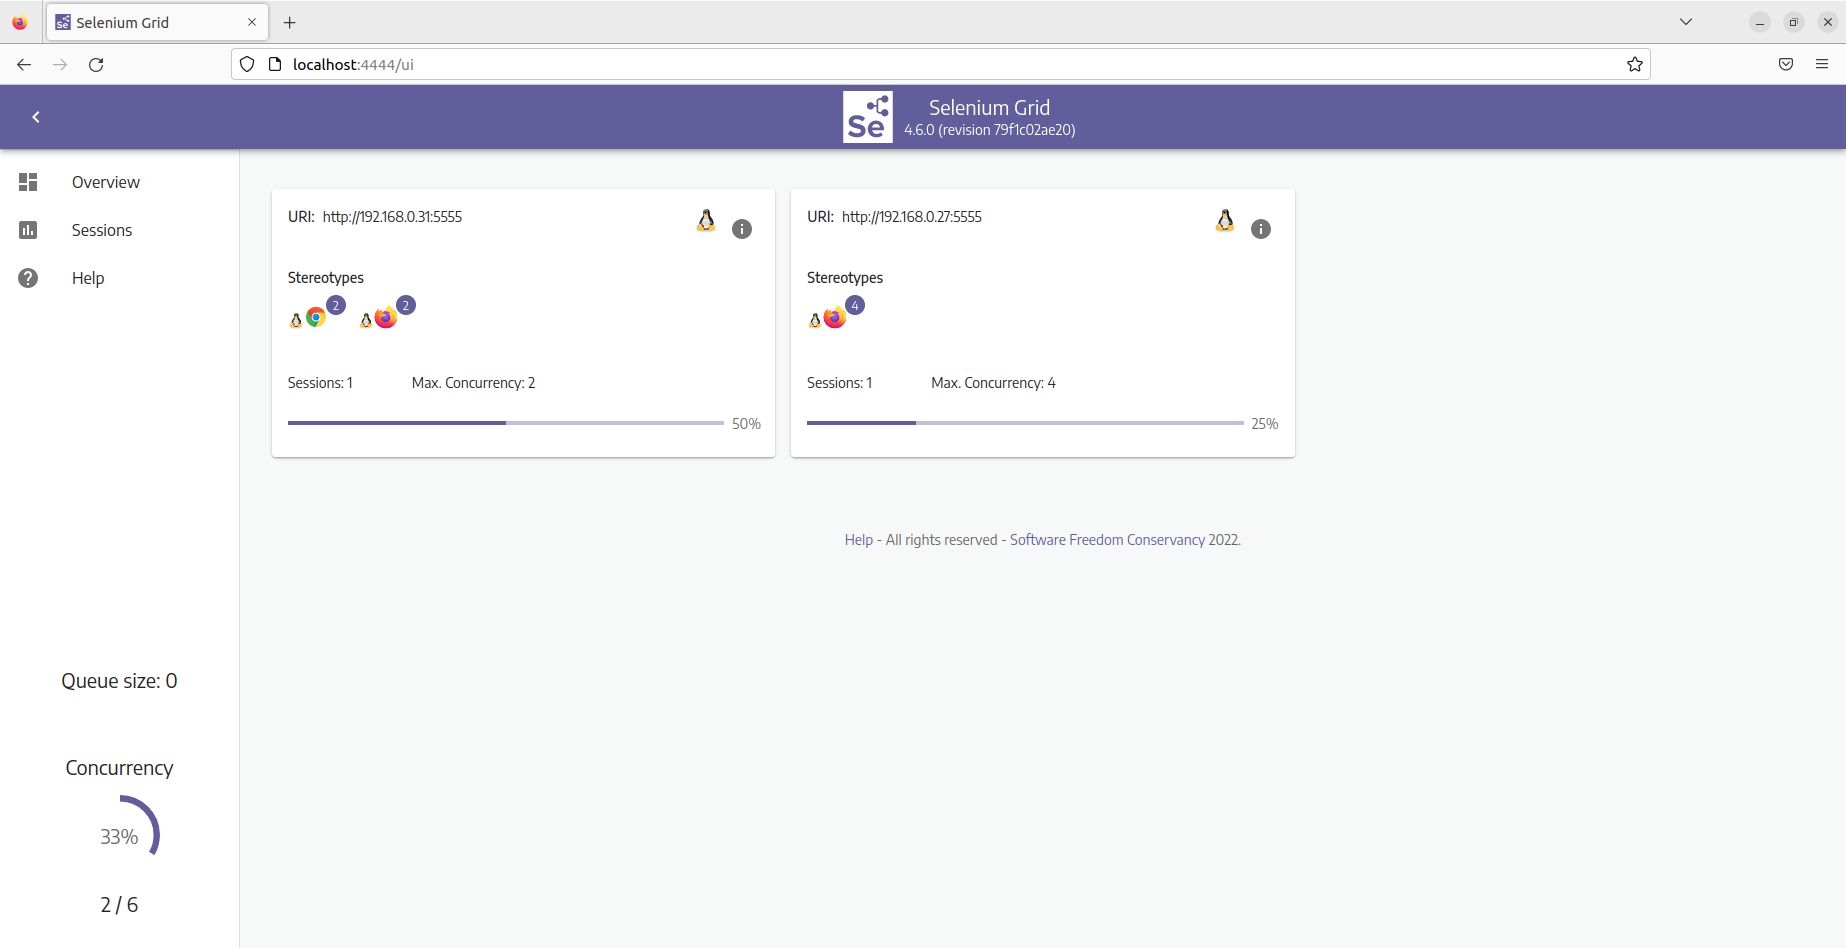
Here we can see that both Nodes are running one session each. The first Node uses 50% of its capacity since it can run 2 tests concurrently (2 CPUs dedicated to the VM). And the second Node is only using 25% since it can execute 4 test cases. In the lower-left corner, we can see the total percentage of the concurrency for our Grid, and we can also see that the queue size is at 0. If we had been running more than 6 test classes via our testng.xml file, the queue size parameter would indicate how many test cases are waiting for their turn to be executed.
When the execution started, the Grid found a Node that could run tests on Chrome and forwarded the request to it. Since both Nodes could run tests against Firefox, the Grid forwarded the second request to the Node without running sessions.
Once the tests finish executing, after a couple of minutes, the Grid GUI will get back into its initial state.
Selenium Grid executes WebDriver scripts on remote machines by routing commands sent by the client to remote browser instances.
It provides an easy way to run tests in parallel, against different browser types, browser versions, and operating systems.
It can drastically reduce the test execution times.
Of course, this was just a short introduction. If you are interested in the files and code used in this article, you can find them here. And if you want to learn more about Selenium Grid, visit the official website. 🙂