Integrating FlaUI Tests into a CI/CD Pipeline with GitHub Actions

In our previous guide, we covered the basics of automating Windows desktop applications with FlaUI. Now it's time to take things a step further by integrating those tests into a CI/CD pipeline so they run automatically on every push or pull request. The catch? Desktop UI automation comes with a unique challenge that web testing doesn't: it needs a real, interactive Windows session to function. In this post, we'll walk through setting up a GitHub Actions workflow that handles exactly that, so your FlaUI tests become a reliable part of your development process rather than something you run manually and hope for the best.
Prerequisites
Before we dive in, there are a few things you'll need to have in place.
First, familiarity with FlaUI basics is assumed. If you're new to FlaUI or need a refresher, check out our beginner's guide before continuing, as this post builds directly on top of those concepts.
Second, you'll need a GitHub repository with a working FlaUI test project already set up. Your tests should be passing locally before attempting to run them in a pipeline. Trying to debug both your tests and your CI configuration at the same time is a recipe for frustration.
Third, a basic understanding of GitHub Actions is helpful. You don't need to be an expert, but knowing what a workflow file is and how jobs and steps work will make the rest of this post much easier to follow. If you're starting from scratch, GitHub's own quickstart guide is a great place to get up to speed.
Finally, make sure the executable of the application you're testing is accessible within your repository or can be fetched during the workflow run. We'll cover how to handle this properly in a later section.
Understanding the Desktop Session Problem
Before we jump into writing our workflow file, it's important to understand why running desktop UI tests in a CI environment is trickier than running, say, a web test with Selenium or Playwright.
FlaUI works by interacting with real UI elements on screen. Clicking buttons, entering text, reading labels - all of these actions require a live, interactive Windows desktop session to be present. This is fine on your local machine, where you're logged in and a desktop is always available. In a CI environment, however, things work differently.
Most CI runners operate in a non-interactive mode, meaning there is no visible desktop session for FlaUI to interact with. When your test tries to launch the application and find a window, it will either fail to open the application entirely or fail to find any UI elements, causing your tests to crash before they even get started.
GitHub Actions offers hosted runners with the windows-latest image, which is a good starting point. These runners do provide a Windows environment, but they run as a background service without a proper interactive desktop session by default. This means some FlaUI tests will work, while others, particularly those involving certain UI interactions or applications that strictly require an interactive session, may still fail unpredictably.
The most reliable solution for production setups is to use a self-hosted runner, which is a machine you control and configure yourself. On a self-hosted runner, you can ensure a proper user session is always active, giving FlaUI exactly the environment it needs. That said, for many projects, GitHub-hosted runners with the right configuration will get the job done, and we'll cover both approaches as we move through this post.
Setting Up the GitHub Actions Workflow File
With a solid understanding of the desktop session challenge, we can now start building our GitHub Actions workflow. The workflow file is a YAML file that tells GitHub Actions what to do and when to do it.
Creating the Workflow File
In the root of your repository, create a new directory called .github/workflows if it doesn't already exist. Inside that directory, create a new file called flaui-tests.yml. This is where our entire pipeline configuration will live.
Your repository structure should look something like this:
your-repo/├── .github/
│ └── workflows/
│ └── flaui-tests.yml
├── YourFlaUITestProject/
└── YourApplicationUnderTest/
Choosing the Right Runner
At the top of our workflow file, we'll define the name of the workflow and specify that we want to run it on a Windows machine. As discussed in the previous section, FlaUI requires a Windows environment, so this is non-negotiable.
name: FlaUI Tests

on:
  push:
    branches: [ main ]
  pull_request:
    branches: [ main ]

jobs:
  test:
    runs-on: windows-latest
The runs-on: windows-latest line is what tells GitHub Actions to use a hosted Windows runner for this job. This gives us a clean Windows environment on every run.
Triggering the Workflow
In the example above, we've configured the workflow to trigger in two scenarios. It will run automatically whenever code is pushed to the main branch, and it will also run whenever a pull request is opened or updated against main. This ensures your FlaUI tests act as a quality gate, catching issues before they make it into your main codebase.
You can also add a scheduled trigger if you want your tests to run on a nightly basis, regardless of any code changes. This is useful for catching flakiness or environment issues over time.
on:
  push:
    branches: [ main ]
  pull_request:
    branches: [ main ]
  schedule:
    - cron: '0 2 * * *'
This cron expression runs the workflow every day at 2:00 AM UTC. Adjust it to whatever schedule suits your team.
Building and Running FlaUI Tests in the Pipeline
With our workflow file set up and our triggers defined, it's time to add the steps that will actually build our project and run our FlaUI tests. All of these steps will be added under the steps key inside our test job.
Setting Up .NET
The first thing we need to do is make sure the correct version of .NET is available on the runner. We can do this using the setup-dotnet action provided by GitHub.
steps:
      - name: Checkout repository
        uses: actions/checkout@v6

      - name: Setup .NET
        uses: actions/setup-dotnet@v5
        with:
          dotnet-version: '8.0.x'
The checkout step pulls your repository code onto the runner, and the setup-dotnet step ensures the right .NET version is installed and ready to use. Make sure the version you specify here matches the version your project targets.
Restoring NuGet Packages
Next, we need to restore our NuGet packages, including the FlaUI libraries we depend on. This is the equivalent of Visual Studio automatically resolving your dependencies when you open a project.
- name: Restore NuGet packages
        run: dotnet restore
This command will scan your solution for any packages.config or .csproj files and download all required dependencies, including FlaUI.Core and whichever UIA library your project uses.
Building the Solution
Once our packages are restored, we can build the solution. We use the --no-restore flag here to skip the restore step since we've already done it, keeping things efficient.
- name: Build solution
        run: dotnet build --configuration Release --no-restore
Building in Release mode is generally recommended for CI pipelines, as it more closely reflects the environment your application will run in when deployed.
Handling the Application Under Test
This is a step that often gets overlooked. Your FlaUI tests need to know where the executable of the application under test is located. On your local machine, this path is likely hardcoded or relative to your project structure. In CI, the directory layout may be slightly different.
A clean way to handle this is to copy the application executable into a predictable location as part of your workflow steps.
- name: Copy application under test
        run: |
          cp ./YourApplicationUnderTest/bin/Release/YourApp.exe ./YourFlaUITestProject/bin/Release/
Adjust the paths to match your actual project structure. Alternatively, you can use an environment variable in your test code to make the application path configurable, which is a cleaner long-term solution.
string appPath = Environment.GetEnvironmentVariable("APP_PATH")
    ?? "default/local/path/to/YourApp.exe";
application = Application.Launch(appPath);
You can then set the APP_PATH variable in your workflow file like this:
- name: Run FlaUI tests
        env:
          APP_PATH: ./YourApplicationUnderTest/bin/Release/YourApp.exe
        run: dotnet test --configuration Release --no-build --verbosity normal
Running the Tests
The dotnet test command handles test discovery and execution. The --no-build flag skips rebuilding since we already did that, and --verbosity normal gives us a reasonable amount of output to understand what is happening during the run without being overwhelmed by noise.
Your complete workflow file at this point should look like this:
name: FlaUI Tests

on:
  push:
    branches: [ main ]
  pull_request:
    branches: [ main ]

jobs:
  test:
    runs-on: windows-latest

    steps:
      - name: Checkout repository
        uses: actions/checkout@v6

      - name: Setup .NET
        uses: actions/setup-dotnet@v5
        with:
          dotnet-version: '8.0.x'

      - name: Restore NuGet packages
        run: dotnet restore

      - name: Build solution
        run: dotnet build --configuration Release --no-restore

      - name: Copy application under test
        run: |
          cp ./YourApplicationUnderTest/bin/Release/YourApp.exe ./YourFlaUITestProject/bin/Release/

      - name: Run FlaUI tests
        env:
          APP_PATH: ./YourApplicationUnderTest/bin/Release/YourApp.exe
        run: dotnet test --configuration Release --no-build --verbosity normal
With this in place, GitHub Actions will build your project and execute your FlaUI tests on every push or pull request. Next, we'll tackle the interactive session challenge and make sure our tests have the environment they need to run reliably.
Dealing with the Interactive Session Challenge
As we touched on earlier, FlaUI tests require an interactive Windows desktop session to function correctly. This section covers the practical approaches to dealing with this challenge, both on GitHub-hosted runners and self-hosted runners.
Approach 1: GitHub-Hosted Runners
GitHub-hosted Windows runners run as a service under a system account, which means they don't have an interactive desktop session by default. However, there is a workaround that enables UI interaction on these runners by configuring the workflow to run tests within an interactive session.
The key is to enable the interactive services detection mechanism. You can do this by adding the following step to your workflow file before your test execution step:
- name: Enable interactive session
        run: |
          Set-ItemProperty -Path "HKLM:\SYSTEM\CurrentControlSet\Control\Windows" `
            -Name "NoInteractiveServices" -Value 0
          Set-Service -Name "UI0Detect" -StartupType Manual
          Start-Service -Name "UI0Detect"
        shell: powershell
This PowerShell script modifies a registry key to allow interactive services and starts the UI0Detect service, which is responsible for detecting and managing interactive service sessions on Windows. While this approach works for many scenarios, it is not a guaranteed solution for all applications. Some applications are particularly strict about requiring a fully interactive user session, and this workaround may not be sufficient for those cases.
Another helpful addition for GitHub-hosted runners is to disable any screen saver or lock screen behavior that might interrupt your tests mid-run.
- name: Disable screen saver and lock screen
        run: |
          Set-ItemProperty -Path "HKCU:\Control Panel\Desktop" -Name "ScreenSaveActive" -Value 0
          powercfg /change standby-timeout-ac 0
          powercfg /change monitor-timeout-ac 0
        shell: powershell
This ensures the runner's display stays active throughout the test run, reducing the chance of intermittent failures caused by the screen locking or the display turning off.
Approach 2: Self-Hosted Runners
For teams that need a fully reliable and consistent environment for their FlaUI tests, a self-hosted runner is the recommended approach. A self-hosted runner is a machine you own and manage, registered with GitHub Actions to execute your workflows.
The key advantage of a self-hosted runner is that you have full control over the session configuration. By setting up the machine with an always-active user session, FlaUI gets exactly the environment it needs every time.
To register a self-hosted runner, navigate to your GitHub repository, go to Settings, then Actions, and then Runners. Click "New self-hosted runner" and follow the instructions provided for your operating system.
Once your runner is registered, there are a couple of important configuration steps to ensure a persistent interactive session.
First, configure the runner to run as a user account rather than a system service. During the runner setup, when prompted, opt to run the runner as a regular user account that is always logged in. This ensures an interactive desktop session is always present.
Second, enable auto-logon on the machine so that if it restarts, it automatically logs back in and restores the session without requiring manual intervention.
# Run this on your self-hosted runner machine as an administrator
Set-ItemProperty -Path "HKLM:\SOFTWARE\Microsoft\Windows NT\CurrentVersion\Winlogon" `
  -Name "AutoAdminLogon" -Value "1"
Set-ItemProperty -Path "HKLM:\SOFTWARE\Microsoft\Windows NT\CurrentVersion\Winlogon" `
  -Name "DefaultUserName" -Value "your-username"
Set-ItemProperty -Path "HKLM:\SOFTWARE\Microsoft\Windows NT\CurrentVersion\Winlogon" `
  -Name "DefaultPassword" -Value "your-password"
Replace your-username and your-password with the credentials of the user account you want to use. Keep in mind that storing a password in the registry carries security implications, so make sure this machine is appropriately secured and not publicly accessible.
To use your self-hosted runner in the workflow file, simply update the runs-on field:
jobs:
  test:
    runs-on: self-hosted
You can also add labels to your runner during setup and reference those labels in your workflow to target a specific machine if you have multiple self-hosted runners registered.
jobs:
  test:
    runs-on: [self-hosted, windows, flaui]
Which Approach Should You Choose?
For small projects or teams just getting started with CI for their FlaUI tests, the GitHub-hosted runner with the interactive session workaround is a perfectly reasonable starting point. It requires no additional infrastructure and is quick to set up.
For teams with more demanding test suites, applications that are strict about session requirements, or those who need consistent and reproducible results over time, investing in a self-hosted runner is well worth the effort. The added control it provides pays dividends in test reliability and reduced pipeline headaches down the road.
Viewing Test Results in GitHub Actions
Running tests in CI is only half the battle. Being able to clearly see what passed, what failed, and why is equally important. GitHub Actions provides several ways to surface test results and diagnostic information directly in the pipeline, making it easier to act on failures quickly.
Publishing Test Results
By default, dotnet test will print test results to the console log, which is readable but not particularly easy to scan through, especially as your test suite grows. A much better approach is to output results in a structured format and use a GitHub Actions reporter to display them in a dedicated summary view.
First, we need to configure dotnet test to output results in the TRX format, which is the standard test result format for .NET projects.
- name: Run FlaUI tests
        env:
          APP_PATH: ./YourApplicationUnderTest/bin/Release/YourApp.exe
        run: dotnet test --configuration Release --no-build --verbosity normal --logger "trx;LogFileName=test-results.trx" --results-directory ./TestResults
The --logger flag tells the test runner to write results to a .trx file, and --results-directory specifies where that file should be saved.
Next, we can use the dorny/test-reporter action to parse that TRX file and display the results as a nicely formatted report directly in the GitHub Actions summary page.
- name: Publish test results
        uses: dorny/test-reporter@v3
        if: always()
        with:
          name: FlaUI Test Results
          path: ./TestResults/*.trx
          reporter: dotnet-trx
The if: always() condition here is important. It ensures this step runs regardless of whether the previous test step passed or failed. Without it, a test failure would cause the workflow to skip the reporting step, which is precisely when you need the report the most.
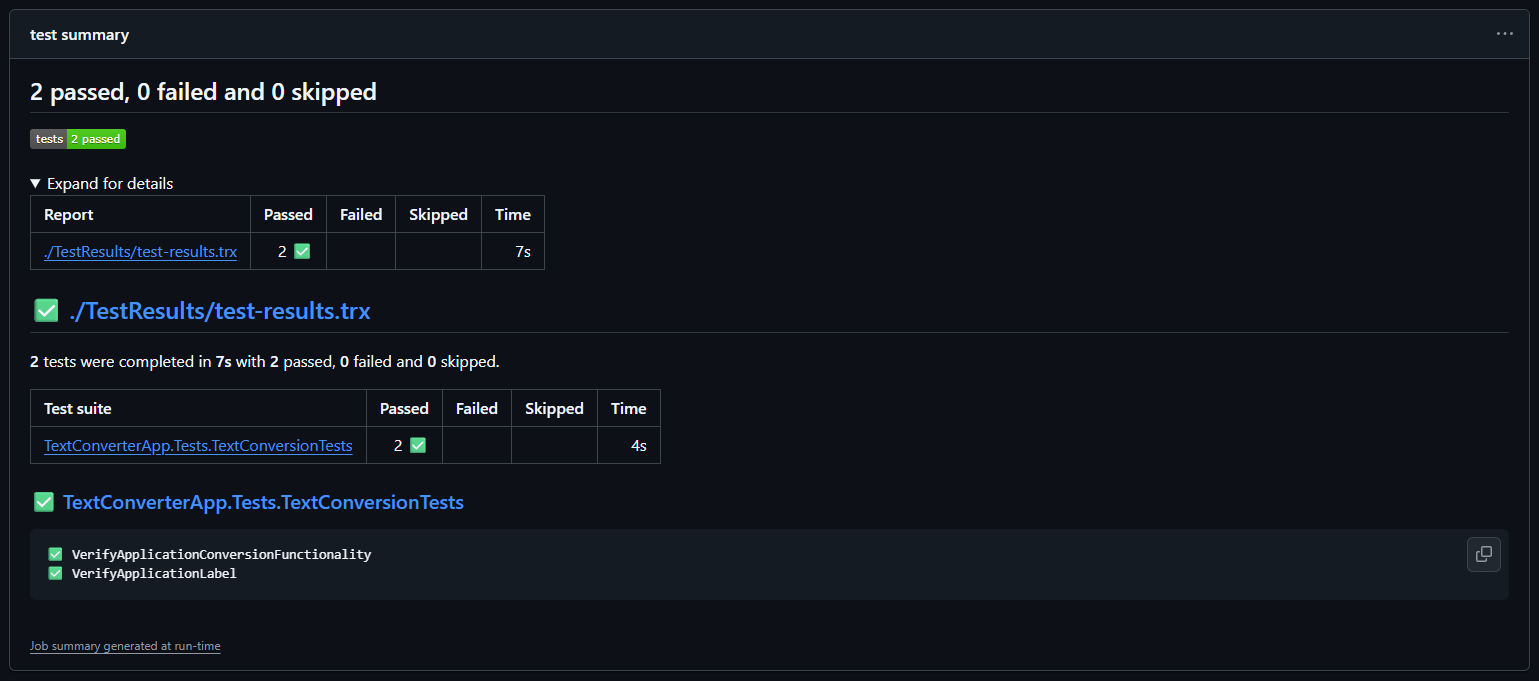
Test Summary Example
Once this is in place, you'll see a dedicated test results tab appear on your workflow run page in GitHub, showing a breakdown of every test, its status, and its execution time.
Uploading Artifacts on Failure
Test results alone sometimes aren't enough to diagnose a failing test. For FlaUI tests in particular, it can be very helpful to capture a screenshot of the desktop at the point of failure, giving you a visual snapshot of exactly what went wrong.
You can capture a screenshot within your FlaUI test code using the following approach:
[TestCleanup]
public void Cleanup() {
    if (TestContext.CurrentTestOutcome != UnitTestOutcome.Passed) {
        var screenshotPath = $"./TestResults/{TestContext.TestName}_failure.png";
        FlaUI.Core.Capturing.Capture.Screen().ToFile(screenshotPath);
    }
    application.Close();
}
This code captures a screenshot of the screen and saves it to the TestResults directory whenever a test fails. The file is named after the test that failed, making it easy to match screenshots to specific test cases.
Once your tests are writing screenshots on failure, you can upload them as artifacts in your workflow so they are accessible directly from the GitHub Actions run page.
- name: Upload test artifacts
        uses: actions/upload-artifact@v7
        if: failure()
        with:
          name: test-failure-artifacts
          path: |
            ./TestResults/*.trx
            ./TestResults/*.png
          retention-days: 7
The if: failure() condition ensures this step only runs when something has gone wrong, keeping your successful runs clean and artifact-free. The retention-days field controls how long GitHub stores the uploaded files before automatically deleting them. Seven days is a sensible default, but adjust it based on your team's needs.
Reading the Actions Summary Dashboard
With test reporting and artifact uploads in place, your GitHub Actions summary page becomes a powerful diagnostic tool. After each workflow run you will be able to see a clear pass or fail status for the entire job, a detailed breakdown of individual test results including names and durations, downloadable artifacts containing screenshots and TRX files for any failures, and a log of every step in the workflow with timestamps and output.
To access this information, navigate to your repository on GitHub, click on the Actions tab, select the workflow run you're interested in, and explore the summary and individual job logs from there.
With solid test reporting in place, let's look at some of the most common pitfalls teams run into when running FlaUI tests in CI and how to avoid them.
Common Pitfalls and How to Avoid Them
Even with a well-configured pipeline, FlaUI tests in CI have a reputation for being tricky. Here are the most common issues teams run into and practical ways to address each one.
Hardcoded File Paths
This is one of the most frequent causes of tests passing locally but failing in CI. A path like C:\Users\john\Projects\MyApp\MyApp.exe is obviously not going to exist on a GitHub Actions runner. Even relative paths can cause problems if the working directory differs between your local machine and the runner.
The cleanest solution is to make your application path configurable through an environment variable, as we covered in an earlier section. Beyond the application path, watch out for hardcoded paths in other places too, such as test data files, configuration files, or log output directories.
// Avoid this
application = Application.Launch(@"C:\Users\john\Projects\MyApp\MyApp.exe");

// Prefer this
string appPath = Environment.GetEnvironmentVariable("APP_PATH")
    ?? Path.Combine(AppDomain.CurrentDomain.BaseDirectory, "MyApp.exe");
application = Application.Launch(appPath);
Using AppDomain.CurrentDomain.BaseDirectory as a fallback is a good practice as it resolves to the directory where your test assembly is located, which tends to be consistent across environments.
Race Conditions and Timing Issues
FlaUI tests are particularly susceptible to timing issues. An element that appears instantly on your fast local machine might take a moment longer to appear on a CI runner, especially during peak usage periods when shared runners are under load. Tests that rely on implicit timing assumptions will fail intermittently, which is one of the most frustrating problems to diagnose.
The solution is to use explicit waits rather than relying on the UI to be ready at a specific moment. FlaUI provides a Retry utility that repeatedly attempts an operation until it succeeds or a timeout is reached.
// Avoid this
Button convertButton = mainWindow.FindFirstDescendant(cf.ByAutomationId("convertButton")).AsButton();

// Prefer this
Button convertButton = Retry.WhileNull(
    () => mainWindow.FindFirstDescendant(cf.ByAutomationId("convertButton"))?.AsButton(),
    timeout: TimeSpan.FromSeconds(10),
    interval: TimeSpan.FromMilliseconds(500)
).Result;

Assert.IsNotNull(convertButton, "Convert button was not found within the timeout period.");
This approach keeps retrying every 500 milliseconds for up to 10 seconds before giving up, giving the UI enough time to settle regardless of the environment it's running in. Applying this pattern consistently across your test suite will dramatically reduce flakiness in CI.
UAC Dialogs Blocking Automation
User Account Control dialogs are a common stumbling block for desktop automation in CI. If the application under test triggers a UAC prompt when launching or performing certain actions, FlaUI will be unable to interact with it, as UAC dialogs run in a separate, elevated session that is isolated from the automation layer.
The most straightforward way to handle this in a CI context is to disable UAC on your self-hosted runner. This is generally acceptable for a dedicated test machine that is not used for anything else.
# Run this on your self-hosted runner machine as an administrator
Set-ItemProperty -Path "HKLM:\SOFTWARE\Microsoft\Windows\CurrentVersion\Policies\System" `
  -Name "EnableLUA" -Value 0
A reboot is required for this change to take effect. For GitHub-hosted runners, you can add this as a step in your workflow file, as the runner is a fresh environment on every run.
- name: Disable UAC
        run: |
          Set-ItemProperty -Path "HKLM:\SOFTWARE\Microsoft\Windows\CurrentVersion\Policies\System" `
            -Name "EnableLUA" -Value 0
        shell: powershell
If disabling UAC is not an option, consider signing your application with a trusted certificate and configuring it to run without requiring elevation, which is a cleaner long-term solution.
Tests Passing Locally but Failing in CI
Beyond the issues already covered, there are a few other reasons tests might behave differently in CI than on your local machine.
Screen resolution differences can cause elements to be positioned or sized differently than expected, particularly if your tests rely on coordinates rather than automation IDs. GitHub-hosted runners typically use a lower screen resolution than a developer workstation. You can set a specific resolution in your workflow to make the environment more predictable.
- name: Set screen resolution
        run: |
          Set-DisplayResolution -Width 1920 -Height 1080 -Force
        shell: powershell
Missing fonts or visual themes can also affect how certain UI elements render, which may impact element detection in some edge cases. Where possible, target elements by their automation ID rather than by visual properties, as automation IDs are much more stable across environments.
Finally, regional and locale settings can sometimes cause unexpected behavior if your application displays or processes dates, numbers, or currency. Make sure the runner locale matches what your application expects, or write your tests to be locale-agnostic where possible.
- name: Set locale
        run: |
          Set-WinSystemLocale -SystemLocale en-US
          Set-WinUILanguageOverride -Language en-US
        shell: powershell
Addressing these pitfalls proactively will save your team a significant amount of time and keep your pipeline running smoothly and reliably.
Conclusion
Integrating FlaUI tests into a CI/CD pipeline with GitHub Actions is not without its challenges, but as we've seen throughout this post, each challenge has a practical solution. By setting up a well-configured workflow file, addressing the interactive session requirement, surfacing test results clearly, and proactively handling common pitfalls, you now have everything you need to make FlaUI a reliable part of your automated development process.
The real payoff of this setup is confidence. Every push and pull request is now backed by an automated check that verifies your Windows desktop application behaves as expected, catching regressions early and reducing the burden of manual testing over time. From here, natural next steps include adding team notifications for failed runs, scheduling nightly test executions, parallelizing your test suite as it grows, and exploring the Page Object Model pattern for better test maintainability. The code examples from this post will be available on our GitHub page for reference. Happy automating!