Elevating Audio Quality Through Practical Automation
Tired of manually testing audio in your software? Join us on a journey to automate audio quality with PyDub! In today's user-centric testing landscape, flawless audio is crucial. As apps integrate complex sounds, ensuring clarity, minimizing distortion, and achieving balanced frequency response is vital. PyDub is your Python ally, offering techniques to automate these tests and elevate your software's auditory experience. Let's dive in and unleash the power of PyDub!
Setting the Stage with PyDub
Before diving into the automation journey, it's crucial to lay a solid foundation by gaining a concise understanding of PyDub. This section serves as a brief yet comprehensive overview of PyDub, shedding light on its capabilities and showcasing how it can be effectively leveraged for audio quality testing.
Capabilities at a Glance
PyDub stands as a versatile audio processing library in Python, equipped with a rich set of features that make it a valuable asset for developers and testers alike. From basic audio manipulations to advanced processing tasks, PyDub simplifies complex operations, making it an ideal tool for a wide range of applications.
Seamless Audio File Manipulation:
PyDub excels in the seamless manipulation of audio files. Whether it's extracting specific segments, merging multiple files, or applying modifications, PyDub streamlines the process with intuitive functionalities.
Effortless Format Conversion:
One of PyDub's strengths lies in its ability to effortlessly convert audio formats. This capability ensures compatibility across various file types, facilitating interoperability and making it adaptable to diverse testing scenarios.
Versatile Audio Operations:
PyDub shines in its versatility when handling diverse audio operations. Tasks like slicing audio clips, concatenating multiple segments, and making precise volume adjustments are executed with ease. This versatility equips testers with the tools needed to simulate a broad range of real-world audio scenarios.
Robust Automation for Quality Assessment:
PyDub's proficiency extends to the automation of tasks essential for audio quality assessment. Whether evaluating clarity, distortion, or frequency response, PyDub's capabilities play a pivotal role in constructing comprehensive automated tests.
PyDub's Role in Automation
Understanding the pivotal role that PyDub plays in the automation of audio quality testing is essential for harnessing its full potential. In this section, we'll explore how PyDub seamlessly integrates into automated testing workflows, offering valuable capabilities to streamline the assessment of audio fidelity.
Integration with Automated Testing Workflows:
PyDub is designed to effortlessly integrate into existing automated testing frameworks. Whether you're using popular tools like Selenium, Appium, or custom testing scripts, PyDub provides the flexibility to become an integral part of your automated testing ecosystem.
Streamlining Audio Quality Assessment:
This section sheds light on PyDub's specific features tailored for automating audio quality assessment. From initiating audio playback simulations to capturing and analyzing output, PyDub simplifies the process, enabling testers to focus on creating robust and efficient test scenarios.
Practical Applications in Automated Testing:
Readers will gain insights into the practical applications of PyDub within automated testing. Examples include automating the validation of audio clarity in response to user interactions, ensuring distortion-free playback under various conditions, and dynamically adjusting volume levels for comprehensive quality assessment.
Efficient Handling of Audio Scenarios:
PyDub's role in automation extends to efficiently handling diverse audio scenarios. Whether it's synchronizing audio with visual elements, validating the timing of audio cues, or simulating real-world conditions, PyDub equips testers to tackle a wide array of audio-related testing challenges.
Analyzing Clarity in Audio
Clarity stands as a pivotal aspect of audio quality, directly impacting how well audio can be perceived and understood by users. In this section, we embark on a journey to explore methodologies for automating the testing of clarity using PyDub. From establishing clarity metrics to the practical implementation of automated tests, we will gain valuable insights into ensuring crystal-clear audio output in our applications.
Defining Clarity Metrics
To effectively automate clarity testing, establishing precise and measurable metrics is paramount. This section encompasses a holistic approach to defining clarity metrics tailored to the specific requirements of our application.
Application-specific Requirements:
We begin by gaining a clear understanding of our application's unique audio quality goals. Whether clarity is defined by the absence of distortion, the accuracy of frequency response, or fidelity in audio reproduction, aligning metrics with application-specific nuances is fundamental.
Selection of Clarity Indicators:
We choose clarity indicators that encapsulate the identified requirements. Whether focusing on signal-to-noise ratio, frequency response analysis, or other key indicators, we select metrics that align with our testing objectives.
Measurable Criteria for Automated Testing:
At this stage, we translate chosen indicators into quantifiable criteria for automated testing. We define acceptable thresholds or measurable ranges that will be incorporated into automated test scripts, ensuring a systematic assessment of clarity metrics during testing.
Consideration of User Experience Factors:
In defining clarity metrics, we should consider broader user experience factors. Assess how clarity impacts the overall audio experience for end-users, integrating user-centric perspectives into the clarity metrics to align automated tests to deliver an exceptional auditory experience.
Automating Clarity Assessmen
PyDub, equipped with a powerful set of tools, provides an efficient avenue for automating clarity assessment. This subsection delves into practical applications, guiding us on how to leverage PyDub with illustrative code examples to simulate real-world scenarios where clarity is paramount.
Simulating Real-world Scenarios:
Achieving clarity in diverse situations is crucial for comprehensive testing. PyDub facilitates the creation of scenarios that closely mimic real-world conditions. The following code snippet demonstrates how to simulate a scenario with background noise:
from pydub import AudioSegment
from pydub.generators import WhiteNoise

# Load audio clip
audio_clip = AudioSegment.from_file("resources/the_last_piano.wav", format="wav")

# Simulate background noise
background_noise = WhiteNoise().to_audio_segment(duration=len(audio_clip))
audio_with_noise = audio_clip.overlay(background_noise)

# Continue with clarity assessment on audio_with_noise
Scripting Clarity-focused Test Scenarios:
Well-defined test scenarios are crucial for effective automation. The following code example illustrates how to script a clarity-focused test using PyDub. In this case, we adjust the volume levels during playback:
from pydub import AudioSegment

# Load audio clip
audio_clip = AudioSegment.from_file("resources/the_last_piano.wav", format="wav")

# Adjust volume levels for clarity assessment
adjusted_volume = audio_clip + 10  # Increase volume by 10 dB

# Continue with clarity assessment on adjusted_volume
Utilizing PyDub's Audio Manipulation Features:
PyDub's rich audio manipulation features play a pivotal role in automating clarity assessment. The code snippet below showcases how to utilize PyDub functions for basic equalization:
from pydub import AudioSegment

# Load audio clip
audio_clip = AudioSegment.from_file("resources/the_last_piano.wav", format="wav")

# Apply band-pass filters for basic equalization:
equalized_audio = audio_clip.low_pass_filter(2000).high_pass_filter(400)

# Continue with clarity assessment on equalized_audio
Automation Workflow Integration:
Seamless integration into existing workflows is key. The code example below demonstrates integrating PyDub into a testing script for clarity assessment:
from pydub import AudioSegment

# Load audio clip
audio_clip = AudioSegment.from_file("path/to/audio_clip.wav", format="wav")

# Define clarity assessment functions
def assess_clarity(audio):
    #Perform clarity assessment tasks

# Integrate into automation workflow
assess_clarity(audio_clip)
Validation Techniques
Validation is a pivotal step in the automation of clarity testing, ensuring the accuracy and reliability of results. This subsection provides practical insights into validation techniques with illustrative code examples.
Comparing Expected and Actual Clarity Values:
One fundamental validation technique involves comparing expected and actual clarity values. The code snippet below demonstrates how to perform this comparison using PyDub:
from pydub import AudioSegment

# Load expected and actual audio clips
expected_audio = AudioSegment.from_file("path/to/expected_audio.wav", format="wav")
actual_audio = AudioSegment.from_file("path/to/actual_audio.wav", format="wav")

# Compare clarity values
expected_clarity = calculate_clarity_metrics(expected_audio)
actual_clarity = calculate_clarity_metrics(actual_audio)

# Validate by comparing expected and actual clarity using assertions
assert expected_clarity == actual_clarity, "Clarity validation failed. Discrepancy detected."
Identifying Discrepancies in Clarity:
Detecting discrepancies is crucial for maintaining the precision of clarity assessments. The following code example showcases how PyDub can be used to identify discrepancies in clarity values:
from pydub import AudioSegment

# Load audio clips for comparison
audio_clip_1 = AudioSegment.from_file("path/to/audio_clip_1.wav", format="wav")
audio_clip_2 = AudioSegment.from_file("path/to/audio_clip_2.wav", format="wav")

# Calculate clarity metrics for comparison
clarity_1 = calculate_clarity_metrics(audio_clip_1)
clarity_2 = calculate_clarity_metrics(audio_clip_2)

# Identify discrepancies using assertions
discrepancy_threshold = 0.05  # Adjust threshold based on testing requirements
assert abs(clarity_1 - clarity_2) <= discrepancy_threshold, "Clarity discrepancy detected between audio_clip_1 and audio_clip_2"
Implementing Validation Checks:
Validation checks play a crucial role in ensuring that audio clarity meets the desired standards. The code snippet below demonstrates how to implement validation checks using PyDub:
from pydub import AudioSegment

# Load audio clip for clarity assessment
audio_clip = AudioSegment.from_file("path/to/audio_clip.wav", format="wav")

# Define clarity threshold for validation
clarity_threshold = 0.9  # Adjust threshold based on testing requirements

# Validate clarity against the defined threshold using assertions
assert calculate_clarity_metrics(audio_clip) >= clarity_threshold, "Audio clarity falls below the desired threshold."
Real-world Scenarios
Understanding clarity in isolation is valuable, but real-world scenarios often introduce complexity to audio environments. This subsection explores practical applications with code examples, showcasing how PyDub can be utilized to automate clarity testing in diverse scenarios.
Assessing Clarity in Noisy Environments:
In real-world scenarios, audio clarity may be challenged by background noise. PyDub provides tools to simulate and assess clarity in such environments. The code snippet below demonstrates how to add background noise to an audio clip for clarity testing:
from pydub import AudioSegment
from pydub.generators import WhiteNoise

# Load audio clip for clarity assessment
audio_clip = AudioSegment.from_file("resources/the_last_piano.wav", format="wav")

# Simulate noisy environment by overlaying white noise
noisy_audio = audio_clip.overlay(WhiteNoise().to_audio_segment(duration=len(audio_clip)))

# Continue with clarity assessment on noisy_audio
Evaluating Clarity in Varying Acoustics:
While different real-world acoustics can impact perceived audio clarity, PyDub itself cannot directly measure this quality. However, it allows developers to create audio variations that enable subjective human evaluation of clarity under simulated conditions. This example code demonstrates adjusting the volume level of an audio clip to create variations for clarity assessment:
from pydub import AudioSegment

# Load audio clip
audio_clip = AudioSegment.from_file("resources/the_last_piano.wav", format="wav")

# Adjust volume by -14 dB (approximately 80% reduction)
low_volume = audio_clip - 14  # Use dBFS method for volume adjustment

# Continue with clarity assessment on low_volume
Replicating Clarity Across Different Playback Devices:
Audio clarity may differ across various playback devices. PyDub facilitates the replication of different playback scenarios for clarity testing. The code snippet below demonstrates converting an audio clip to a specific format for device-specific testing:
from pydub import AudioSegment

# Load audio clip for clarity assessment
audio_clip = AudioSegment.from_file("resources/the_last_piano.wav", format="wav")

# Convert audio clip to a different format for playback device testing
converted_audio = audio_clip.export("resources/the_last_piano.mp3", format="mp3")

# Continue with clarity assessment on converted_audio
Tackling Distortion in Audio Playback
Distortion can significantly impact the user experience, making it imperative to automate its testing. In this section, we explore techniques using PyDub to detect and validate distortion in audio playback. With practical code examples, we delve into understanding distortion signatures and crafting automated tests, providing us with the tools needed to ensure distortion-free audio in our applications.
Understanding Distortion Signatures
Before diving into the automation of distortion testing, it's crucial to gain a comprehensive understanding of the distinctive signatures of distortion. This subsection provides insights into identifying and analyzing different types of distortion signatures, accompanied by practical code examples using PyDub.
Analyzing Harmonic Distortion:
Harmonic distortion is a common type of distortion that introduces additional harmonics to the original audio signal. PyDub's features allow for the analysis and visualization of harmonic distortion. The following code snippet illustrates how to emphasize and analyze harmonic distortion in an audio clip:
from pydub import AudioSegment

# Load audio clip for distortion analysis
audio_clip = AudioSegment.from_file("resources/dramatic_piano.wav", format="wav")

# Apply gain adjustment to emphasize distortion (adjust gain_db based on your needs)
gain_db = 6

# Ensure the gain_db doesn't exceed the maximum amplitude
max_amplitude = audio_clip.max_dBFS
gain_db = min(gain_db, max_amplitude)  # Limit gain to prevent clipping

distorted_audio = audio_clip + gain_db  # Apply gain adjustment

# Continue with distortion analysis on distorted_audio
The code amplifies the audio clip to a controlled degree to make potential distortion more noticeable for analysis.
Visualizing Clipping Distortion:
Clipping distortion occurs when the audio signal exceeds the maximum possible amplitude, resulting in the "clipping" of the waveform. PyDub provides tools to visualize and detect clipping distortion. The code snippet below demonstrates visualizing clipping distortion in an audio clip:
from pydub import AudioSegment
import matplotlib.pyplot as plt

# Load audio clip for distortion analysis
audio_clip = AudioSegment.from_file("resources/dramatic_piano.wav", format="wav")

# Extract and plot the audio waveform
samples = audio_clip.get_array_of_samples()
plt.plot(samples)
plt.title("Audio Waveform")
plt.xlabel("Sample Index")
plt.ylabel("Amplitude")
plt.show()
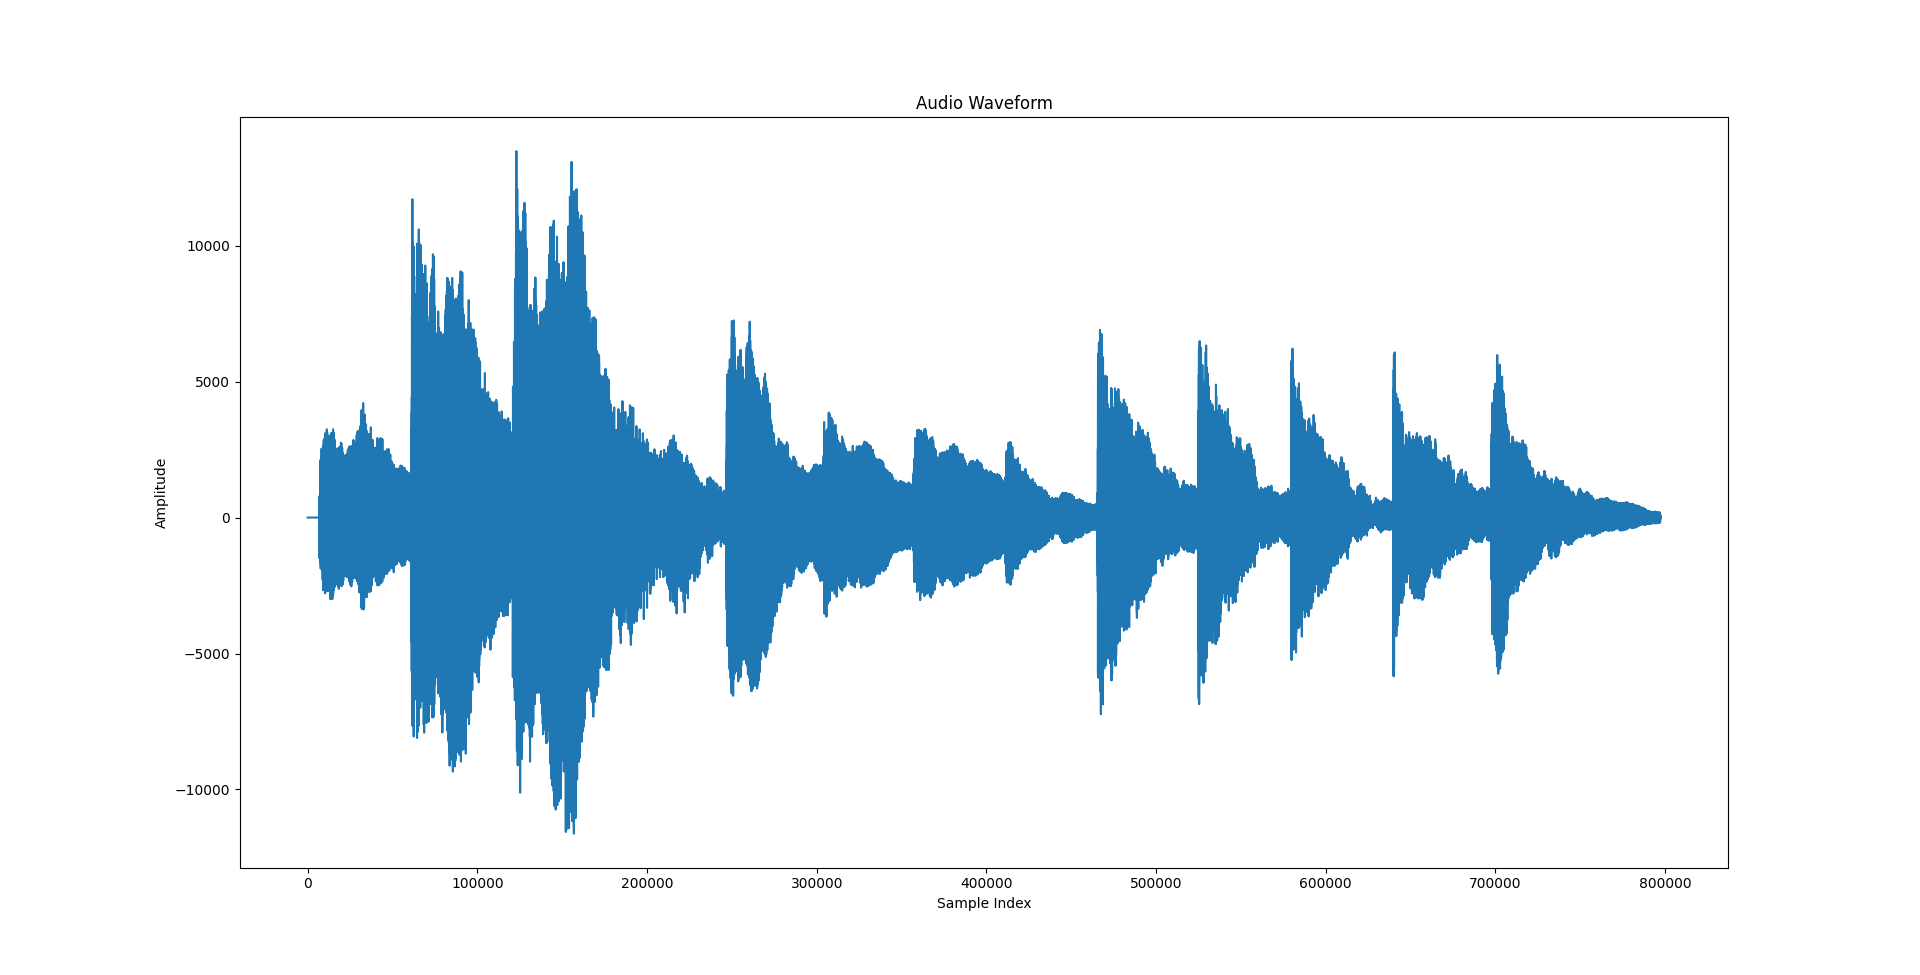
This code generates a plot of the audio waveform, allowing testers to visually inspect for any clipping distortion by identifying instances where the waveform exceeds the maximum amplitude.
Understanding these distortion signatures provides a foundation for crafting automated tests and validation techniques in the subsequent sections, ensuring a comprehensive approach to distortion testing using PyDub.
Automating Distortion Detection:
PyDub empowers us to automate distortion detection with its versatile functionalities. This subsection guides crafting automated tests to identify distortion. The following code example demonstrates comparing distortion metrics between an original and distorted audio clip:
from pydub import AudioSegment

# Load original and distorted audio clips
original_audio = AudioSegment.from_file("path/to/original_audio.wav", format="wav")
distorted_audio = AudioSegment.from_file("path/to/distorted_audio.wav", format="wav")

# Calculate distortion metrics for comparison
distortion_original = calculate_distortion_metrics(original_audio)
distortion_distorted = calculate_distortion_metrics(distorted_audio)

# Validate by comparing distortion metrics
assert distortion_original != distortion_distorted, "Distortion detection successful"
In this example, two audio clips, an original and a distorted version, are loaded using PyDub. Distortion metrics are then calculated for each clip using a hypothetical function calculate_distortion_metrics(). The assertion checks if the distortion metrics are not equal, indicating a difference between the original and distorted audio. This approach allows for automated detection of distortion, providing a foundation for further analysis or corrective actions in the testing process.
Validation Techniques for Distortion
Validation is crucial in distortion testing automation to ensure the accuracy of distortion metrics. The following snippet demonstrates using assertions to validate distortion against a defined threshold:
from pydub import AudioSegment

# Load audio clip for distortion assessment
audio_clip = AudioSegment.from_file("path/to/audio_clip.wav", format="wav")

# Define distortion threshold for validation
distortion_threshold = 5.0  # Adjust threshold based on testing requirements

# Validate distortion against the defined threshold using assertions
assert calculate_distortion_metrics(audio_clip) <= distortion_threshold, "Distortion falls within acceptable limits"
In this example, the distortion of the loaded audio clip is calculated using the calculate_distortion_metrics function. The distortion is then compared against a predefined distortion threshold (distortion_threshold). The assert statement checks whether the calculated distortion is within acceptable limits. If the distortion exceeds the threshold, the assertion will raise an AssertionError with the specified error message, indicating that the distortion is beyond the acceptable range. Adjust the threshold value based on your specific testing requirements and quality standards.
Navigating the Frequency Response Landscape
Frequency response is a crucial element in audio quality, influencing the range of audible frequencies. In this section, we leverage PyDub to automate the testing of frequency response, ensuring that applications deliver a well-balanced audio experience across the spectrum.
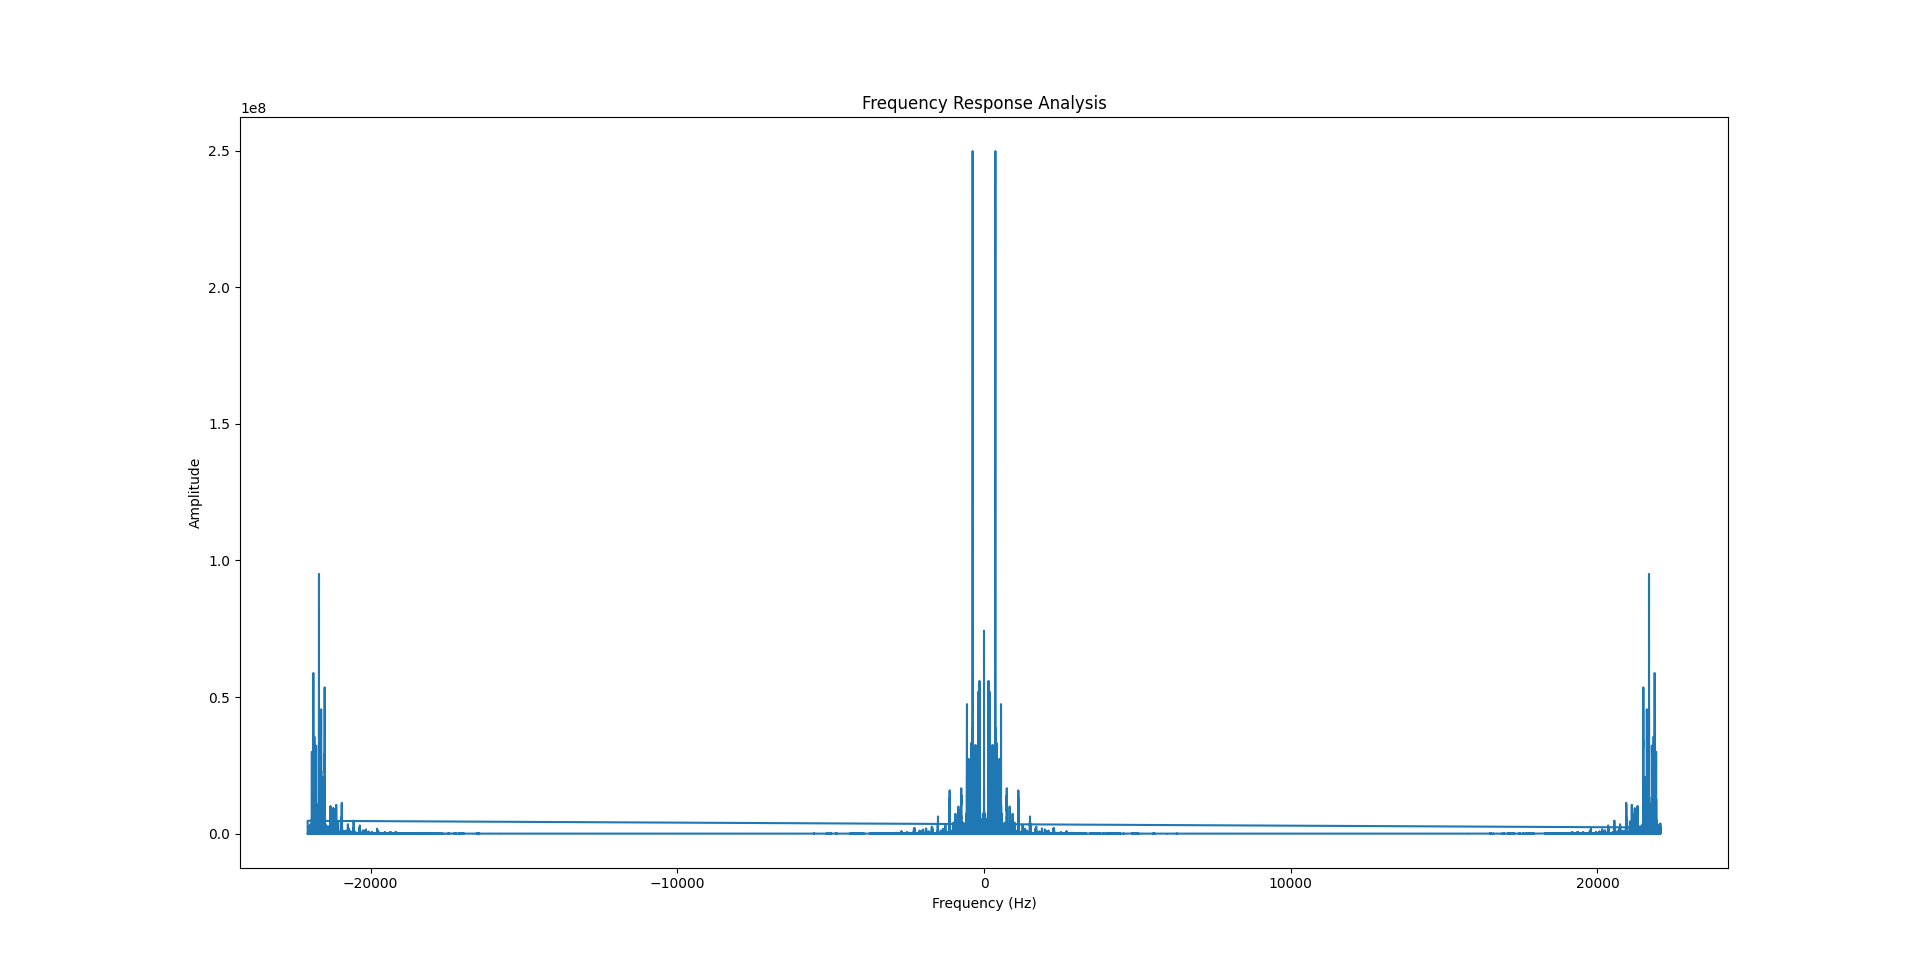
Analyzing Frequency Response:
PyDub provides tools to analyze the frequency response of an audio clip. The code snippet below illustrates how to plot the frequency spectrum of an audio clip:
import matplotlib.pyplot as plt
import numpy as np
from pydub import AudioSegment

# Load audio clip for frequency response analysis
audio_clip = AudioSegment.from_file("resources/dramatic_piano.wav", format="wav")

# Convert the audio clip to a NumPy array
samples = np.array(audio_clip.get_array_of_samples())

# Compute the frequency spectrum using Fast Fourier Transform (FFT)
frequencies = np.fft.fftfreq(len(samples), 1 / audio_clip.frame_rate)
spectrum = np.fft.fft(samples)

# Plot the frequency spectrum
plt.plot(frequencies, np.abs(spectrum))
plt.title("Frequency Response Analysis")
plt.xlabel("Frequency (Hz)")
plt.ylabel("Amplitude")
plt.show()
This code generates a plot of the frequency spectrum using the Fast Fourier Transform (FFT). Testers can analyze the plot to assess how well the audio clip reproduces frequencies across the audible spectrum.
Interpreting Results for Optimization
Interpreting frequency response results is crucial for optimizing audio quality. The following example demonstrates how to calculate the frequency range with the maximum amplitude, providing insights into the dominant frequencies:
# Find the frequency with the maximum amplitude
max_frequency = frequencies[np.argmax(np.abs(spectrum))]

print(f"Maximum Amplitude at Frequency: {max_frequency} Hz")
This snippet identifies the frequency with the maximum amplitude in the spectrum, aiding in understanding the dominant frequencies and optimizing the audio system accordingly.
By following these examples, we can effectively automate frequency response testing using PyDub, ensuring a well-balanced audio experience across the entire frequency spectrum.
Bringing It All Together
In this final section, we consolidate the insights gained throughout the guide, focusing on strategies for integrating PyDub into existing testing workflows, exploring best practices for sustained audio quality testing, and providing tips on incorporating automated audio quality checks into continuous integration pipelines.
Integrating PyDub into Testing Workflows:
Integrating PyDub into our testing workflows enhances the efficiency and comprehensiveness of audio quality testing. The following code snippet illustrates a basic integration scenario where PyDub is utilized to automate clarity assessment within an existing testing script:
from pydub import AudioSegment

# Load audio clip for clarity assessment
audio_clip = AudioSegment.from_file("path/to/audio_clip.wav", format="wav")

# Automate clarity assessment using PyDub
clarity_result = automate_clarity_assessment(audio_clip)

# Assert clarity assessment result
assert clarity_result, "Clarity assessment failed."
This example showcases how PyDub can seamlessly integrate into an existing testing script, providing an automated assessment of clarity. Adjust the integration based on the specific audio quality aspects we are testing.
Best Practices for Sustained Audio Quality Testing
Sustained audio quality testing requires a systematic approach. Consider incorporating PyDub into your testing practices with the following best practices:
Incorporating Automated Checks into CI Pipelines
Automating audio quality checks within our continuous integration (CI) pipelines enhances the reliability of our software development process. The code snippet below demonstrates integrating audio quality checks into a CI script using a hypothetical CI tool:
from pydub import AudioSegment

# Load audio clip for automated audio quality checks
audio_clip = AudioSegment.from_file("path/to/audio_clip.wav", format="wav")

# Perform automated audio quality checks using PyDub
audio_quality_check_result = perform_audio_quality_checks(audio_clip)

# Fail the CI build if audio quality checks fail
if not audio_quality_check_result:
    raise Exception("Audio quality checks failed. Build aborted.")
This example highlights the integration of PyDub into a CI script, where the CI build is aborted if audio quality checks fail. Adjust the script according to your CI tool and specific requirements.
Conclusion
In wrapping up this practical guide, we now possess the knowledge and tools essential for enhancing our audio quality testing endeavors with PyDub. Through the seamless integration of automation into the assessment of clarity, distortion, and frequency response, we can guarantee that our applications consistently deliver an exceptional audio experience. With PyDub serving as a reliable ally, we embark on a journey toward achieving audio excellence in our software projects.
You can find the mentioned (and additional) function implementations on our GitHub page. For those interested in learning more about the tools used in this blog, here are some helpful links: