Building StageMask: A Visual Approach to Masking Dynamic Content in Playwright Tests

Visual regression testing is powerful, but flaky tests from dynamic content like timestamps and ads make it frustrating. The typical solution is manually defining pixel coordinates to mask these regions, which is tedious and error-prone. After dealing with this problem in my Playwright test suites, I built StageMask: a tool that lets you draw masks directly on screenshots through an interactive UI, then automatically applies them in your tests. In this post, I'll walk you through how I built it, the technical decisions behind it, and how you can use it to make your visual tests more reliable.
Architecture Overview
StageMask is built around three core components that work together to provide a seamless visual testing experience. Understanding how these pieces interact will help you appreciate the design decisions and potentially contribute to the project.
The Three Main Components:
1. Playwright Test FixturesThe test integration layer provides custom assertions (visualSnapshot and softVisualSnapshot) that extend Playwright's test fixtures. These fixtures handle screenshot capture, mask application, and pixel-by-pixel comparison. When a test runs, the fixture takes a screenshot, loads any configured masks from the JSON file, applies them to both the baseline and actual images, then compares the masked results using a configurable threshold.
2. Mask Storage and ConfigurationAll mask data lives in a single stage-masks.json file at your project root. This JSON-based approach means masks are easily version-controlled, human-readable, and can be reviewed in pull requests. Each screenshot has its own entry with an array of mask regions (x, y, width, height coordinates), optional per-screenshot thresholds, and metadata like creation timestamps and reasons for masking.
3. Review UI ServerThe visual editor is a React application served by a local Express server during development. When you run npx stagemask review, it spins up a Vite dev server that reads your test results directory, loads the failed screenshots, and presents them in an interactive canvas interface. You can draw masks, resize them, and save them directly back to the configuration file. The server is deliberately bound to localhost only for security.
Technology Stack Choices
I chose TypeScript throughout the project for type safety and better developer experience. Playwright Test was a natural fit since the tool is designed specifically for Playwright users, and its fixture system provides clean extensibility points. For the UI, React offered the component structure needed for the interactive canvas and controls, while Vite provided fast hot-module replacement during development and efficient bundling for production. The CLI commands are built with Node.js for easy npm integration.
Architecture Diagram
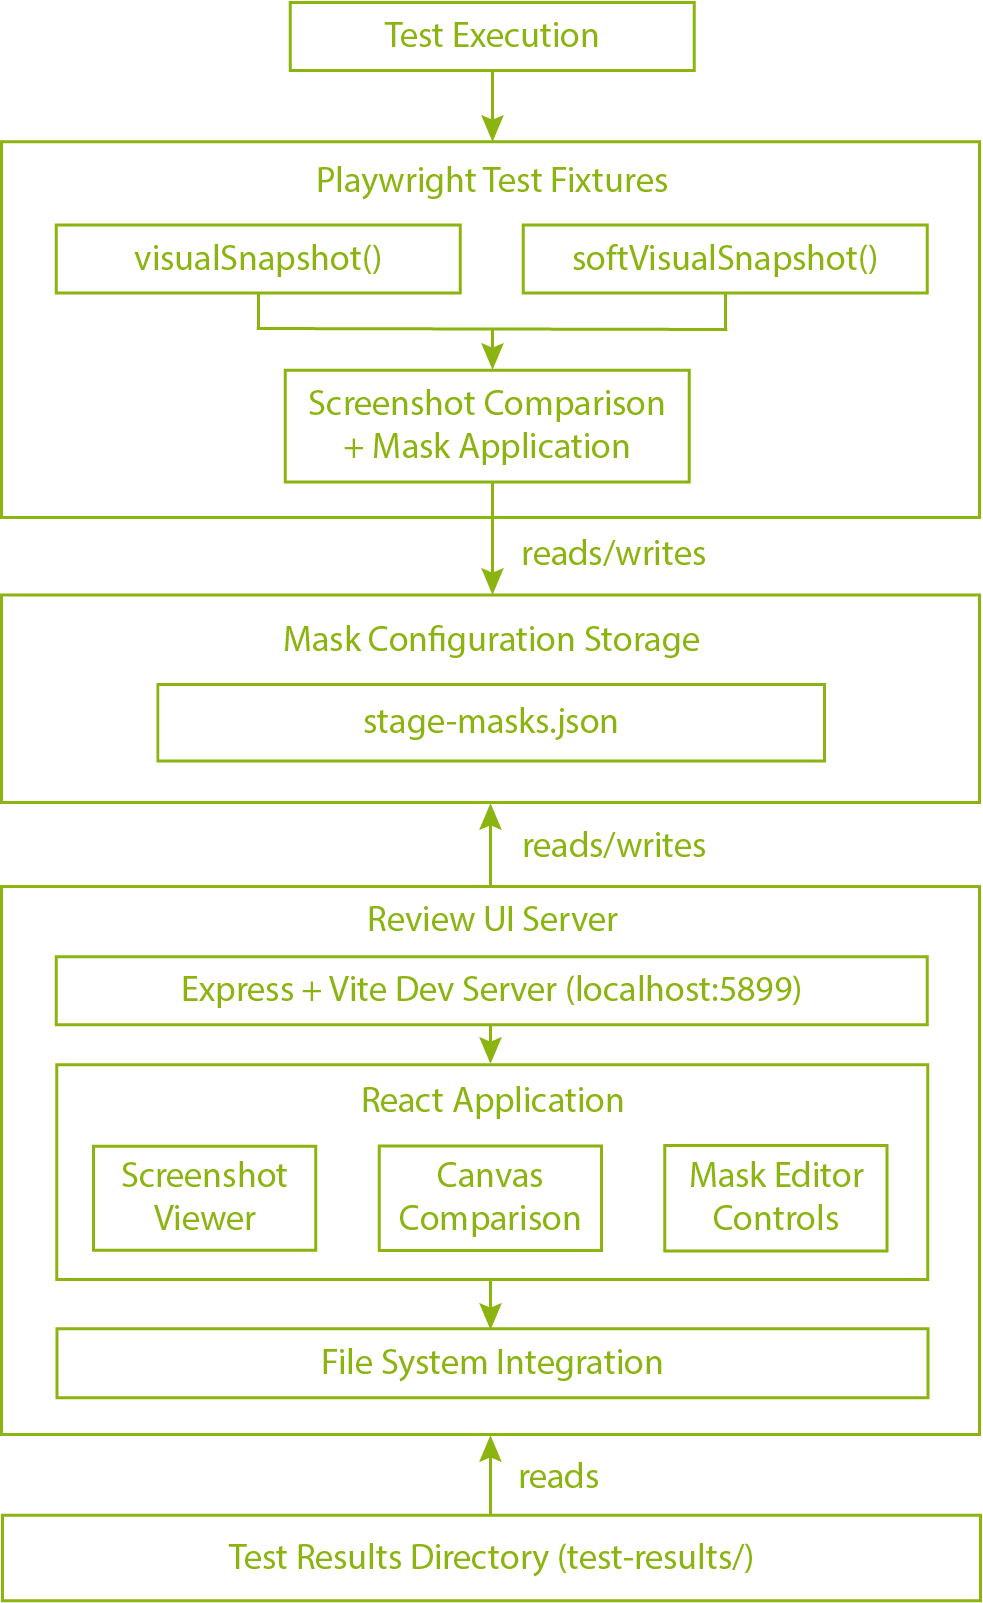
StageMask Architecture Diagram
The beauty of this architecture is its simplicity. Tests produce screenshots, the config file stores masks, and the UI provides a visual way to create those masks. Each component has a single, clear responsibility, making the codebase maintainable and the workflow intuitive for QA engineers.
Custom Playwright Fixtures: The Test Integration
The heart of StageMask lies in how it integrates with Playwright's test framework. Rather than forcing users to import separate libraries or change their test structure dramatically, StageMask extends Playwright's fixture system to provide custom assertions that feel native to the framework.
How Playwright Fixtures Work
Playwright fixtures are a dependency injection mechanism that lets you extend the test context with custom functionality. Think of them as reusable building blocks that get automatically set up before each test and torn down afterward. When you write async ({ page }) => {} in a test, that page object is a fixture provided by Playwright. We can add our own fixtures alongside the built-in ones.
Here's the basic pattern:
import { test as base } from '@playwright/test';

const test = base.extend({
  customFixture: async ({}, use) => {
    // Setup code here
    const myObject = { /* ... */ };

    await use(myObject); // Provide to test

    // Teardown code here
  }
});

export { test };
This approach keeps tests clean and declarative while hiding complex setup logic behind a simple API.
Implementing visualSnapshot and softVisualSnapshot
StageMask extends Playwright's test object with two fixtures: visualSnapshot for hard assertions and softVisualSnapshot for collecting multiple failures. Both share the same underlying comparison logic but differ in their error handling strategy.
export const test = base.extend({
  visualSnapshot: async ({ page }, use, testInfo) => {
    const snapshot = async (name: string, options?: SnapshotOptions) => {
      await captureAndCompare(page, name, options, testInfo, false);
    };
    await use(snapshot);
  },

  softVisualSnapshot: async ({ page }, use, testInfo) => {
    const errors: Error[] = [];

    const snapshot = async (name: string, options?: SnapshotOptions) => {
      try {
        await captureAndCompare(page, name, options, testInfo, false);
      } catch (error) {
        errors.push(error);
      }
    };

    await use(snapshot);

    // Throw all collected errors at the end
    if (errors.length > 0) {
      throw new AggregateError(errors,
        `${errors.length} visual snapshot(s) failed`);
    }
  }
});
The key difference is that softVisualSnapshot catches errors in an array and only throws at the end of the test, allowing all screenshots to be captured even if some fail.
Screenshot Capture and Comparison Flow
The comparison flow follows these steps:
Here's a simplified version of the core logic:
async function captureAndCompare(
  page: Page,
  name: string,
  options: SnapshotOptions,
  testInfo: TestInfo,
  isSoft: boolean
) {
  const paths = generatePaths(testInfo, name);

  // Capture actual screenshot
  const actualBuffer = await page.screenshot({
    ...options.screenshotOptions
  });

  // First run: save as baseline
  if (!fs.existsSync(paths.expected)) {
    fs.writeFileSync(paths.expected, actualBuffer);
    return;
  }

  // Load expected
  const expectedBuffer = fs.readFileSync(paths.expected);

  // Load masks from config
  const config = loadConfig();
  const masks = config.screenshots[name]?.masks || [];

  // Compare with masks applied
  const result = await compareImages(
    expectedBuffer,
    actualBuffer,
    masks,
    options.threshold
  );

  if (!result.match) {
    fs.writeFileSync(paths.actual, actualBuffer);
    fs.writeFileSync(paths.diff, result.diffBuffer);

    throw new Error(
      `Screenshot "${name}" doesn't match.\n` +
      `Expected: ${paths.expected}\n` +
      `Actual: ${paths.actual}\n` +
      `Diff: ${paths.diff}`
    );
  }
}
Applying Masks During Pixel Comparison
Masks work by painting over specific rectangular regions in both images before comparison. This ensures that dynamic content in those areas won't cause pixel differences. The masking happens at the pixel buffer level using the PNG library:
function applyMasks(imageBuffer: Buffer, masks: Mask[]): Buffer {
  const png = PNG.sync.read(imageBuffer);

  for (const mask of masks) {
    for (let y = mask.y; y < mask.y + mask.height; y++) {
      for (let x = mask.x; x < mask.x + mask.width; x++) {
        const idx = (png.width * y + x) << 2;

        // Paint with semi-transparent gray
        png.data[idx] = 128;     // R
        png.data[idx + 1] = 128; // G
        png.data[idx + 2] = 128; // B
        png.data[idx + 3] = 128; // A (50% transparent)
      }
    }
  }

  return PNG.sync.write(png);
}
The comparison then uses pixelmatch or a similar algorithm to count differing pixels outside the masked regions. If the percentage of different pixels exceeds the threshold, the test fails.
Hard vs. Soft Assertions Pattern
The distinction between hard and soft assertions is crucial for different testing scenarios:
Hard assertions (visualSnapshot) throw immediately on the first failure. This is ideal for critical user flows where a broken screenshot means the rest of the test is meaningless:
test('checkout flow', async ({ visualSnapshot }) => {
  await visualSnapshot('cart.png');         // Fails? Test stops here
  await visualSnapshot('payment.png');      // Won't run
  await visualSnapshot('confirmation.png'); // Won't run
});
Soft assertions (softVisualSnapshot) collect all failures and report them together at the end. This is perfect for comprehensive visual audits where you want to see all problems at once:
test('dashboard audit', async ({ softVisualSnapshot }) => {
  await softVisualSnapshot('header.png');  // Captures even if fails
  await softVisualSnapshot('sidebar.png'); // Captures even if fails
  await softVisualSnapshot('content.png'); // Captures even if fails
  // All three failures reported together
});
You can even mix both in the same test to get the best of both worlds: use soft assertions for exploratory checks and hard assertions for critical validations.
This fixture-based approach makes StageMask feel like a natural extension of Playwright rather than a bolted-on third-party tool. The API is clean, the behavior is predictable, and the integration is seamless.
The Mask Configuration System
One of the most important design decisions in StageMask was how to store mask data. The solution needed to be simple, version-controllable, and human-readable. A JSON file turned out to be the perfect fit.
stage-masks.json Schema Design
The configuration schema is intentionally flat and straightforward. Here's what a typical config looks like:
{
  "version": 1,
  "threshold": 0.1,
  "port": 5899,
  "screenshots": {
    "homepage.png": {
      "name": "homepage.png",
      "masks": [
        {
          "id": "mask_1234567890_abc123",
          "x": 150,
          "y": 200,
          "width": 200,
          "height": 50,
          "reason": "Dynamic timestamp",
          "createdAt": "2024-01-15T10:30:00.000Z"
        }
      ],
      "threshold": 0.15,
      "updatedAt": "2024-01-15T10:30:00.000Z"
    }
  }
}
The schema has three levels:
This structure makes it trivial to find all masks for a given screenshot and allows for fine-grained control when needed.
Why JSON Over Database
I considered several storage options including SQLite, a custom binary format, and even storing masks as sidecar files next to screenshots. JSON won for several compelling reasons:
The tradeoff is that JSON doesn't scale to thousands of screenshots with complex queries, but for typical test suites with dozens to hundreds of visual tests, it's perfect.
Mask Coordinate System and Region Format
Masks use a standard Cartesian coordinate system with the origin (0, 0) at the top-left corner of the image. This matches how most image libraries and browser APIs work, making the mental model consistent.
Each mask region is defined by four values:
interface Mask {
  id: string;
  x: number;        // Distance from left edge
  y: number;        // Distance from top edge
  width: number;    // Horizontal span
  height: number;   // Vertical span
  reason?: string;
  createdAt: string;
}
The coordinates are always in pixels and are absolute, not relative. This means a mask at { x: 100, y: 50, width: 200, height: 100 } will cover the rectangle from pixel (100, 50) to pixel (300, 150).
When multiple masks overlap, they're all applied independently. There's no special handling for overlapping regions because the masking algorithm simply paints over all specified coordinates. This keeps the implementation simple and the behavior predictable.
The unique ID is generated using a combination of timestamp and random characters, ensuring masks can be tracked across edits and preventing duplicate IDs even if multiple people create masks simultaneously.
Version Control Considerations
The config file is designed to play nicely with Git and other version control systems. Here are the key considerations:
One source of truth. The stage-masks.json file should be committed to your repository. It's not a build artifact or generated file; it's part of your test configuration, just like playwright.config.ts.
Meaningful diffs. When you add or modify a mask, the JSON diff clearly shows what changed. The pretty-printed formatting ensures each mask object is on its own lines, making line-based diffs readable:
"homepage.png": {"masks": [
{
"id": "mask_1234567890_abc123",
"x": 150,
"y": 200,
- "width": 200,
+ "width": 250,
"height": 50
}
]
}
Merge conflict resolution. Because each screenshot has its own top-level key and masks are in arrays, merge conflicts are rare. If two people add different masks to the same screenshot, Git can usually auto-merge. If both modify the same mask, the conflict is localized and easy to resolve manually.
Audit trail. The createdAt and updatedAt timestamps, combined with Git history, give you a complete audit trail of when and why masks were added. This is valuable when debugging test flakiness or questioning whether a mask is still necessary.
The combination of JSON's simplicity and Git's diffing power creates a workflow where mask changes are transparent, reviewable, and traceable. This prevents the "mask creep" problem where tests accumulate unnecessary masks over time because nobody remembers why they were added.
Building the Visual Review UI
The review UI is where StageMask really shines. It transforms the tedious process of calculating pixel coordinates into an intuitive visual workflow. Building this required careful consideration of both the server architecture and the frontend user experience.
Server Architecture: Express + Vite in Dev Mode
The review server combines Express for API routes with Vite for the React frontend. When you run npx stagemask review, it spins up a hybrid server that handles both static file serving and dynamic API endpoints.
async function startServer(options: ServerOptions) {
  const app = express();

  // Create Vite dev server in middleware mode
  const vite = await createViteServer({
    server: { middlewareMode: true },
    appType: 'spa'
  });

  // API routes for mask operations
  app.get('/api/screenshots', getScreenshots);
  app.post('/api/masks', saveMasks);
  app.get('/api/config', getConfig);

  // Serve screenshot images from test results
  app.use('/screenshots', express.static(testResultsDir));

  // Use Vite's middleware for HMR and React
  app.use(vite.middlewares);

  app.listen(5899, 'localhost');
}
This architecture gives us the best of both worlds. Vite handles hot module replacement during development, making UI iteration fast. Express provides the API layer for reading and writing the config file. The server is explicitly bound to localhost for security, ensuring it's never exposed to the network.
The separation of concerns is clean: the Express routes handle file system operations and config management, while Vite serves the React application that handles all the user interaction and visual rendering.
File System Integration: Reading Test Results Directory
When the UI loads, it needs to discover all failed visual tests and present them to the user. This happens through a file system scan of the test results directory:
function getScreenshots(req, res) {
  const resultsDir = path.join(projectRoot, 'test-results');
  const screenshots = [];

  // Walk through test results directory
  const testDirs = fs.readdirSync(resultsDir);

  for (const testDir of testDirs) {
    const files = fs.readdirSync(path.join(resultsDir, testDir));

    // Look for actual/expected pairs
    const actualFiles = files.filter(f => f.includes('-actual.png'));

    for (const actualFile of actualFiles) {
      const baseName = actualFile.replace('-actual.png', '');
      const expectedFile = `${baseName}-expected.png`;
      const diffFile = `${baseName}-diff.png`;

      if (files.includes(expectedFile)) {
        screenshots.push({
          name: extractScreenshotName(baseName),
          testName: extractTestName(testDir),
          actualPath: `/screenshots/${testDir}/${actualFile}`,
          expectedPath: `/screenshots/${testDir}/${expectedFile}`,
          diffPath: files.includes(diffFile)
            ? `/screenshots/${testDir}/${diffFile}`
            : null
        });
      }
    }
  }

  res.json(screenshots);
}
The key insight here is that Playwright organizes test results by test name, and failed visual comparisons always produce both an actual and expected PNG file. By scanning for these pairs, we can reconstruct which tests failed and what screenshots need review.
The paths are served through Express's static middleware, allowing the React app to load them as regular image URLs. This keeps the frontend simple and lets the browser handle image caching naturally.
Image Comparison and Diff Generation
While Playwright generates diff images during test execution, the UI also needs to perform real-time comparisons when users modify masks. This is done using the pixelmatch library, which provides efficient pixel-by-pixel comparison:
import pixelmatch from 'pixelmatch';
import { PNG } from 'pngjs';

function generateDiff(
  expectedBuffer: Buffer,
  actualBuffer: Buffer,
  masks: Mask[]
): DiffResult {
  const expected = PNG.sync.read(expectedBuffer);
  const actual = PNG.sync.read(actualBuffer);

  const { width, height } = expected;
  const diff = new PNG({ width, height });

  // Apply masks to both images
  applyMasksToPixelData(expected.data, masks, width, height);
  applyMasksToPixelData(actual.data, masks, width, height);

  // Compare and generate diff
  const mismatchedPixels = pixelmatch(
    expected.data,
    actual.data,
    diff.data,
    width,
    height,
    { threshold: 0.1 }
  );

  const totalPixels = width * height;
  const matchPercentage = ((totalPixels - mismatchedPixels) / totalPixels) * 100;

  return {
    diffBuffer: PNG.sync.write(diff),
    mismatchedPixels,
    matchPercentage
  };
}
The diff image highlights differences in bright colors (typically red or pink), making it immediately obvious where the screenshots diverge. When a user adds or modifies a mask, the diff is regenerated in real-time to show the impact. This instant feedback loop helps users verify that their masks are covering the right areas.
Interactive Canvas for Drawing Masks
Here's what the review UI looks like in action:
Drawing masks on failed screenshots in the StageMask review UI
The canvas interface is built using HTML5 Canvas API wrapped in React components. The core interaction model is simple: click and drag to create a rectangular mask.
function MaskCanvas({ screenshot, masks, onMasksChange }) {
  const canvasRef = useRef<HTMLCanvasElement>(null);
  const [isDragging, setIsDragging] = useState(false);
  const [dragStart, setDragStart] = useState<Point | null>(null);
  const [currentMask, setCurrentMask] = useState<Mask | null>(null);

  const handleMouseDown = (e: MouseEvent) => {
    const rect = canvasRef.current.getBoundingClientRect();
    const x = e.clientX - rect.left;
    const y = e.clientY - rect.top;

    setIsDragging(true);
    setDragStart({ x, y });
  };

  const handleMouseMove = (e: MouseEvent) => {
    if (!isDragging || !dragStart) return;

    const rect = canvasRef.current.getBoundingClientRect();
    const x = e.clientX - rect.left;
    const y = e.clientY - rect.top;

    // Calculate mask dimensions
    const mask = {
      x: Math.min(dragStart.x, x),
      y: Math.min(dragStart.y, y),
      width: Math.abs(x - dragStart.x),
      height: Math.abs(y - dragStart.y)
    };

    setCurrentMask(mask);
    redrawCanvas(mask);
  };

  const handleMouseUp = () => {
    if (currentMask && currentMask.width > 5 && currentMask.height > 5) {
      const newMask = {
        ...currentMask,
        id: generateMaskId(),
        createdAt: new Date().toISOString()
      };

      onMasksChange([...masks, newMask]);
    }

    setIsDragging(false);
    setDragStart(null);
    setCurrentMask(null);
  };

  return (
    <canvas
      ref={canvasRef}
      onMouseDown={handleMouseDown}
      onMouseMove={handleMouseMove}
      onMouseUp={handleMouseUp}
    />
  );
}
Each mask is rendered as a semi-transparent overlay on the canvas. Existing masks display resize handles at their corners and edges, allowing users to adjust them after creation. The canvas also supports panning and zooming for large screenshots, using similar mouse event handlers with modifier keys.
The rendering loop continuously redraws the background image, all existing masks, and the mask currently being drawn. This gives immediate visual feedback and makes the interaction feel responsive.
State Management: Saving Masks Back to Config
React state manages the in-memory representation of masks, but persistence happens through API calls to the Express backend:
function ScreenshotEditor({ screenshot }) {
  const [masks, setMasks] = useState<Mask[]>([]);
  const [isSaving, setIsSaving] = useState(false);

  // Load existing masks
  useEffect(() => {
    fetch('/api/config')
      .then(res => res.json())
      .then(config => {
        const screenshotConfig = config.screenshots[screenshot.name];
        setMasks(screenshotConfig?.masks || []);
      });
  }, [screenshot.name]);

  // Save masks to config file
  const saveMasks = async () => {
    setIsSaving(true);

    await fetch('/api/masks', {
      method: 'POST',
      headers: { 'Content-Type': 'application/json' },
      body: JSON.stringify({
        screenshot: screenshot.name,
        masks: masks
      })
    });

    setIsSaving(false);
  };

  return (
    <div>
      <MaskCanvas
        masks={masks}
        onMasksChange={setMasks}
      />
      <button onClick={saveMasks} disabled={isSaving}>
        {isSaving ? 'Saving...' : 'Save Masks'}
      </button>
    </div>
  );
}
The backend handler reads the existing config, updates the masks for the specified screenshot, and writes the file back atomically:
function saveMasks(req, res) {
  const { screenshot, masks } = req.body;
  const configPath = path.join(projectRoot, 'stage-masks.json');

  const config = JSON.parse(fs.readFileSync(configPath, 'utf-8'));

  config.screenshots[screenshot] = {
    name: screenshot,
    masks: masks,
    updatedAt: new Date().toISOString()
  };

  // Write with pretty formatting for git diffs
  fs.writeFileSync(
    configPath,
    JSON.stringify(config, null, 2)
  );

  res.json({ success: true });
}
The pretty-printed JSON output ensures clean Git diffs, as discussed in the previous section.
Keyboard Shortcuts and UX Considerations
Good keyboard shortcuts make the UI feel professional and efficient. StageMask implements several key bindings:
useEffect(() => {
  const handleKeyDown = (e: KeyboardEvent) => {
    if (e.key === 'Delete' && selectedMask) {
      setMasks(masks.filter(m => m.id !== selectedMask.id));
      setSelectedMask(null);
    }

    if (e.key === 'Escape') {
      setSelectedMask(null);
      setIsDragging(false);
    }

    if (e.key === ' ') {
      setPanMode(true);
      e.preventDefault();
    }

    if (['ArrowUp', 'ArrowDown', 'ArrowLeft', 'ArrowRight'].includes(e.key)) {
      nudgeSelectedMask(e.key);
      e.preventDefault();
    }
  };

  window.addEventListener('keydown', handleKeyDown);
  return () => window.removeEventListener('keydown', handleKeyDown);
}, [selectedMask, masks]);
Beyond keyboard shortcuts, several UX decisions enhance the experience:
These details transform the UI from a functional tool into something that feels polished and professional, encouraging adoption across the team.
Key Implementation Challenges
Building StageMask came with several technical challenges that required careful solutions. Here are the key issues I encountered and how I solved them.
Handling Various Screenshot Sizes and Formats
Screenshots come in wildly different dimensions depending on viewport size, device emulation, and whether tests capture full pages or specific elements. A mobile screenshot might be 375x667 pixels, while a full desktop page could be 1920x8000 pixels or larger.
The canvas needed to scale these images to fit the viewport without losing the ability to draw masks at precise pixel coordinates. I solved this using a viewport coordinate system that maps between screen space and image space:
function screenToImageCoordinates(
  screenX: number,
  screenY: number,
  scale: number,
  panOffset: Point
): Point {
  return {
    x: (screenX - panOffset.x) / scale,
    y: (screenY - panOffset.y) / scale
  };
}
This ensures that when a user draws a mask at screen position (100, 100) on a zoomed-in canvas, it translates to the correct pixel coordinates in the original image. The masks are always stored in image coordinates, making them independent of zoom level or viewport size.
For format support, I initially only handled PNG files since that's Playwright's default. The PNG format is lossless and well-suited for pixel-perfect comparisons. Supporting JPEG would require different comparison thresholds due to compression artifacts, so I kept it simple and stuck with PNG.
Coordinate Precision When Zooming and Panning
Zooming introduces floating-point precision issues. When you zoom to 150% and draw a mask, the coordinates need to map back to exact integer pixels in the original image. Rounding errors can cause masks to be off by a pixel or two, which defeats the purpose.
The solution was to round coordinates only at the final save step, not during drawing. While the user is dragging, coordinates remain as floating-point values. Only when they release the mouse button do I snap to integer pixels:
const handleMouseUp = () => {
  if (currentMask) {
    const snappedMask = {
      ...currentMask,
      x: Math.round(currentMask.x),
      y: Math.round(currentMask.y),
      width: Math.round(currentMask.width),
      height: Math.round(currentMask.height)
    };

    saveMask(snappedMask);
  }
};
For panning, I prevented accidental mask creation by checking if the mouse moved more than a threshold during a drag. If you're panning and your mouse drifts slightly, it shouldn't create a tiny mask.
Ensuring Security: Localhost-Only, No External Access
A review server that exposes your test results to the network is a security nightmare. Your screenshots might contain sensitive data, API tokens in URLs, or internal system details. I made several decisions to keep StageMask secure by default:
Bind to localhost only. The server explicitly listens on 127.0.0.1, not 0.0.0.0. This prevents network access entirely:
app.listen(port, '127.0.0.1', () => {
  console.log(`Server running at http://localhost:${port}`);
});
No authentication needed. Since it's localhost-only, adding authentication would be security theater. The OS-level isolation is the security boundary.
Read-only file access outside project root. The server only reads from the configured test results directory and project root. It validates all paths to prevent directory traversal attacks:
function validatePath(requestedPath: string): boolean {
  const resolved = path.resolve(requestedPath);
  const allowed = path.resolve(projectRoot);
  return resolved.startsWith(allowed);
}
No file upload capabilities. The server only serves existing files and writes to the single config file. This limits the attack surface dramatically.
These constraints make StageMask safe for local development while keeping the implementation simple. For CI environments, the review server isn't needed at all since masks are already defined in the config file.
Browser Compatibility Considerations
The review UI is a development tool, not a production application, which gave me freedom to target modern browsers only. I required Chrome, Firefox, or Safari released within the last two years. This let me use modern JavaScript features without transpilation overhead.
However, I still hit a few compatibility issues:
Canvas rendering performance varies significantly between browsers. Firefox was noticeably slower when redrawing large canvases with many masks. I optimized by using requestAnimationFrame for smooth rendering and only redrawing dirty regions:
function redrawCanvas() {
  if (animationFrameId) return;

  animationFrameId = requestAnimationFrame(() => {
    const ctx = canvas.getContext('2d');
    ctx.clearRect(0, 0, canvas.width, canvas.height);
    drawImage();
    drawMasks();
    animationFrameId = null;
  });
}
Image loading and CORS caused issues when trying to read pixel data from images. Since everything is served from localhost, I avoided CORS problems entirely. But during development with Vite's dev server, I needed to ensure images had appropriate headers.
Mouse event coordinates differed slightly between browsers when accounting for page scroll and canvas transforms. Using getBoundingClientRect() consistently solved this.
Overall, keeping the browser requirements modern and the scope focused on localhost usage avoided most compatibility headaches. The tool works reliably where it matters most: on developer machines during the test review workflow.
Publishing to npm
Getting StageMask from a working prototype to a published npm package required careful attention to package structure and entry points.
Package Structure and Bundling with tsup
I chose tsup for bundling because it handles both CommonJS and ESM outputs with minimal configuration:
// tsup.config.ts
export default defineConfig({
  entry: {
    index: 'src/index.ts',
    cli: 'src/cli.ts',
    server: 'src/server/index.ts'
  },
  format: ['cjs', 'esm'],
  dts: true,
  external: ['@playwright/test']
});
This produces separate bundles for test fixtures, CLI, and server components with TypeScript definitions included.
CLI Commands and Entry Points
The CLI is registered through package.json:
{
  "bin": {
    "stagemask": "./dist/cli.js"
  },
  "main": "./dist/index.cjs",
  "module": "./dist/index.js",
  "types": "./dist/index.d.ts"
}
Commands are implemented using commander.js for clean routing. Each command like review, init, and list maps to a separate function.
Testing Locally Before Publishing
Before publishing, I tested using npm link to simulate installation:
# In stagemask directory
npm link

# In test project
npm link stagemask
This caught issues with file paths, CLI permissions, and missing peer dependencies. I created a minimal test project to verify the complete workflow: install, write tests, create masks, re-run tests. Once everything worked smoothly, I published version 0.1.0 to npm.
Conclusion
Building StageMask taught me that developer tools succeed when they reduce friction rather than add complexity. By integrating directly with Playwright's fixture system and providing a visual interface for mask creation, StageMask eliminates the tedious manual work that makes visual regression testing painful.
The package is open source and available on npm. If you're struggling with flaky visual tests in your Playwright suites, give it a try. Contributions, bug reports, and feature requests are welcome on GitHub. I'm excited to see how the QA community adopts and improves it.
Try it out: npm install -D stagemask