Building our own defect tracking tool

A defect tracking tool in Quality Assurance (QA) is a software application that helps teams identify, track, and resolve defects in software applications. It allows QA teams to document and manage the defects that are found during testing by providing a centralized location for storing and tracking information about each defect.
A defect/bug tracking tool should have the following features:
Some of the most popular defect/bug tracking tools currently available include JIRA, Bugzilla, YouTrack, Redmine, and others.
Why build one?
There are many more defect/bug tracking tools than the ones we just mentioned, and some of them are free. So why would we want to build our own?
Building our tools comes with many benefits:
This blog post is not about how to make a defect/bug tracking tool. It's about making your life easier by creating tools that will do a part of the job for you. We only chose a defect/bug tracking tool for the post because most QA folks use it in one way or another, and it doesn't require much explanation of the backend workings.
Tools for building our tool 😅
To decide which tools to use for building something, we first need to answer the following questions:
We know that our tool will be used by QA engineers. By knowing this, we can decide what are going to be its key features and how to design them.
We will not implement all features mentioned above since the post would be quite long. But by creating the following features, we will gain enough knowledge to do the remaining once on our own:
In our case, we want to build a desktop application that will support Mac, Windows, and Linux operating systems. For that, we will use Python with a library called Tkinter. Tkinter can work in conjunction with databases, and this will be helpful for us since we need to store our data somewhere.
And those are all the tools we need! At the end of the post, I will mention other tools that can be used as alternatives or that can support different platforms and programming languages. Let's do some designing first!
Designing our tool
We know what features the tool will support. Now we need to draw some functional diagrams.
Let's say our tool will contain four windows to cover all mentioned features:
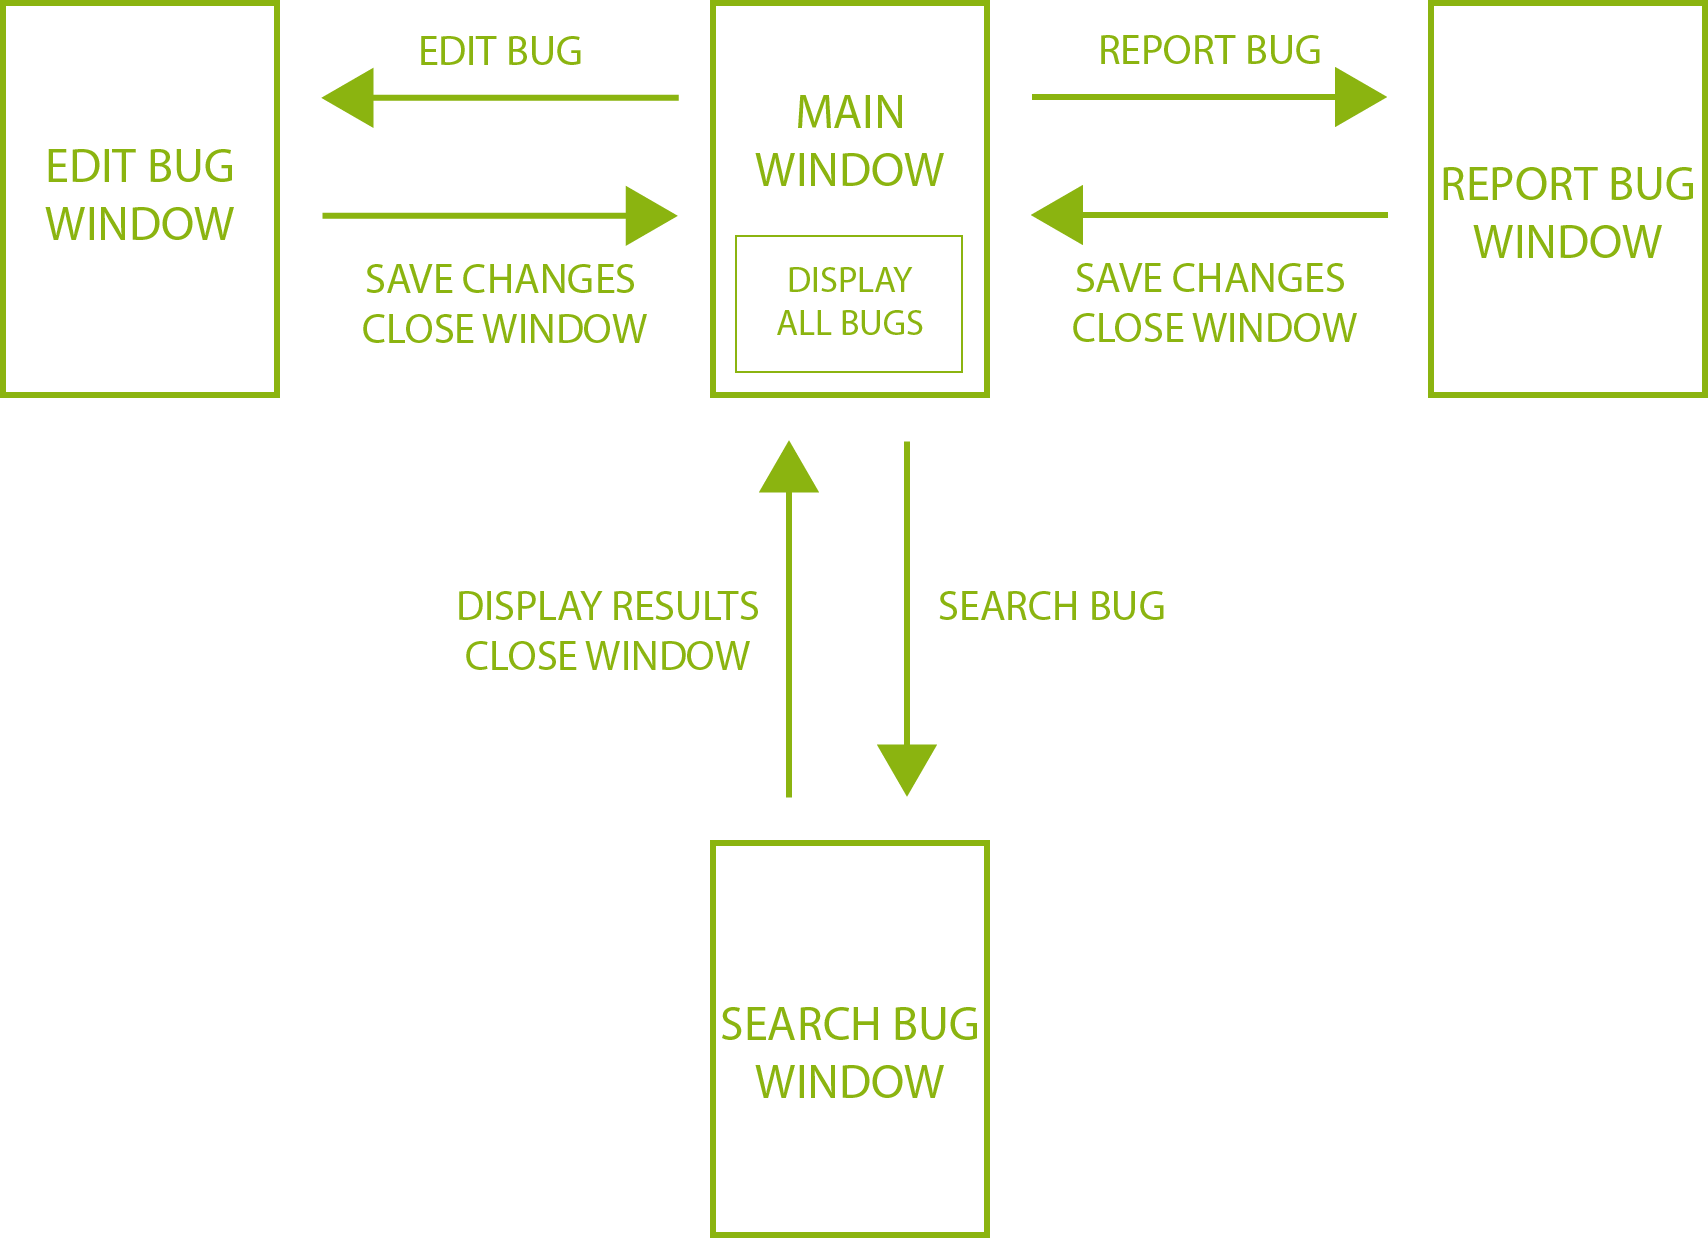
From the diagram, we can see that the main window will navigate the user to the create, edit and search bug windows. The main window will also have a feature to show all existing bugs after a successful search has been completed. And this feature won't take the user to a new window, only refresh the content of the existing one.
Since we know how the application is going to work, it's time to design the actual windows. We mentioned that the tool for this task is the Tkinter library.
By looking at its documentation, we can see that it offers all regular components found on desktop applications. The ones we will need are:
Now that we know the components available to us, we can design the app however we want. In the end, my design looks like this:
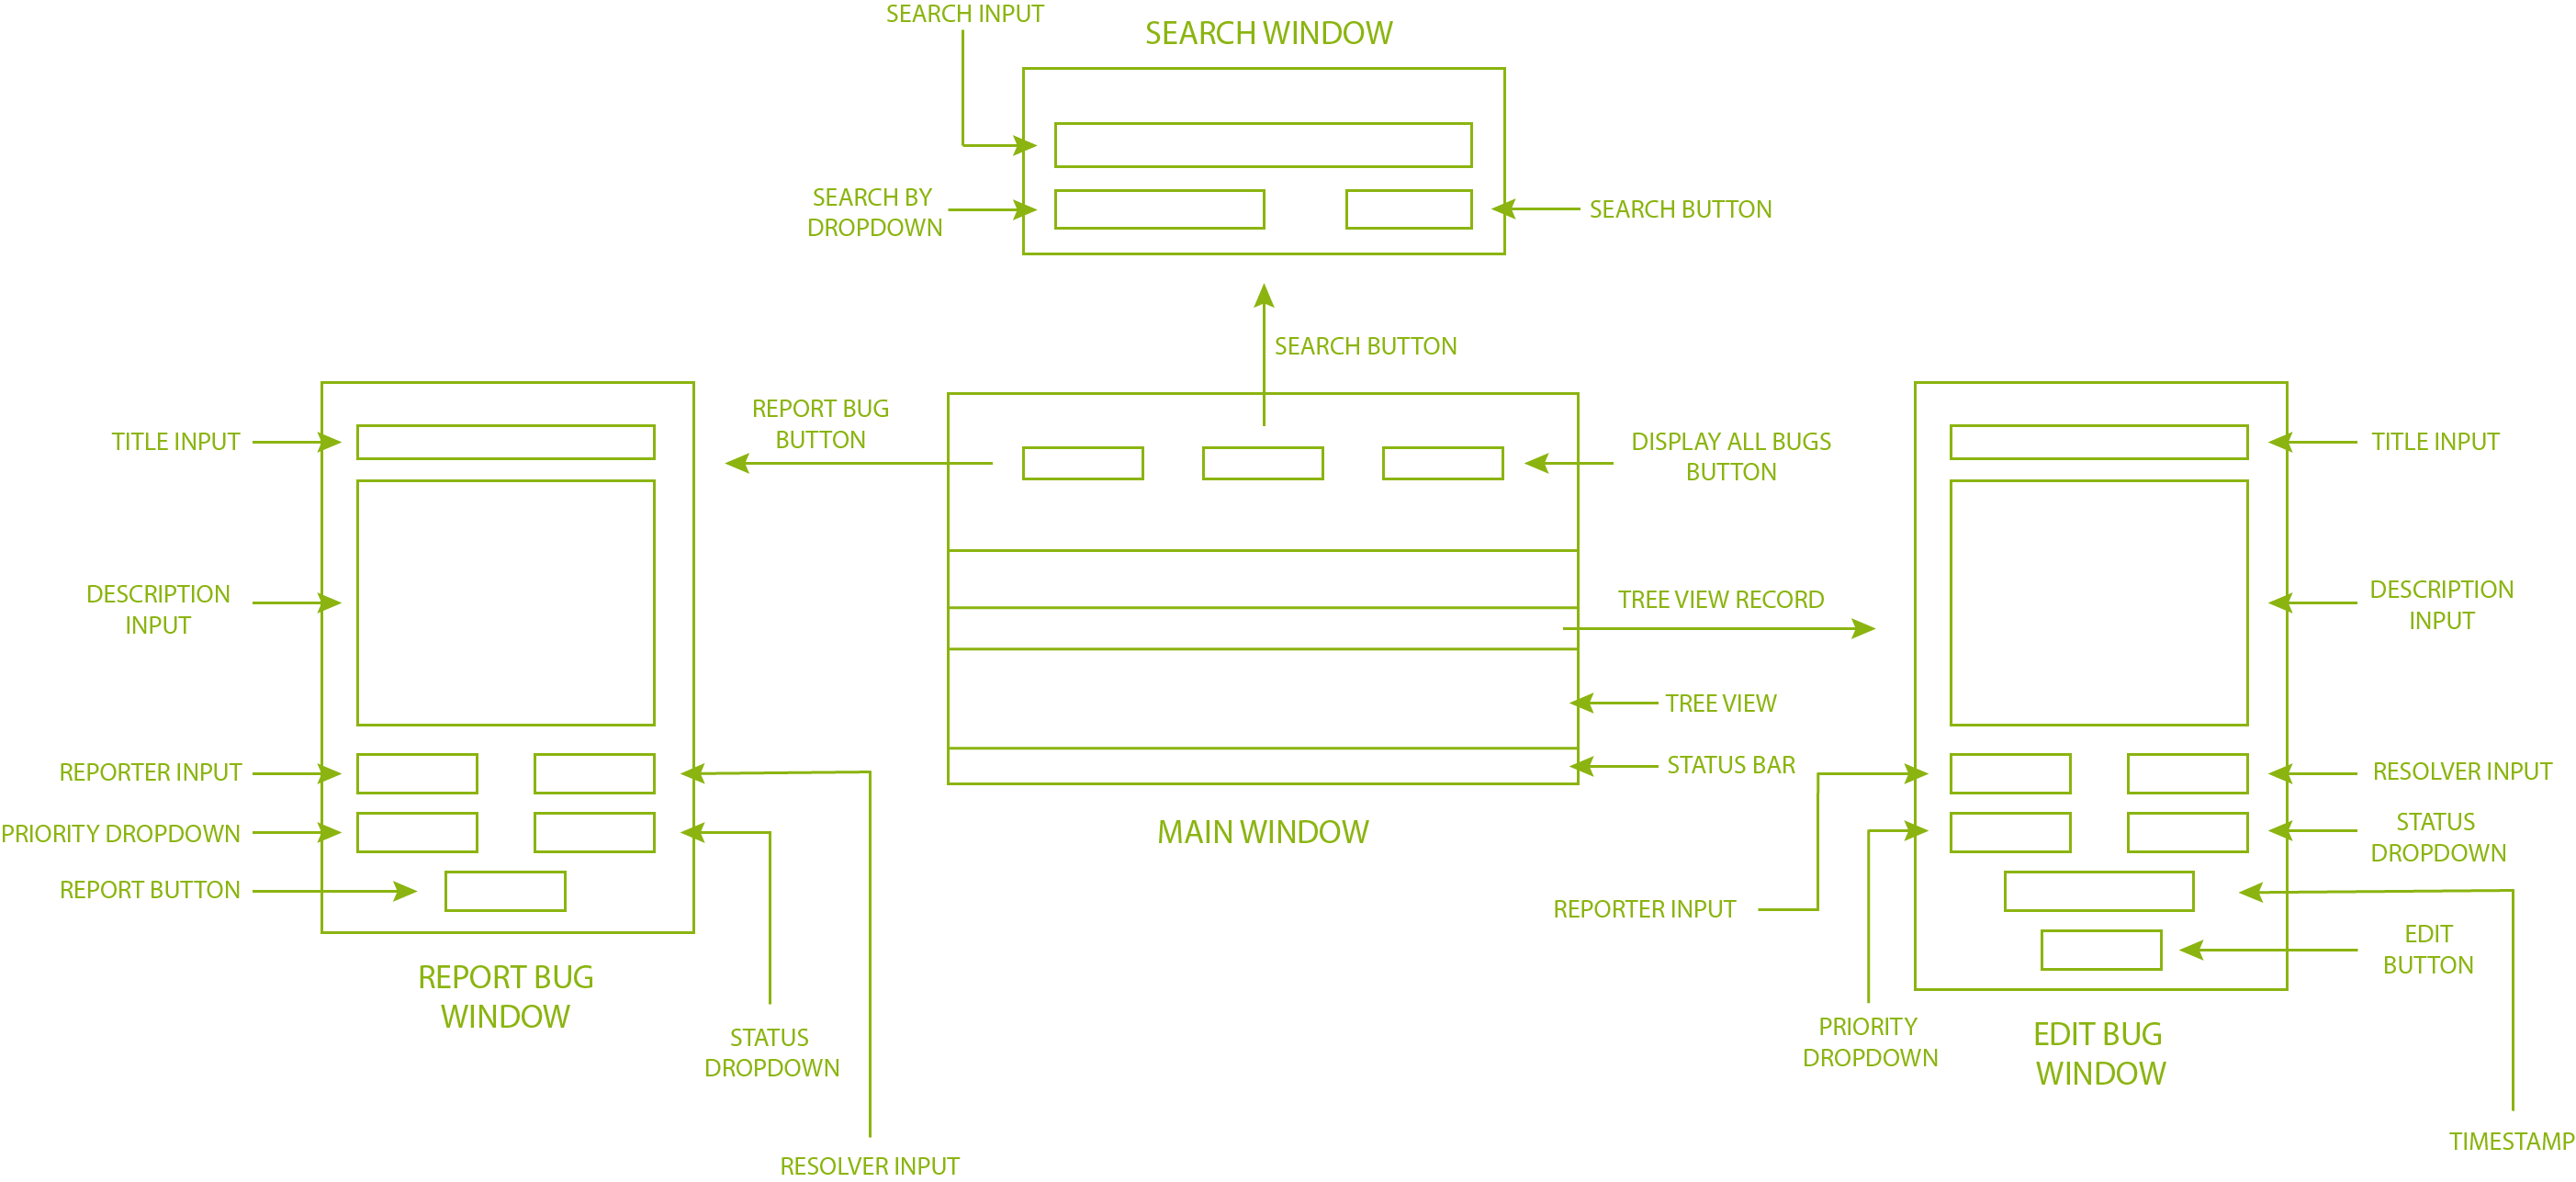
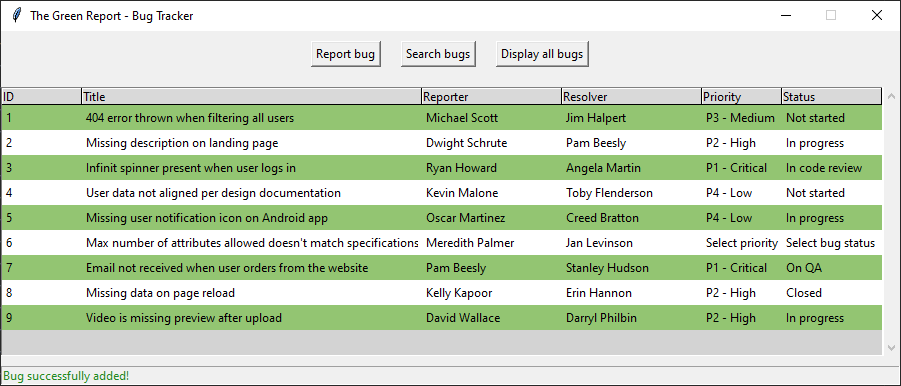
The main window has three buttons. The first one navigates the user to the window where he can create a new bug. The second button opens a search window that allows the user to search for a bug by its ID or name. And the third button refreshes the tree view to display all reported bugs.
The tree view will display all bugs as individual records. By double-clicking a record, the edit window opens for the chosen bug.
The last component on the main window is the status bar at the bottom. It will display important status messages based on the user's actions.
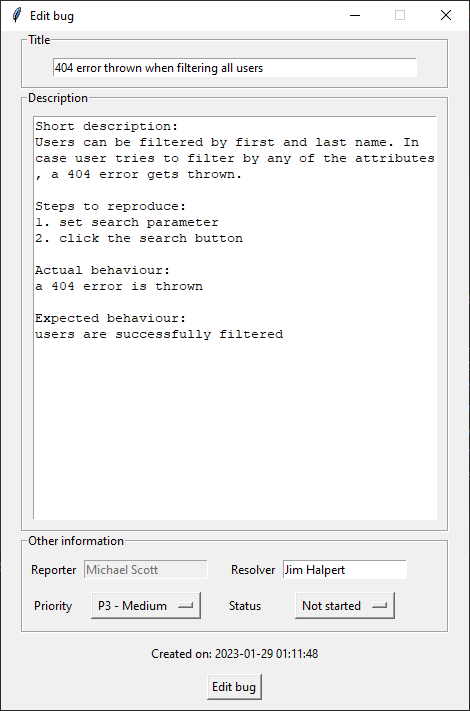
The design of the bug creation and editing windows are alike. Both feature a title field, a description field, reporter and resolver fields, a priority and status dropdown, and a report/edit button. The only variation is that on the editing window, the reporter field is non-editable and displays the timestamp of when the bug was initially reported.
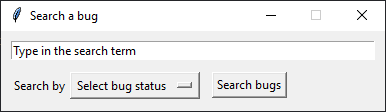
The search window is the simplest. It only has an input field for the search term, a dropdown to choose by which attribute to search, and a search button.
The code
Let's do some coding. We said we would use Python with the help of the Tkinter library to create our app. Besides Tkinter, we will use sqlite3 and datetime libraries.
from tkinter import *
from tkinter import ttk
import sqlite3
import datetime
SQLite is a highly efficient and convenient relational database management system that is often used in conjunction with Python. Its simple design and ease of use make it a popular choice for embedding within applications as a local database, which is perfect for small to medium-sized projects that require powerful features and a small footprint.
First, we will build the foundation for our GUI application by creating the root window. We will add a name to it and make it not resizable:
root = Tk()
root.title('The Green Report - Bug Tracker')
root.resizable(False, False)
Let's first add the buttons for the main window. The buttons will live in the button_frame frame. They will be positioned next to each other, and every one of them will call a function when clicked:
button_frame = Frame(root)
create_button = Button(button_frame, text="Report bug", command=report_bug)
create_button.grid(row=0, column=0, padx=10, pady=10)
search_button = Button(button_frame, text="Search bugs", command=search_bug)
search_button.grid(row=0, column=1, padx=10, pady=10)
display_bugs_button = Button(
    button_frame,
    text="Display all bugs",
    command=lambda: [display_bugs(), status_bar.config(text="All bugs displayed!", fg="#228B22")]
)
display_bugs_button.grid(row=0, column=2, padx=10, pady=10)
button_frame.pack()
From the code above, we can see that the "Display all bugs" button will call two functions by utilizing a lambda. One that will handle the displaying of all the bugs and another one for updating the status bar.
The next component is our tree view. The tree view will be positioned beneath the buttons, and it will have a vertical scrollbar on the right side in case there are multiple entries:
treeview_frame = Frame(root)
treeview_frame.pack(pady=10)

tree_scroll = Scrollbar(treeview_frame)
tree_scroll.pack(side=RIGHT, fill=Y)

treeview = ttk.Treeview(treeview_frame, yscrollcommand=tree_scroll.set, selectmode="extended")
treeview.pack()

tree_scroll.config(command=treeview.yview)
The tree view consists of headings and columns. We will use them to display the following information: ID, title, reporter, resolver, priority, and status:
treeview['columns'] = ("ID", "Title", "Reporter", "Resolver", "Priority", "Status")

treeview.column("#0", width=0, stretch=NO)
treeview.column("ID", anchor=W, width=80, minwidth=60)
treeview.column("Title", anchor=W, width=340, minwidth=250)
treeview.column("Reporter", anchor=W, width=140, minwidth=100)
treeview.column("Resolver", anchor=W, width=140, minwidth=100)
treeview.column("Priority", anchor=W, width=80, minwidth=60)
treeview.column("Status", anchor=W, width=100, minwidth=80)

treeview.heading("#0", text="", anchor=W)
treeview.heading("ID", text="ID", anchor=W)
treeview.heading("Title", text="Title", anchor=W)
treeview.heading("Reporter", text="Reporter", anchor=W)
treeview.heading("Resolver", text="Resolver", anchor=W)
treeview.heading("Priority", text="Priority", anchor=W, command=lambda: sort_treeview("priority"))
treeview.heading("Status", text="Status", anchor=W, command=lambda: sort_treeview("status"))
In the above code, the column named #0 is a special column that is used to identify a row in a tree view widget. Since it creates an empty column at the beginning of the tree view, we set the stretch property to NO for the column and the text to an empty string for the heading to hide it.
We can also see that the Priority and Status headings call a sort function when clicked. More about that in a moment.
The tree view widget, by default, uses the same background color for all rows. We will create two tags to separate the odd and even rows and apply different background colors for them. As a result, each odd row with the applied tag will have a white background, and each even row will have a green one:
treeview.tag_configure('odd_rows', background="white")
treeview.tag_configure('even_rows', background="#93C572")
We can also apply a unique style to the whole tree view widget with custom colors. For our app, we will use the default theme with a grey background. And if we select a row from the tree view, it will have a dark green highlight:
style = ttk.Style()
style.theme_use('default')
style.configure(
    "Treeview",
    background="#D3D3D3",
    foreground="black",
    rowheight=25,
    fieldbackground="#D3D3D3"
)
style.map('Treeview', background=[('selected', "#097969")])
To edit a specific bug in the tree view, we need to call a function that will open the edit window when a user double-clicks on a row. In Python, we can accomplish this by binding a function to an event. In our case, we will call the edit_bug function when a row is double-clicked (In Python, the left double mouse click event is referred to as <Double-1>):
treeview.bind('<Double-1>', edit_bug)
And the last component on the main window is the status bar. We will apply some styling to it and make it expand for the whole window width:
status_bar = Label(root, text="Bug Tracker v1.0", bd=1, relief=SUNKEN, anchor=W)
status_bar.pack(expand=YES, fill=BOTH)
Now to be able to run our code, we need to start the event loop that listens for events (such as button clicks or key presses) and runs the associated event handlers. In Tkinter, this is the job of the mainloop() function, and it is usually called at the end of the program:
root.mainloop()
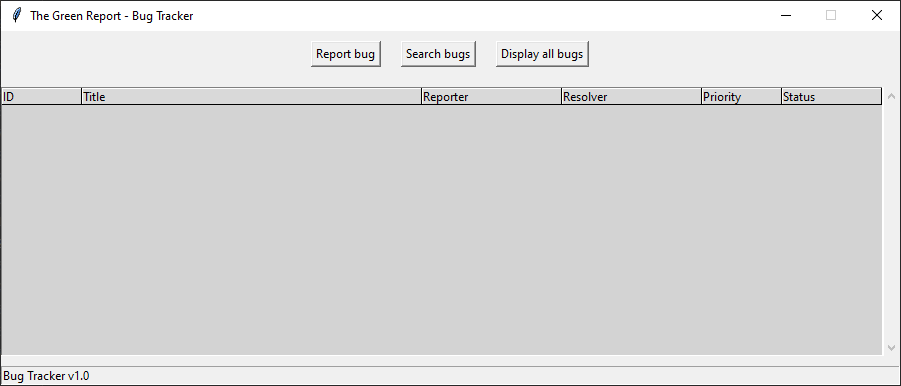
After the initial run, our main window looks like this:
Adding a database
Since it's our first run of the app and there are no existing bugs in the tree view, it sounds logical to build the 'Create bug' window next. But to be able to create a bug, we need to store it in our database. So before we create the window, we will first create a database and add a table to it.
To connect to a database in sqlite3, we call the connect method and pass the name of the database. In our case, the database is called bug_tracker. If the database doesn't exist, sqlite3 will create a new one for us, and in case it already exists, it will establish a connection to it.
connection = sqlite3.connect('bug_tracker.db')
To execute SQL commands and traverse the result set of a query in sqlite3, we need a cursor object. We can create one by calling the cursor method on our connection object.
cursor = connection.cursor()
The cursor object in sqlite3 provides a convenient way to execute SQL statements on the connected database by using its execute method. The method accepts a single argument, which is the SQL statement to be executed on the database.
We will use this method to execute a SQL statement responsible for creating our database table. The table will hold all of our data and will be called bugs. From the design, we know which information we need to store in it and what type of data it will hold:
| Information to store | Data type |
|---|---|
| id | integer |
| title | text |
| reporter | text |
| resolver | text |
| priority | text |
| status | text |
| description | text |
| time | timestamp |
The method call with the statement looks now like this:
cursor.execute("""
CREATE TABLE bugs (
id INTEGER PRIMARY KEY AUTOINCREMENT,
title TEXT,
reporter TEXT,
resolver TEXT,
priority TEXT,
status TEXT,
description TEXT,
time TIMESTAMP
)
""")
We used triple quotation marks to create a multi-line string. The id will be our primary key and automatically be incremented for each new row added.
Now that we have our table let's see how we can retrieve data from it. We can again use the execute method and pass the SELECT SQL statement:
cursor.execute("SELECT * FROM bugs")
To get the actual data in Python, we need to call the fetchall method. The method will retrieve all the rows of the query result as a list of tuples. Each tuple represents a row in the result set, and its elements correspond to the values of the columns in the row:
records = cursor.fetchall()
Once we are done with the database operations, we need to save our changes and close the connection:
connection.commit()
connection.close()
When we run our app, we want to see all existing bugs from the database in the tree view. If it is our first run, we want to create the table; otherwise, we only want to query it.
One way we can do this is with a try block. In the try block, we will try to query the table. In case it doesn't exist, it will throw an operational error, and in that case, we will create one:
def query_database():
connection = sqlite3.connect('bug_tracker.db')
cursor = connection.cursor()
try:
    cursor.execute("SELECT * FROM bugs")
except sqlite3.OperationalError:
    cursor.execute("""
    CREATE TABLE bugs (
    id INTEGER PRIMARY KEY AUTOINCREMENT,
    title TEXT,
    reporter TEXT,
    resolver TEXT,
    priority TEXT,
    status TEXT,
    description TEXT,
    time TIMESTAMP
    )
    """)
    cursor.execute("SELECT * FROM bugs")
records = cursor.fetchall()
populate_treeview(records)
connection.commit()
connection.close()
We wrapped the logic in a function, and we will call it right before the mainloop method. You can see that after we get the records from the database, we pass them to a function responsible for populating the tree view.
The populate_treeview function takes all records as an argument and loops over each of them. In case it's an even record, it will receive the even_rows tag; otherwise, it gets the odd_rows one:
def populate_treeview(records):
count = 0

for record in records:
    if count % 2 == 0:
        treeview.insert(parent='',
                        index='end',
                        text='',
                        values=(record[0], record[1], record[2], record[3], record[4], record[5]),
                        tags=('even_rows',)
                        )
    else:
        treeview.insert(parent='',
                        index='end',
                        text='',
                        values=(record[0], record[1], record[2], record[3], record[4], record[5]),
                        tags=('odd_rows',)
                        )
    count += 1
From the above insert method, we see that the values are passed as a tuple made of data retrieved from the queried records. We can see that only the first six columns are passed since the description and timestamp are not initially visible on the tree view.
Common window controls
Time to move on to the remaining windows. We saw that the report and edit bug windows would have a similar structure. It's a good idea to make a function that will create identical components on the window provided as the function argument:
def add_and_edit_controls(window):
The window will contain a title and description frame. For the description field, we will use the Text widget from Tkinter:
title_frame = LabelFrame(window, text="Title")
title_frame.pack(fill=X, padx=20)
title_input = Entry(title_frame, width=60)
title_input.pack(padx=10, pady=10)

desc_frame = LabelFrame(window, text="Description")
desc_frame.pack(fill=X, padx=20)
desc_input = Text(desc_frame, width=50, height=25)
desc_input.pack(padx=10, pady=10)
In the third frame, we will house the reporter and resolver components:
other_frame = LabelFrame(window, text="Other information")
other_frame.pack(fill=X, padx=20)
reporter = Label(other_frame, text="Reporter")
reporter.grid(row=0, column=0, padx=5, pady=10)
reporter_input = Entry(other_frame)
reporter_input.grid(row=0, column=1, pady=10)
resolver = Label(other_frame, text="Resolver")
resolver.grid(row=0, column=2, padx=(20, 5), pady=10)
resolver_input = Entry(other_frame)
resolver_input.grid(row=0, column=3, pady=10)
For the priority dropdown, we are going to use the OptionMenu widget. When it comes to the dropdown options, we will stick with the basic four (critical, high, medium, and low):
priority = Label(other_frame, text="Priority")
priority.grid(row=1, column=0, pady=(0, 10))
priority_options = [
    "P1 - Critical",
    "P2 - High",
    "P3 - Medium",
    "P4 - Low"
]
po_datatype = StringVar()
po_datatype.set("Select priority")
priority_dropdown = OptionMenu(other_frame, po_datatype, *priority_options)
priority_dropdown.grid(row=1, column=1, pady=(0, 10))
The same goes for the status dropdown. For the available options, we will use the ones present in most projects:
status = Label(other_frame, text="Status")
status.grid(row=1, column=2, pady=(0, 10))
status_options = [
    "Not started",
    "In progress",
    "In code review",
    "On QA",
    "In production",
    "Closed"
]
status_datatype = StringVar()
status_datatype.set("Select bug status")
status_dropdown = OptionMenu(other_frame, status_datatype, *status_options)
status_dropdown.grid(row=1, column=3, pady=(0, 10))
The last step would be to return the interactable components:
return [title_input, desc_input, reporter_input, resolver_input, po_datatype, status_datatype]
Creating the report bug window
Let's now build the report bug window. The method that is called when the 'Report bug' button is clicked is called report_bug. Since it's a new window, we will use the Toplevel class to create one. It will also have a fixed size, and the grab_set method will forbid the user from interacting with the main window until this one is closed:
def report_bug():
    rb_window = Toplevel(root)
    rb_window.title('Report a bug')
    rb_window.resizable(False, False)
    rb_window.grab_set()
Next, we will call the method we just wrote to add all common components to the window:
[
    title_input,
    desc_input,
    reporter_input,
    resolver_input,
    po_datatype,
    status_datatype
] = add_and_edit_controls(
    rb_window
)
The only thing left to add is the 'Report bug' button. When clicked, the button will call two functions. The first one is called add_bug, which will add the inserted data to the database. And the second one (actually a built-in method) will close the window.
report_button = Button(
    rb_window,
    text="Report bug",
    command=lambda: [
        add_bug(
            title_input.get(),
            reporter_input.get(),
            resolver_input.get(),
            po_datatype.get(),
            status_datatype.get(),
            desc_input.get("1.0", "end-1c")
        ),
        rb_window.destroy()
    ]
)
report_button.pack(pady=10)
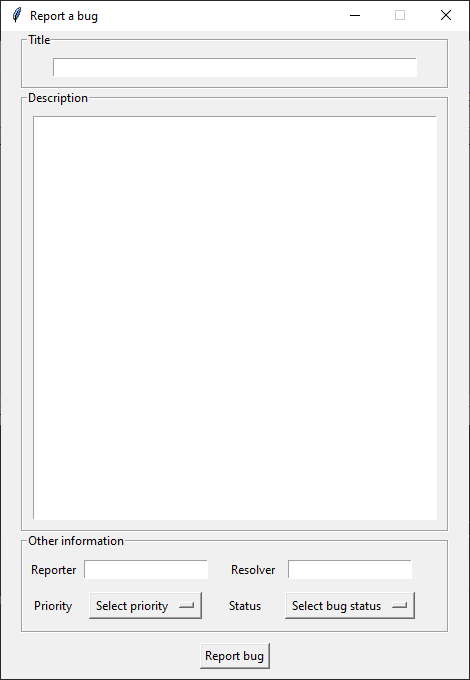
If we click the 'Report bug' button, we will see a similar window:
Adding the logic
Before we add a bug to the tree view, we need to write our add_bug function. The function will take all the inserted data as arguments:
def add_bug(title, reporter, resolver, priority, status, description):
In the function, we will first establish a connection to our database. After that, we will create a tuple with all the data we want to insert into our table. The first variable has a value of None since it's the id that gets automatically incremented. The last parameter is the timestamp. To get the current time, we will use the now method from the datetime library. And the remaining variables are passed from the input arguments.
connection = sqlite3.connect('bug_tracker.db')
data = (None, title, reporter, resolver, priority, status, description, datetime.datetime.now())
Next, we will write the query to insert the data into our table. We will use the ? symbol as a placeholder for our values:
add_query = "INSERT INTO bugs values(?, ?, ?, ?, ?, ?, ?, ?)"
And what remains is to execute the statement and save our changes:
connection.execute(add_query, data)
connection.commit()
This will save our record to the database. But we also want to see our record in the tree view. To do that, we need to clear the existing tree view and query all records for display again.
clear_treeview()
query_database()
We also want the user to know that the record has been saved:
status_bar.config(text="Bug successfully added!", fg="#228B22")
Clearing the tree view is very easy. We get all the child elements from the tree view, loop over each of them, and delete them:
def clear_treeview():
    for item in treeview.get_children():
        treeview.delete(item)
If we add a bug now, it will be saved to the database and displayed on the main window:
Creating the search bug window
When it comes to searching the bugs, the flow is almost identical. Once the 'Search bugs' button is clicked, the search_through_bugs function is called, and the window will close:
def search_bug():
    sb_window = Toplevel(root)
    sb_window.title('Search a bug')
    sb_window.resizable(False, False)
    sb_window.grab_set()

    search_input = Entry(sb_window, width=60)
    search_input.insert(END, "Type in the search term")
    search_input.pack(padx=10, pady=10)
    search_frame = Frame(sb_window)
    search_frame.pack(anchor=W, padx=10)
    search_by = Label(search_frame, text="Search by")
    search_by.grid(row=0, column=0, pady=(0, 10))
    search_options = ["title", "id"]
    search_datatype = StringVar()
    search_datatype.set("Select bug status")
    search_dropdown = OptionMenu(search_frame, search_datatype, *search_options)
    search_dropdown.grid(row=0, column=1, pady=(0, 10))
    sb_button = Button(
        search_frame,
        text="Search bugs",
        command=lambda: [
            search_through_bugs(
                search_datatype.get(),
                search_input.get()
            ),
            sb_window.destroy()
        ]
    )
    sb_button.grid(row=0, column=2, padx=10, pady=(0, 10))
From the previous code snippet, we can see that the function takes the search term and the parameter by which to search as arguments. After connecting to the database, we will create a search query depending on which parameter the user wants to search:
def search_through_bugs(search_by, search_term):
    connection = sqlite3.connect('bug_tracker.db')
    if search_by == "id" and search_term.isnumeric():
        search_query = "SELECT * FROM bugs WHERE id = " + search_term
    else:
        search_query = "SELECT * FROM bugs WHERE title LIKE '%" + search_term + "%'"
As we can see, when searching by id, we want an exact match from the database, and when searching by title, we want the search term present inside the title (LIKE operator).
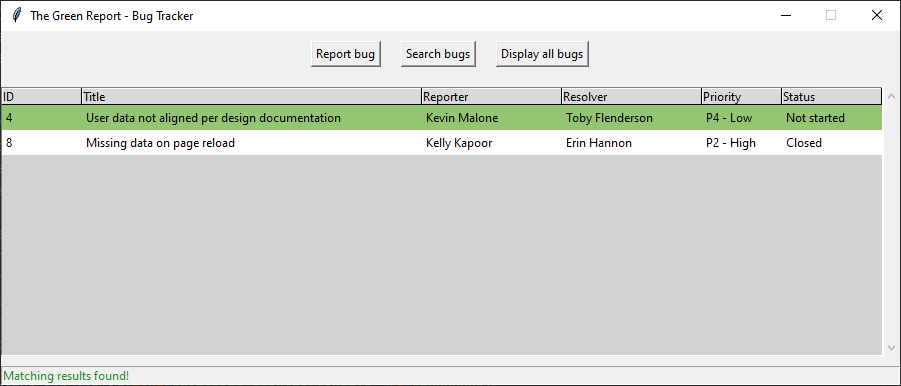
Now we need to execute the correct query, fetch the results and display a status message to the user. Of course, if the query returns some results, we will clear the existing tree view:
cursor = connection.cursor()
cursor.execute(search_query)
records = cursor.fetchall()
if len(records) == 0:
    status_bar.config(text="No matching results!", fg="#EE4B2B")
else:
    status_bar.config(text="Matching results found!", fg="#228B22")
    clear_treeview()
The last thing we need to do is to populate the tree view with the search results, save our changes, and close the connection:
populate_treeview(records)
connection.commit()
connection.close()
If we click the 'Search bugs' button now, we will see a similar window:
And it will search our existing bugs ('data' term used for searching by title in the screenshot example):
Adding the 'Display all bugs' feature
Achieving the functionality of the third button (Display all bugs) is quite easy. We just need to clear the tree view and re-query our database:
def display_bugs():
    clear_treeview()
    query_database()
Making the bugs editable
We have already added the function that will execute when we double-click a record in the tree view. It is now time to incorporate the necessary logic for this action.
Since we bind the function to a double-click, we will pass an event as the function argument. First, we will get the selected row from the tree view and extract the ID value:
def edit_bug(event):
    selected_row = treeview.selection()[0]
    bug_id = treeview.item(selected_row, "values")[0]
After that, we will connect to the database and get the row with the extracted ID:
connection = sqlite3.connect('bug_tracker.db')
cursor = connection.cursor()
cursor.execute("SELECT * FROM bugs WHERE id = " + bug_id)
record = cursor.fetchone()
Now we will create the 'Edit bug' window, which is similar to our 'Report bug' window:
edit_window = Toplevel(root)
edit_window.title("Edit bug")
edit_window.resizable(False, False)
edit_window.wait_visibility()
edit_window.grab_set()
[
    title_input,
    desc_input,
    reporter_input,
    resolver_input,
    po_datatype,
    status_datatype
] = add_and_edit_controls(
    edit_window
)
We mentioned that the 'Edit bug' window has a timestamp component. The information is retrieved from the database row and formatted in a way we don't see the milliseconds on the GUI:
time_label = Label(edit_window, text="Created on: " + record[7].split(".")[0])
time_label.pack(pady=(10, 0))
The 'Edit bug' button will similarly call a function that will edit the data and close the window:
edit_button = Button(
    edit_window,
    text="Edit bug",
    command=lambda: [
        edit_bug_data(
            title_input.get(),
            resolver_input.get(),
            po_datatype.get(),
            status_datatype.get(),
            desc_input.get("1.0", "end-1c"),
            bug_id
        ),
        edit_window.destroy()
    ]
)
edit_button.pack(pady=10)
With the 'Edit bug' window now open, it is necessary to populate the fields with the existing data previously retrieved from the database. Additionally, the reporter field will be disabled as it would not be appropriate for it to be editable:
title_input.insert(0, record[1])
desc_input.insert(END, record[6])
reporter_input.insert(0, record[2])
reporter_input.config(state=DISABLED)
resolver_input.insert(0, record[3])
po_datatype.set(record[4])
status_datatype.set(record[5])
If we double-click a row from the tree view now, we will see our 'Edit bug' window in action:
To be able to edit any of the bugs, we still need to add the logic to the edit_bug_data function. The function will take all properties we want to edit as parameters and the row ID. We will again establish a connection to our database and execute an UPDATE query:
def edit_bug_data(title, resolver, priority, status, description, bug_id):
    connection = sqlite3.connect('bug_tracker.db')
    cursor = connection.cursor()
    cursor.execute(
        """
        UPDATE bugs SET
        title = :title,
        resolver = :resolver,
        priority = :priority,
        status = :status,
        description = :description
        WHERE id = :id
        """, {
            'title': title,
            'resolver': resolver,
            'priority': priority,
            'status': status,
            'description': description,
            'id': bug_id
        })
    connection.commit()
    connection.close()
What remains is to refresh the tree view and add a message to the status bar:
display_bugs()
status_bar.config(text="Bug successfully edited!", fg="#228B22")
Sort the results
The only thing that remains is the sorting functionality. We added the function calls to the tree view headings we want to be sortable. Now let's add the logic to that function.
To sort the tree view by a specific column, first, we will use list comprehension to extract the text and values associated with each item in the tree view:
def sort_treeview(sort_by):
    count = 0
    data = [(treeview.item(item)['text'], treeview.item(item)['values']) for item in treeview.get_children()]
Since the resulting text and values are collected in a tuple and added to the list called data, we will use the sort method with the key argument. The key is set to a lambda function that will take an element of the list (x) and return the appropriate element of the second tuple element (the 5th element for the status and the 4th for the priority).
To clarify, let's consider an example where our data list contains tuples such as (A, (B, C, D, E, F, G)). By using the lambda function in the sort method, the sorting key would be the 5th element of the second element of the tuple, which is G.
if sort_by == "status":
    data.sort(key=lambda x: x[1][5])
    status_bar.config(text="Bugs sorted by status!", fg="#228B22")
else:
    data.sort(key=lambda x: x[1][4])
    status_bar.config(text="Bugs sorted by priority!", fg="#228B22")
What is left to do, is to clear the tree view and re-add the records, but this time sorted:
treeview.delete(*treeview.get_children())
for item in data:
    if count % 2 == 0:
        treeview.insert("", END, text=item[0], values=item[1], tags=('even_rows',))
    else:
        treeview.insert("", END, text=item[0], values=item[1], tags=('odd_rows',))
    count += 1
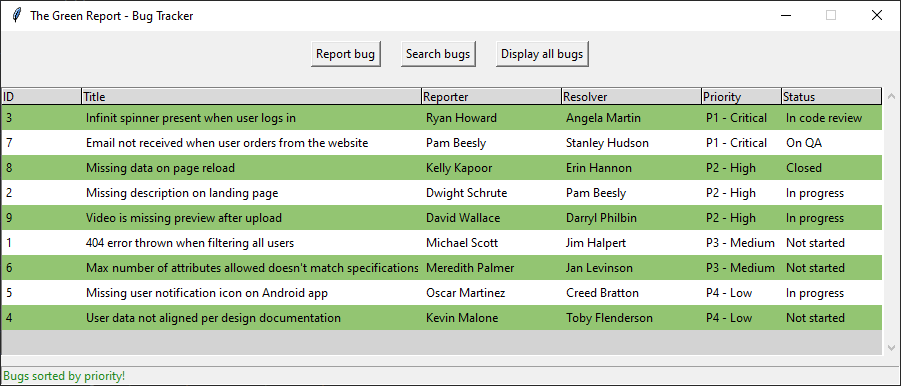
If we click on the status or priority headings now, our records will be sorted, and a status message will be displayed:
The conclusion
We have successfully created our own defect/bug tracking tool! While it may not have all the features of other publicly available tools, that was not the purpose of this project. The goal was to demonstrate how a small effort can lead to significant savings in time by automating repetitive and tedious tasks.
If you would like to learn more and expand this project, here are some features that you could integrate:
I also said that I would mention some alternative tools to the ones we used in the article, so here they are:
The complete code is available in our GitHub repository. Have fun! 😉